Animation in ES6
Animation in ES6
In JavaScript, the animation feature is used to manage the aspect that the CSS (Cascading Style Sheet) can’t. JavaScript provides various new elements that help us to construct complicated animation such as Fireworks, Roll-in and Roll-out, Fade effects. We can easily shift the DOM (Document Object Model) elements like <div>, <img/> and many others.
We can create the animation with the help of the following two methods in ES6.
- With the help of requestAnimationFrame() method: This method executes the function if the screen is ready for the next iteration. It accepts the single line function. We can create animated effects when we invoke this function in a repeated way. The process of creating animation is done frame by frame. The browser invokes the frames.
- With the help of setInterval() method: This method is used to accept two arguments in the form of an integer and a function. We can also terminate this method with the help of clearInterval() method.
Now, we will discuss each method in detail.
requestAnimationFrame() method
The requestAnimationFrame() method is easy to establish but complicated to terminate. It is used to create gentle animation. We can create the loops and timings required to set up manually. This method cannot be used with some specific intervals. This method contains the loop at 60fps (frames per second) to create a gentle and smooth animation. We cannot execute it in the background.
Here, we have an illustration of the same.
Example1
<html>
   <head>
      <script type = "text/javascript">
            var image = null;
            function init(){
               image = document.getElementById('myimage');
               image.style.position = 'relative';
               image.style.left = '50px';
            }
            function moveRight(){
               img.style.left = parseInt(
               img.style.left) + 100 + 'px';
            }
            window.onload = init;
      </script>
   </head>
   <body>
      <form>
         <image id = "myimage" src = "train1.png" />
         <center>
            <p>Click on the below button to move the image left</p>
         <input type = "button" value = "Click Me" onclick = "moveLeft();" />
      </center>
      </form>
   </body>
</html>
Output
After the execution of the above code, we got the following output:

In the above example, we tried to create a simple animation with the help of DOM object properties and JavaScript functions. First, we tried to get the DOM object with the help of getElementById(), then stored the object into a global variable.
Here, we also have another example of creating the animation with the help of setTimeout(), and clearTimeout() functions.
Example2
<html>
   <head>
      <title>JavaScript Animation</title>
      <script type = "text/javascript">
            var animation ;
            function init(){
               img = document.getElementById('myimg');
               img.style.position = 'relative';
               img.style.left = '0px';
            }
            function towardRight(){
               img.style.left = parseInt(img.style.left) + 10 + 'px';
               animation = setTimeout(towardRight,50);
            }
            function stop() {
               clearTimeout(animation);
              img.style.left = '0px';
            }
            window.onload = init;
      </script>
   </head>
   <body>
      <form>
         <img id = "myimg" src = "train1.png" />
         <center>
         <h2 style="color:darkred;">Click on the following buttons to manage animation</h2>
         <input type="button" value="Start" onclick = "towardRight();" />
         <input type = "button" value="Stop" onclick = "stop();" />
         <center>
      </form>
   </body>
</html>
Output
After the successful execution of the above example, we got the following output:

setInterval() method
In ES6, this method is used as a classical method, which helps to create animation effects. The setInterval() method depends upon the recursive execution of the source code. It helps us to modify the frame of the element by frame.
Syntax
animation = setInterval(display, t);   // To invoked the function after t milliseconds
clearInterval(animation);                  // For terminate the process
In the above syntax, when the display function modifies the element style, the setInterval(display, t) method can be used for step-by-step modifications in element style after a time interval. If we have a small-time interval, then the animation looks regular.
Rollover with a Mouse Event
In the rollover image, the event refers to an image on which when we shift the mouse pointer, then the HTTP (Hypertext transfer protocol) modifies the image with another image. But, when we move the mouse pointer from the image, then it shows the previous image.
Here, we have an example to understand the above concept.
Example
<html>
   <head>
      <script type = "text/javascript">
            if(document.images) {
               var img1 = new Image();
               img1.src = "cat.jpg";
               var img2 = new Image();
               img2.src = "tiger.jpg";
            }
      </script>
   </head>
   <body>
   <center>
      <a href = "#" onMouseOver = "document.myImg.src = img2.src;"
         onMouseOut = "document.myImg.src = img1.src;">
         <img name = "myImg" src = "train.jpg" />
      </a><br><br>
      <h2>Shift your mouse over the image to see the modification</h2>
   </center>
   </body>
</html>
Output
After the execution of the code, we got the following output:

Page Printing in ES6
The user often requires a print button on the web page which is used to print the data on the web page with the help of a printer. JavaScript facilitates us to perform printing a web page. In JavaScript, we have window.print() function, which is used to print the current web page. Window.print() function can be used with the onclick event.
Syntax
window.print();
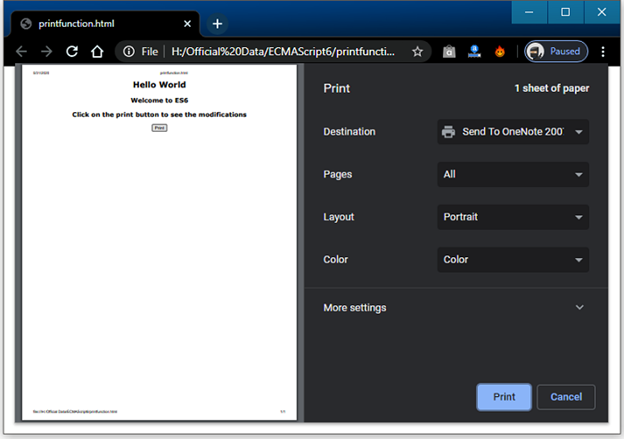
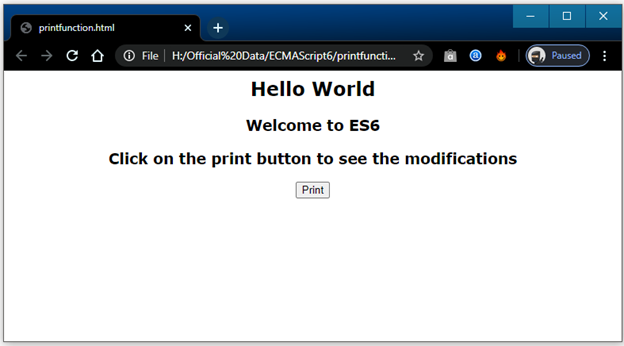
Example
We have an example to elaborate the above function.
<html>
<head>
</head>
<body>
    <center>
        <h2>Hello World </h2>
        <h3>Welcome to ES6</h3>
        <h3>Click on the print button to see the modifications</h3>
        <input type = "button" value = "Print" onclick = "window.print()"/>
    </center>
</body>
</html>
Output
After the execution of the code, we got the following output:
When we click on the print button, then we got the following output: