Basics of Userform
A User Form is a built-in customized dialog box that fetches data from the user through a user-friendly dialog box or window that makes up part of an application's user interface. It enables a user data entry operation easier, controllable, and manageable to use for the user. With the help of User forms, the users can easily enter data in a workbook that they can create in an Excel VBA. It functions as a VBA container and can add various controls as per the required functionality, each of which has certain usage and related properties.
Userform Controls
Controls are a part of VBA userform that makes the form easier to implement and for each control the user can easily set a property to a certain value. You can modify the size or position then or can do it later as well by entering design mode. When you add a control, to change its properties, you can go into ‘Design mode’ by clicking on the button next to ‘Insert’ in ‘Controls’.
Steps to add a control in excel:-
• Go to the Developer tab.
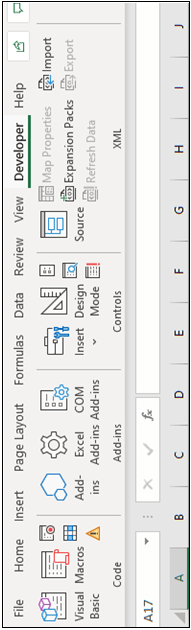
• In the Controls group, click on insert.
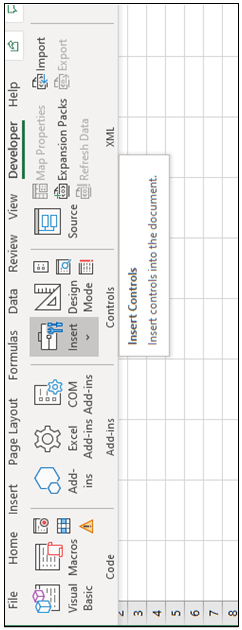
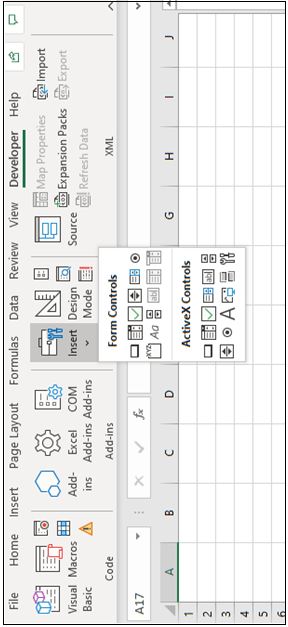
• Select the control you want to use and create that on your worksheet using
your mouse
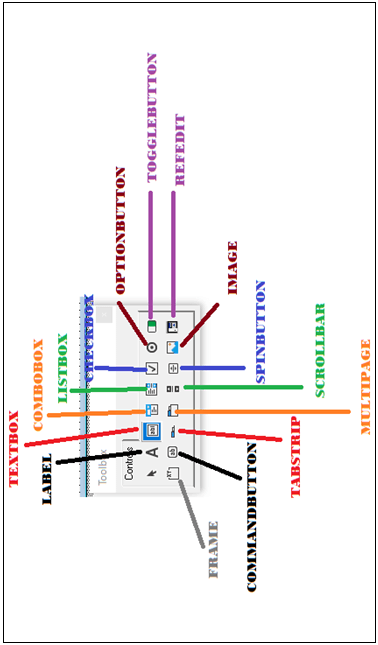
The Different controls available in form control are as follows:
- Button
- TextBox
- Label
- Check Box
- Option Button
- List Box
- Combo Box
- Spin Button
- Scroll Bar
- Toggle Button
- Frame Control
- Multipage Control
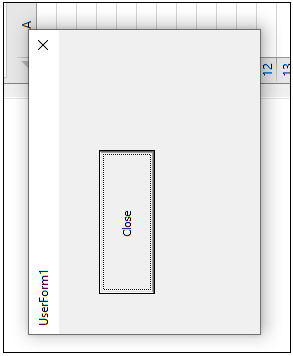
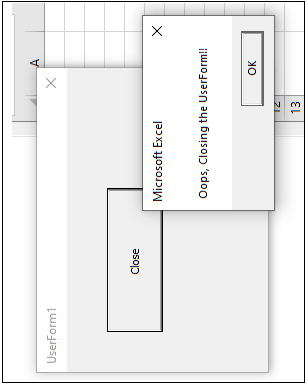
Button
By pressing the Button, you can execute a macro. The user can attach the event
of the Command button to a VBA code and can run any logical statement and
action. A single click on the commandbutton is used to rename the button, and a
double click enables you to access the event. In the below given example, we
have created a close button in the userform and have added action to it
(whenever the user will click on the close event and message box will pop up
showing certain message).
Example 1: Write a macro in VBA, to demonstrate the example of a button.
Private Sub CommandButton1_Click()
 'An alert message box will appear once you press the close button
 MsgBox "Oops, Closing the UserForm!!"
 'unloading the UserForm
 Unload Me
 End Sub
Output
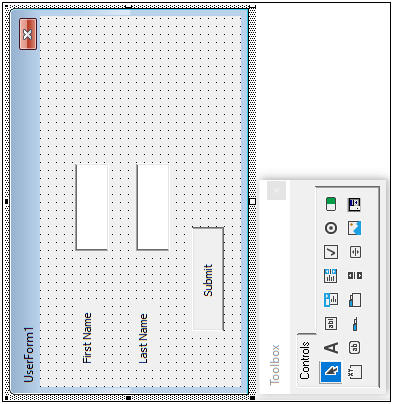
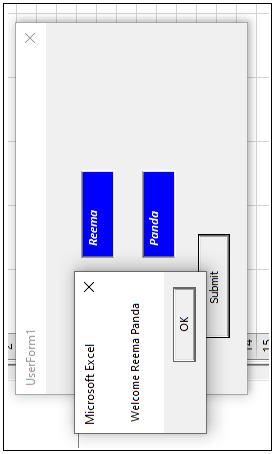
TextBox
This control is used to accept data from the user. You can customize the textbox as per your requirement. You can specify the number of characters to be fed with the help of MaxLength Property. You can even specify what characters to be displayed irrespective of what has been enter by enabling the PasswordChar Property. You will set all the properties in the property window and can enable or disable the specifications as per your requirement.
Example 1
'double click on the CommandButton1 control to get this code
 Private Sub CommandButton1_Click()
 MsgBox ("Welcome " & TextBox1 & " " & TextBox2)
 End Sub
 'double click on the Textbox2 control to get this code
 Private Sub TextBox1_Change()
 With TextBox1
     .Font.Name = "Calibri"
     .Font.Size = 10
     .Font.Italic = True
     .Font.Bold = True
     .ForeColor = RGB(255, 255, 255)
     .BackColor = RGB(0, 0, 255)
 End With
 End Sub
 'double click on the Textbox2 control to get this code
 Private Sub TextBox2_Change()
 With TextBox2
     .Font.Name = "Calibri"
     .Font.Size = 10
     .Font.Italic = True
     .Font.Bold = True
     .ForeColor = RGB(255, 255, 255)
     .BackColor = RGB(0, 0, 255)
 End With
Output
Userform:
After running the program:
Enter your first name and last name.
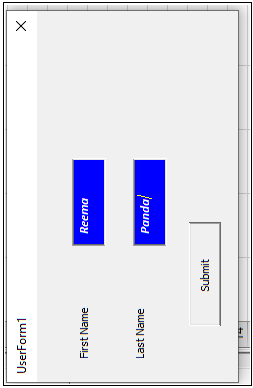
Click on submit. The following msgbox will get displayed.
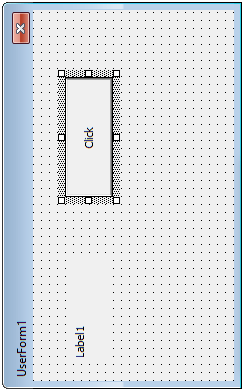
Label
This can also be used as a button but is more often used put in front of
another Control to explain what that control stands for, but it is mostly used
to Textbox. The bel can be formatter either in the format window or with the
help of VBA code. In the below example, we have used ‘.caption’ to format the
text for label and various other syntax to alter the properties of ‘label1’.
Example 1:
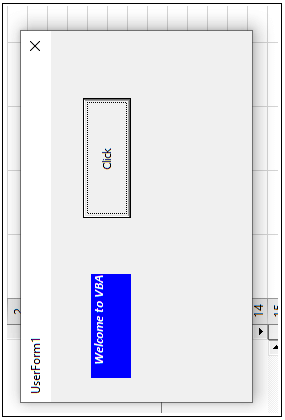
‘Firstly, drag a label and button in the userform
 Private Sub CommandButton1_Click()
 'The event in the command button of Form will format the Label
 With Label1
 'will show the given text
 .Caption = "Welcome to VBA"
 'text alignment set to center
 .TextAlign = fmTextAlignRight
 'set font property
 .Font.Name = "Calibri"
 .Font.Size = 10
 .Font.Italic = True
 .Font.Bold = True
 .ForeColor = RGB(255, 255, 255)
 .BackColor = RGB(0, 0, 255)
 End With
 End Sub
Output
Userform:
After running the program:
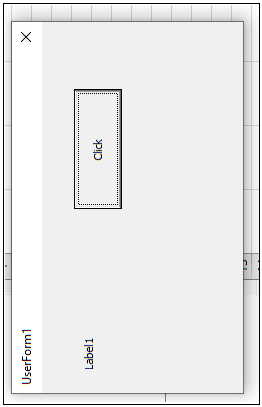
Press the click button.
Check Box
You can have as many check boxes you want and they all will be independent of each other. If a checkbox is checked in, then it will return ‘TRUE’ else ‘FALSE’ to a linked cell. You can also have another category for a null value, to achieve this set the value Triple state property (can be done through VBA code or through properties window) to True.
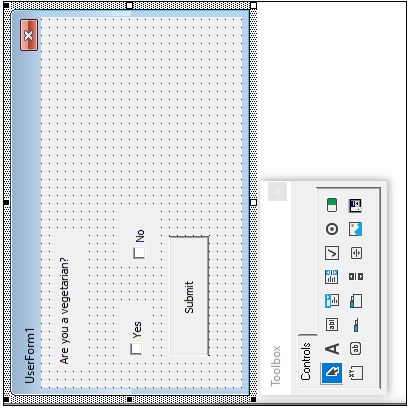
Example 1:
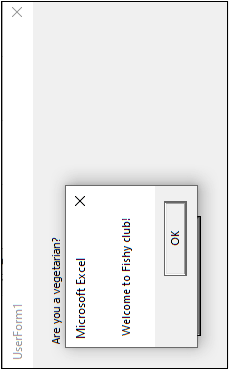
'Firstly drag a label, two checkboxes with the caption
"yes" and "no" and button in the userform
 Private Sub CommandButton1_Click()
 'MsgBox will display value of CheckBox, indicating if it is selected, cleared or in a Null state
 If CheckBox1.Value = True Then
 MsgBox "Welcome to Veggy Club!"
 ElseIf CheckBox2.Value = True Then
 MsgBox "Welcome to Fishy club!"
 Else
 MsgBox "Oops! Please choose a category."
 End If
 End Sub
Output
Userform:
After running the code:
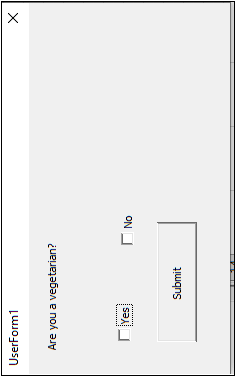
Select either of the checkbox. Here for instance we have selected No.
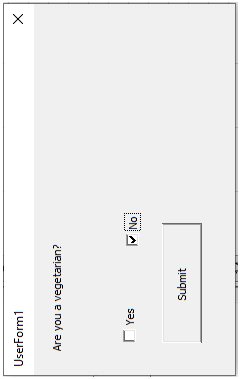
Click on the submit button. The following message box will be displayed.
Option Button
This is slightly different to check boxes just that you can
copy multiple option buttons together but all of them would be dependent on
each other i.e. at one time, only one will be selected and the others will be
turned off. It works like a radio button. And when you link a cell, the cell
will give the number of the option which is currently selected.
Example 1
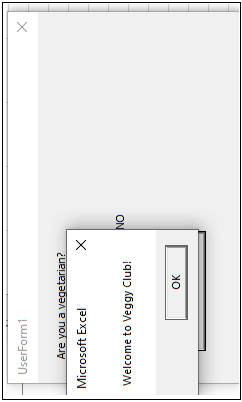
'Firstly drag a label, two optionbox with caption
"YES" and "NO" and button in the userform
 Private Sub CommandButton1_Click()
 'MsgBox will display value of CheckBox, indicating if it is selected, cleared or in a Null state
 If OptionButton1.Value = True Then
 MsgBox "Welcome to Veggy Club!"
 ElseIf OptionButton2.Value = True Then
 MsgBox "Welcome to Fishy club!"
 Else
 MsgBox "Oops! Please choose a category."
 End If
 End Sub
Output
Userform:
After running the code:
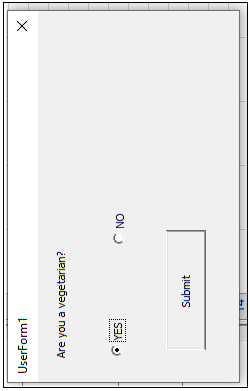
Selecting the yes radiobutton. It will show the following message alert:
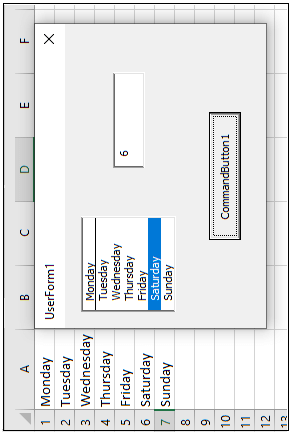
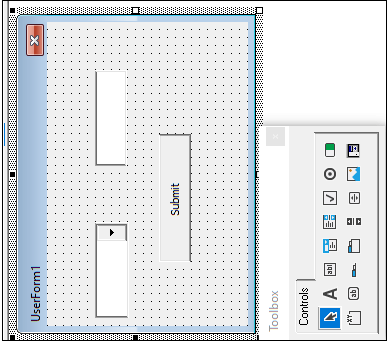
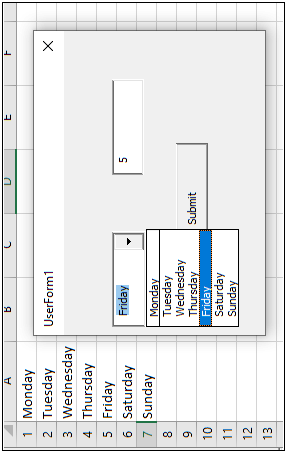
List Box
The List box allows the selection of one or more items from a list. In this
one or more than one value can be visible a time. To give the range, once you
have created a list box, just do a right-click and select ‘Format Controls’ –
in the ‘Input Range’, select the cells which you want to see in the list box
and then select a cell where you want to output which item of the list is
selected currently.
Example 1
Private Sub CommandButton1_Click()
     If ListBox1.Value <> "" Then
         TextBox1.Value = ListBox1.Value + 1
     End If
 End Sub
 Private Sub UserForm_Initialize()
 With ListBox1
     .ColumnHeads = True
     .ColumnCount = 2
     .ColumnWidths = "60;0"
     .RowSource = "=Sheet1!A2:B6"
     .BoundColumn = 0
 End With
 End Sub
Output
Userform:

After running the program:
Combo Box
The Combo Box is similar to the list box just that it has a drop-down – so you can only see the selection and no other value. In other words, it is a combination of ListBox and TextBox. In this, only one row of elements is displayed at a time. It will return the position for the given item.
Example 1
Private Sub CommandButton1_Click()
     If ComboBox1.Value <> "" Then
         TextBox1.Value = ComboBox1.Value + 2
     End If
 End Sub
 Private Sub UserForm_Initialize()
 With ComboBox1
     .ColumnHeads = True
     .ColumnCount = 2
     .ColumnWidths = "60;0"
     .RowSource = "=Sheet1!A2:B7"
     .BoundColumn = 0
 End With
 End Sub
Output
Userform:
Alter running the code:
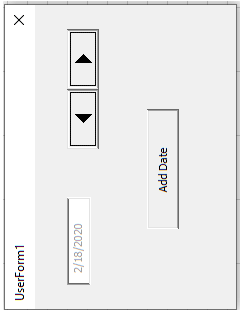
Spin Button
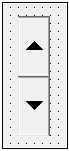
This button helps the user to increase or decrease the value of a related cell by a pre-defined volume. To use this, simply select the spin button and create one – do a right-click and go to ‘Format Controls’ – write the values as per your requirements and select the linked cell – using spin button then, you can increase or decrease the value of the linked cell.
Example 1
Private Sub UserForm_Initialize()
 Dim date_val As Date
 'disabling the manual input in TextBox
 TextBox1.Enabled = False
 date_val = "02/22/2020"
 TextBox1.Text = date_val
 End Sub
 Private Sub SpinButton1_SpinUp()
 'increasing the day by one in the same month of the date:
 Dim date_Upper As Date
 date_Upper = "03/22/2020"
 If DateValue(TextBox1.Text) < date_Upper Then
 TextBox1.Text = DateValue(TextBox1.Text) + 1
 End If
 End Sub
 Private Sub SpinButton1_SpinDown()
 'decreasing the day by one in the same month of the date:
 Dim date_Down As Date
 date_Down = "01/22/2020"
 If DateValue(TextBox1.Text) > date_Down Then
 TextBox1.Text = DateValue(TextBox1.Text) - 1
 End If
 End Sub
Output
Userform:
After running the code
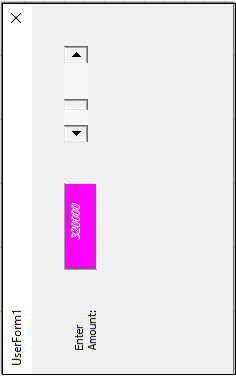
Scroll Bar
The Scroll Bar Form Control, often referred to as a Slider is a simple linear slider that allows the increase or decrease of a linked cell’s value by sliding a bar either left/right or up/down. Similarly, the values can be filled to the rest of the controls we have discussed so far.
Example 1:
Private Sub UserForm_Initialize()
 'Setting the value of various Control properties of UserForm.
 TextBox1.BackColor = RGB (255, 0, 255)
 TextBox1.TextAlign = fmTextAlignCenter
 TextBox1.Font.Italic = True
 TextBox1.Enabled = False
 Label1.Caption = "Enter Amount: "
 Label1.TextAlign = fmTextAlignLeft
 ‘setting the value of scroll bar
 ScrollBar1.Min = 10
 ScrollBar1.Max = 1000
 ScrollBar1.Orientation = fmOrientationHorizontal
 ScrollBar1.SmallChange = 10
 ScrollBar1.LargeChange = 10
 ScrollBar1.Value = 10
 End Sub
 'double click on the scroll bar to get the code
 Private Sub ScrollBar1_Change()
 'displaying the value of scrollbar in the textbox:
 TextBox1.Value = ScrollBar1.Value * 1000
 End Sub
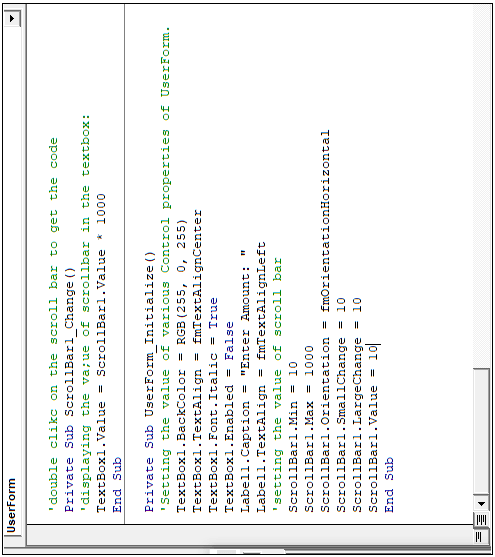
Output
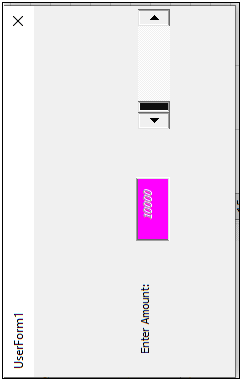
The amount changes with respect to the scroll bar.
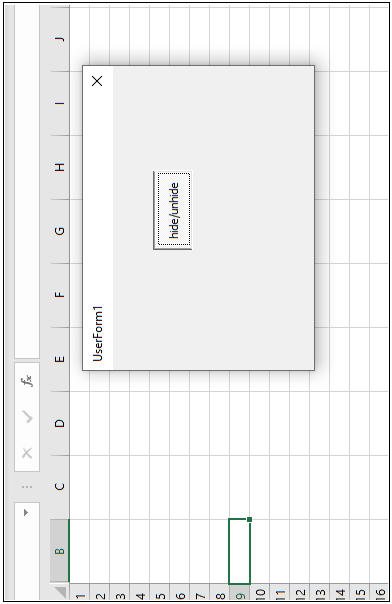
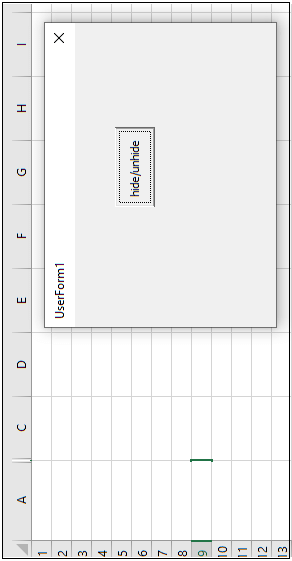
Toggle Button
This control acts as an on-off state. It calls for action when pressed first and calls different action when pressed for the second click. When the button is selected, it returns a Boolean value True and returns Boolean False when it is unselected.
Example 1
Private Sub ToggleButton1_Click()
 If ToggleButton1.Value = True Then
 'hiding the Column A for first click
 Sheet1.Columns("A").EntireColumn.Hidden = True
 Sheet1.Columns("B").EntireColumn.Hidden = False
 Else
 Sheet1.Columns("A").EntireColumn.Hidden = False
 'hiding the Column B for Second click
 Sheet1.Columns("B").EntireColumn.Hidden = True
 End If
 End Sub
Output
UserForm:
After running the VBA code:
- For the First click, column A is hidden
- For the second click, Column B is hidden
Frame
It is used to group the controls that work collectively, or have any similarities, or are related to each other in a UserForm. Frames enhance the UserForm's layout by organizing and clustering the same sort of items.
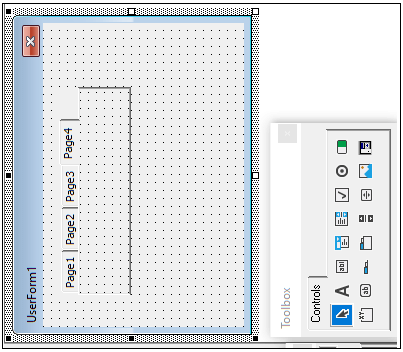
Multipage Control
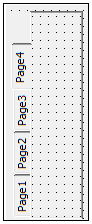
A MultiPage control organizes data into different categories, wherein each category has its own individual Page. It is commonly used when the user handles the bulk of data. It can take one or more Page objects, where each page has its own set of controls. In this, all controls are separately contained or added in a Page to reduce the ambiguity otherwise, all the controls were a part of the UserForm.
Example 1
Sub UserForm_Initialize()
'changing the caption of the Page in MultiPage control, by using various methods of Page Selection.
'Option1: changing the Caption of Page 1 using Numeric:
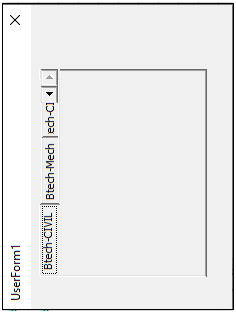
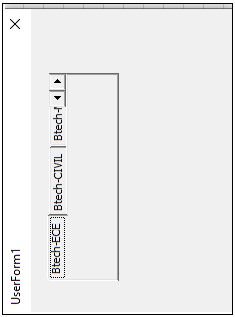
MultiPage1.Pages(0).Caption = "Btech-CSE"
'Option2: changing the Caption of Page 2 using Item Method:
MultiPage1.Pages.Item(1).Caption = "Btech-ECE"
'TabStrip1.Tabs.Item("Tab2").Caption = "Btech-ECE"
'Option 3: changing Caption for Page 3 using Tab Name:
MultiPage1.Pages("Page3").Caption = "Btech-CIVIL"
'Option 4: changing Caption for Page 4 using Tab Object
MultiPage1.Page4.Caption = "Btech-Mech"
End Sub
Output
Userform:
After running the VBA code:
TabStrip
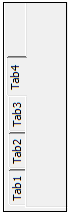
A TabStrip control is a collection of Tabs wherein each Tab contains a set of controls. It looks at different contents contained in each Tab, for each set of controls. By default, this control has 2 Tabs. The control’s content can change if a different page is selected, but the display of the layout stays the same. For adding new tabs, right-click on the empty space next to tab2 and select a new page.
Example 1:
Sub UserForm_Initialize()
'changing the caption of the tabs in TabStrip control, by using various methods of Tab Selection.
'Option1: changing the Caption of Tab 1 using Numeric:
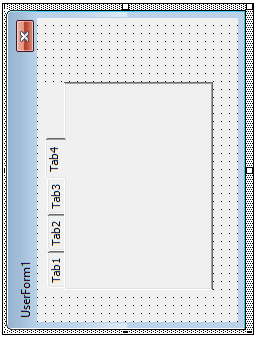
TabStrip1.Tabs(0).Caption = "Btech-CSE"
'Option2: changing the Caption of Tab 2 using Item Method:
TabStrip1.Tabs.Item(1).Caption = "Btech-ECE"
'TabStrip1.Tabs.Item("Tab2").Caption = "Btech-ECE"
'Option 3: changing Caption for Tab 3 using Tab Name:
TabStrip1.Tabs("Tab3").Caption = "Btech-CIVIL"
'Option 4: changing Caption for Tab 4 using Tab Object
TabStrip1.Tab4.Caption = "Btech-Mech"
End Sub
Output
Userform:
After running the code