Configuring OSPF
Consider the topology given below –
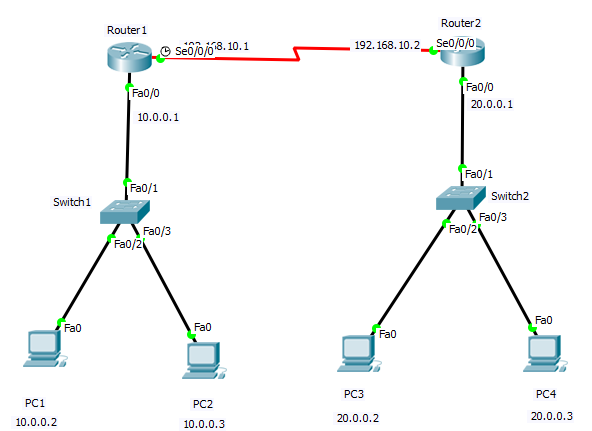
The initial IP configuration table is given below:
| Devices | Interface | IP address |
| Router1 | Se0/0/0 | 192.168.10.1 |
| Fa0/0 | 10.0.0.1 | |
| Router2 | Se0/0/0 | 192.168.10.2 |
| Fa0/0 | 20.0.0.1 | |
| Switch1 | N/A | N/A |
| Switch2 | N/A | N/A |
| PC1 | Fa0 | 10.0.0.2 |
| PC2 | Fa0 | 10.0.0.3 |
| PC3 | Fa0/0 | 20.0.0.2 |
| PC4 | Fa0/0 | 20.0.0.3 |
Configure IP address to router’s interfaces
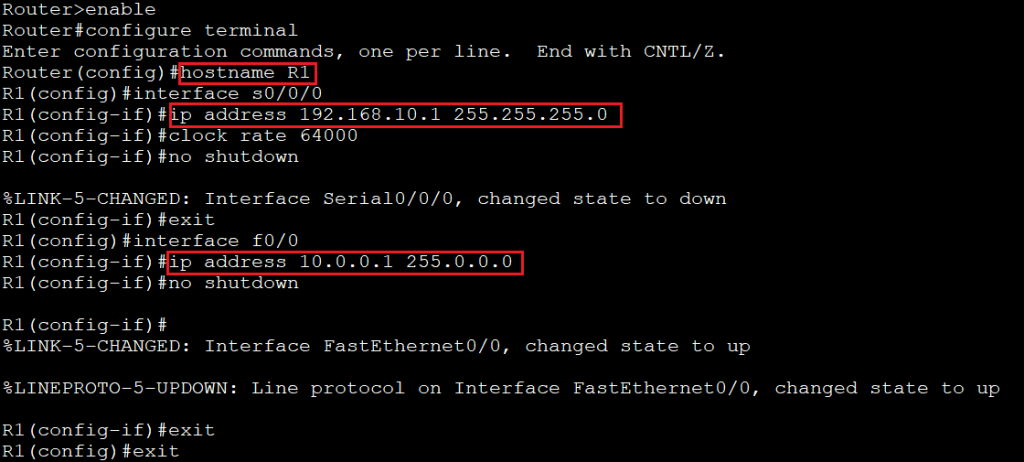
Router>enable isused to enter the privileged exec mode.
Router#configure terminal is used to enter the global configuration mode.
Router(config)#hostname R1 is used to uniquely identify the router in the whole network.
R1(config)#interface s0/0/0 is used to enter the serial mode.
R1(config-if)#ip address 192.168.10.1 255.255.255.0 is used to configure an IP address in the serial interface.
R1(config-if)#clock rate 64000 is used to control the data flow.
R1(config-if)#no shutdown is used to make interface always up.
R1(config-if)#exit is used to return the previous mode.
R1(config)#interface f0/0 is used to enter the fastEthernet.
R1(config-if)# ip address 10.0.0.1 255.0.0.0 is used to configure an IP address in the fastEthernet interface.
R1(config-if)#no shutdown is used to make interface always up.
R1(config-if)#exit is used to move the global configuration mode.
Router1
On Router R1, give the following commands to configure hostname and IP address.
 Router>enable
 Router#configure terminal
 Router(config)#hostname R1
 R1(config)#interface s0/0/0
 R1(config-if)#ip address 192.168.10.1 255.255.255.0
 R1(config-if)#clock rate 64000
 R1(config-if)#no shutdown
 R1(config-if)#interface f0/0
 R1(config-if)#ip address 10.0.0.1 255.0.0.0
 R1(config-if)#no shutdown
 R1(config-if)#exit
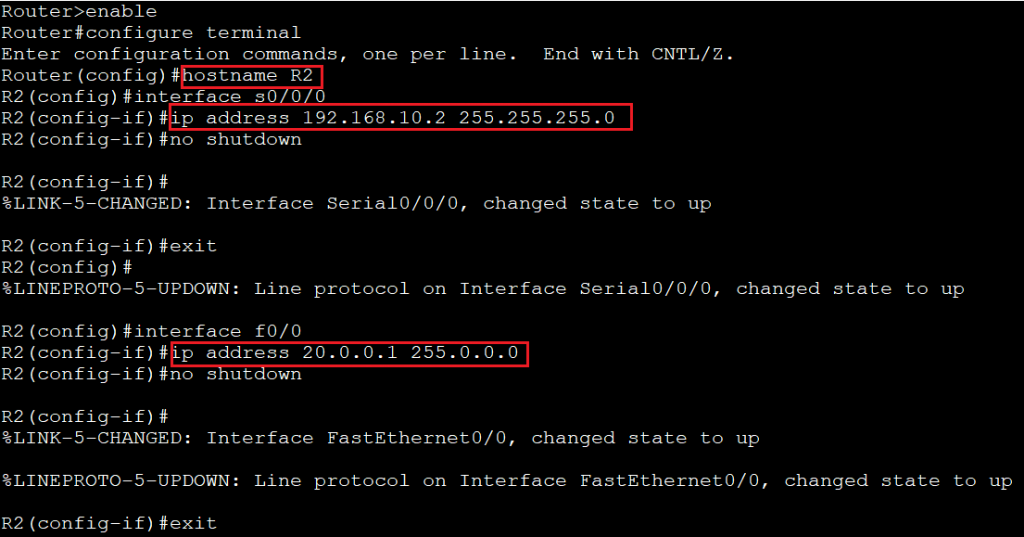
Router2
On Router R2, give the following commands to configure hostname and IP address.
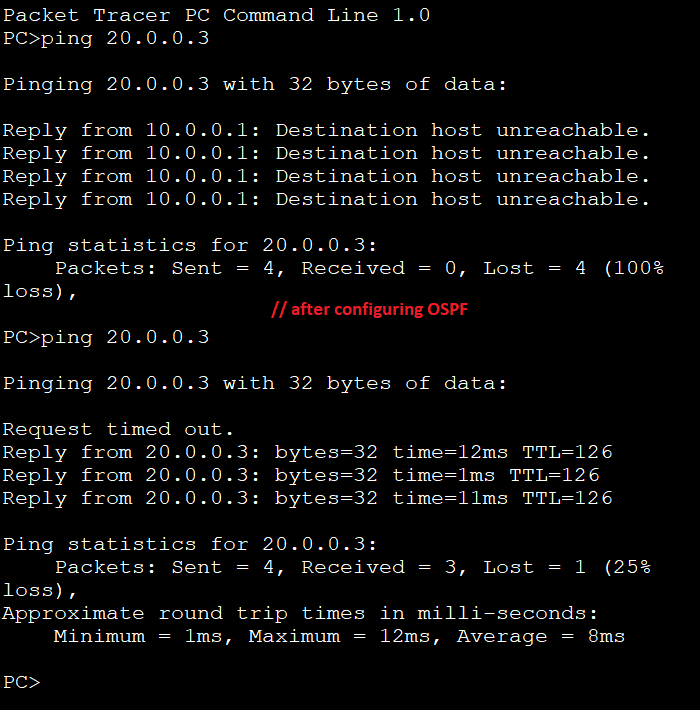
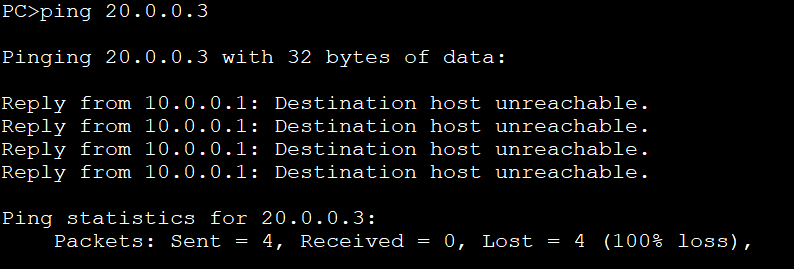
Now when we ping from PC1 to PC3, it does not give any reply means there is no communication takes place between the PC1 and PC3.
Configure the OSPF routing protocol
To enable OSPF, the following commands are used:
R1(config)# router ospf process_ID is used to enable OSPF routing protocol. Process_ID contains any positive integer from 1 to 65,535.
R1(config-router)# network IP_network address [wildcard_mask] area [area number]
The above command allows us to specify interfaces which we want to include in the OSPF process.
The wildcard mask is used with the network address to filter the interfaces.
Router1
On Router1, we use following commands to configure OSPF:
 R1(config)#router ospf 100
 R1(config-router)#network 10.0.0.0 0.255.255.255 area 0
 R1(config-router)#network 192.168.10.0 0.0.0.255 area 0
 R1(config-router)#exit
 R1(config)#

Router2
On Router2, we use the following commands to configure OSPF:

Verifying OSPF Routing
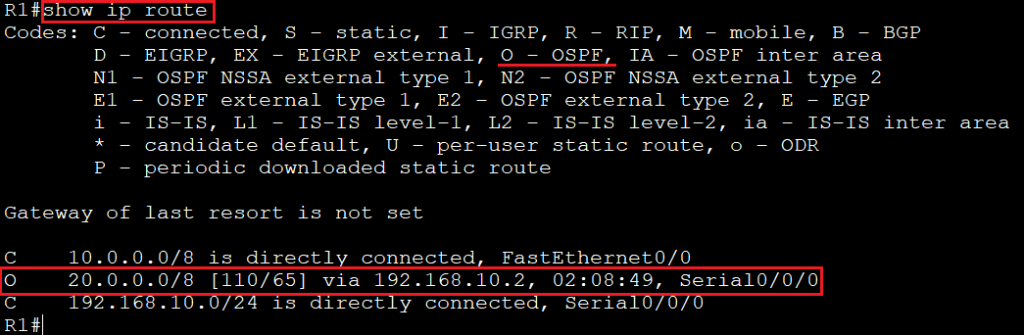
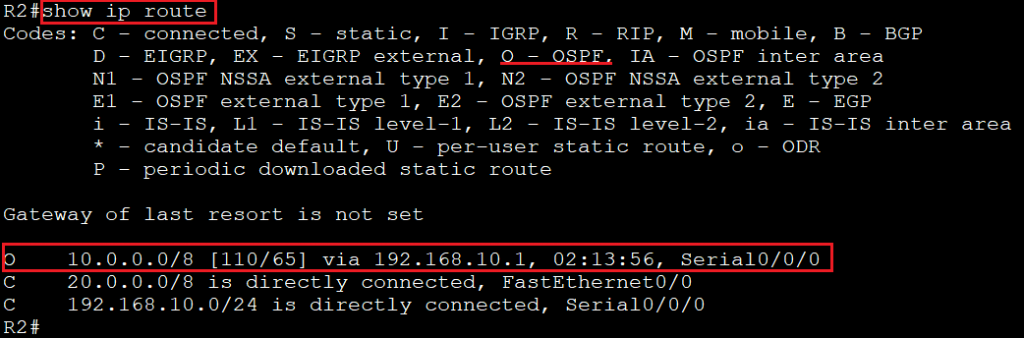
To verify OSPF Routing, we use "show ip route" command on the routers (router1 or router2). If in the routing table there is the entry of the symbol "O" then we say that OSPF is enabled in the network.
Router1's routing table is shown below:
Router2's routing table is shown below:
After configuring OSPF, we again ping from PC1 to PC3, and then it replies with the ip address, bytes, time, and TTL, which means communication has been started between PC1 and PC2.