How to apply Data Protection to the Worksheet?
What do we mean by Data Protection?
Data Protection in excel involves in protecting your file/data from some other user and also prevents the following accidents –
- Accidentally deleting or changing the formulas in it
- Changing the data present in the worksheet/workbook
You can also protect the excel file with a password so that only that person can open the file who knows the password to the file.
How to apply Data Protection to the Worksheet?
There are 2 ways by which data protection can be applied to the sheet/tab –
Using the ‘Review’ tab
- Go to the ‘Review’ tab
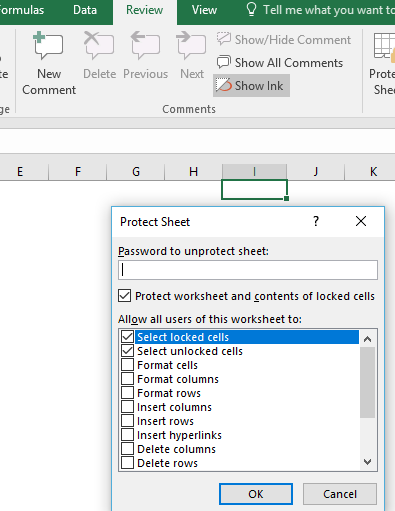
- Click on the ‘Protect Sheet’ – a pop-up will appear as shown in the below
Using Mouse
- Go to Sheet Name
- Do a right-click and click on ‘Protect’ option.
Different Options in ‘Protect Sheet’ dialog box
Once you get the prompt as shown in the figure above and you have entered a password in ‘Password to Unprotect Sheet’ – you can select either of the following options. By default, the first 2 options are already selected which helps you in just selecting the cells – you cannot make any edits to the cells, you cannot do any formatting, you cannot insert/delete any rows/columns. To perform these operations while the sheet is protected, you need to tick the relevant options –
- Select locked cells – It is a default option, that enables you to select the locked cells
- Select unlocked cells – It is a default option, that enables you to select the unlocked cells
- Format cells – If this option is ticked (?), one can easily apply formatting to locked cells otherwise they will not be able to change the format of the cells as well
- Format columns – If this option is selected, you can only change the width of the column or hide, cannot cut, clear contents, delete it as the worksheet is protected, so it will not let you change the structure of the file
- Format rows – If this option is selected, like ‘Columns’ option but just that you can hide or change the height of rows
- Insert columns – If this option is selected, you can insert new columns as per your requirement.
- Insert rows – If this option is selected, you can insert new rows as per your requirement.
- Insert hyperlinks – If this option is selected, the user can insert hyperlinks (even in locked cells).
- Delete columns – If this option is selected, you can delete the desired columns
- Delete rows– If this option is selected (?), you can delete the rows.
- Sort – If this option is selected, the user can sort data in a range (as long as the range doesn’t contain any locked cells).
- Use AutoFilter – If this option is selected, the user can use existing auto filtering.
- Use PivotTable reports – If this option is selected, the user can change the layout of pivot tables or create new pivot tables.
- Edit objects – If this option is selected, the user can make changes to objects (such as Shapes) and charts, as well as insert or delete comments.
- Edit scenarios – If this option is selected, the user can use the scenarios.
What are Locked cells?
If a worksheet is not protected, when you do a right-click on any cell and click on ‘Format Cells’ and then click on ‘Protection’, by default, ‘Locked’ is ticked. When you protect a worksheet and select any of the options above, if a cell is not locked, the protection does not extend to that cell. So, if you want formula-driven cells to be protected, you can make sure they are locked and the cells which are being called in those formulas (input values), you can unlock them as you might want to change the input values to see the impact on the formula cells.
How to protect the workbook?
Follow the below given steps to protect the workbook –
- Go to ‘File’ or click on the ‘Windows’ icon for older versions of Ms Excel
- Click on ‘Protect Workbook’
- Click on ‘Encrypt with Password’
- Enter the Password and click on OK and then re-enter the password
You can also protect the structure of the workbook i.e., users will not be able to add, delete, hide, unhide different worksheets in a file –
- Click on the ‘Review’ tab
- Go to ‘Protect Workbook’
- Add Password and re-enter after pressing OK