How to draw a star, a square, and a circle shape in Photoshop CC?
Draw Shapes in Photoshop
We can easily draw shapes in Photoshop CC. It supports several tools to draw different types of shapes in the image.
In this section, we will explain how to create a star, a square, and a circle shape in Photoshop CC in the easiest way possible.
Photoshop is an easy application with heaps of controls, and it also provides us with amazing options to draw shapes. There are six shape tools to choose from in Photoshop CC. You get the following options in the shape tool:
- The Rectangle Tool
- The Rounded Rectangle tool
- The Ellipse Tool
- The Polygon Tool
- The Line Tool
- The Custom Shape Tool
In the Tools panel, they're all alongside in the same place.
Follow the below steps to draw star, square, and circle shapes in Photoshop CC.
STEP 1: OPEN A NEW WORKSPACE
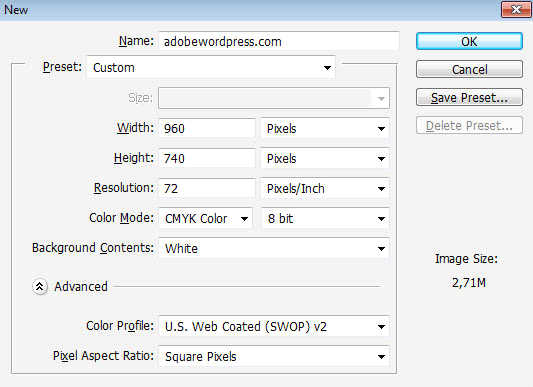
The first thing you have to do is create or open a new workspace where you want to draw a star, square, or circle. This is the very initial step you have to do. Go to file and create a new document.
STEP 2: CHOOSE THE HEIGHT AND WIDTH OF THE WORKSPACE.
After selecting the new workspace, a panel will appear in which you will have to choose the dimension of your document. It's totally up to you on what height and width you want to set.
STEP 3: CLICK ON PHOTOSHOP TOOLBAR.
1. For drawing a star
- Go to the Options bar and choose the shape "polygon".
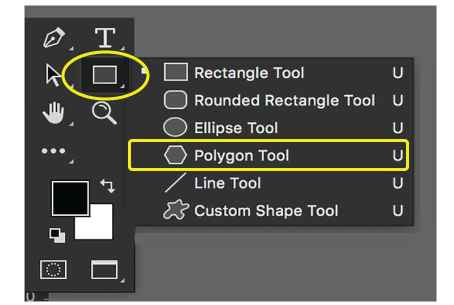
- Decide the number of points you'd like your star to have, and enter it in the "Sides" field.
- Then click on the little menu to get the polygon option.
- Then choose "star"
- Choose the indent
Now you can draw the star in photoshop CC.
2. For drawing a square.
First, you have to select the rectangle tool Icon from the options toolbar.
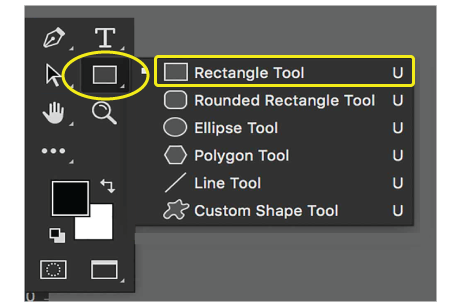
Before drawing any shape, photoshop needs to have some information on it.
After you have selected the rectangle shape, drag the cursor on your newly created document until you have your desired square size.
3. For drawing a circle
Look for the photoshop toolbar and select the "ellipse tool" from it. If it is not visible, press the bottom-right corner of any shape tool in your community that is visible, such as the Rectangle or Line Tool, to show the Ellipse Tool in the drop-down menu.
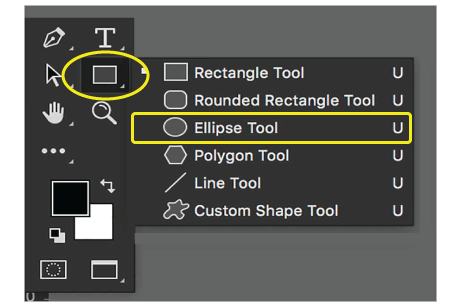
Drag the Ellipse Tool over the canvas while holding down the Shift key.
Tap the "Stroke Options" menu in the Options bar to apply a circle border to a straight line.
Visit the "Weight" menu and change the thickness of the line to your comfort. You may enter the thickness manually or drag the slider to increase or decrease the weight of the rows.
Tap the "Stroke" menu to change the color of the line or the "Fill" menu to change the color of the fill. For both, the menu is identical. For example, click the first line button to select "No Color." You can also select a diagram or gradient. Clicking the "Tone Picker" colored rainbow button in the upper right corner unlocks more color choices.
STEP 4: DRAW THE SHAPE
Now you can easily draw the shape which you want to draw. Refer to the above steps to draw your desired shape and then come straight to your document.
STEP 5: RESIZE YOUR SHAPE
You can change the size of your shape easily. In the menu bar, just go to the Edit menu and choose the Free Transform Path. You may choose the size you want.
STEP 6: CHOOSE AN ATTRACTIVE COLOUR FOR YOUR SHAPE
Yes, you can also add color to your shape. To change the color of your shape, go to the Options bar and select the "fill color swatch" option. The Fill Type dialogue box will appear; click on a new color. Add the color which suits your requirements.
STEP 7: FINAL STEP
If you are happy with the changes you made in your documents, then press the " OK" button and save it. Your document is still editable. You can add some more changes or save the document.
Now you can create beautiful shapes just by following the steps given in this article.