Flutter Animation
Flutter Animations: Animations in flutter are easily one of the best features in it. The built-in animations in flutter satisfy the developer’s need of making user experience better by a margin.
In flutter, animations are very easy to implement and ready to use. Flutter provides us a large range of animations with the help of which we can easily create a beautiful and amazing applications. We have various concepts in animations that we need to understand before implementing various animations.
Let us understand those concepts first:
Animation Class
Animation<T> class is a class which takes value of type T (generic datatype like string, int etc.). It has various properties such as value, status, isCompleted, isDismissed and so on. One of the most common kinds of animation is Animation <double> type. Basically, it generates a sequence of values between the given maximum and minimum. With the help of animation class we can get access to multiple functions which are-
- AnimationController
- CurvedAnimation
- Tween
We can rebuild our widgets with the helps of setState() { } as well.
AnimationController
It is derived from animation <double> class. It adds some concpets such as:
- Play and Stop controls
- Duration
- Allows setting the animation control value
- Allows defining the upper and lower bound of the animation
It also has some properties that are very beneficial to us, let’s see what are those:
- value: Initial value of the animation, it is by default the value of lowerbound.
- duration: Duration of the animation.
- debuglabel: Identifies the controller in the debug output.
- lowerBound: Start value of the animation.
- upperBound: End value of the animation
- animationBehaviours: Configures AnimationControllers’ behaviour when animation is disabled.
CurvedAnimation
It is responsible for non-linear curve in an animation class. It is helpful when we need a different curve for our flutter application’s animations.
We can forward the curve animation by using curve and reverse it by using reverseCurve.
Tween
It helps in fixing and modifying the range of the animation. By default, the start value of animation is 0.0 and the end value of animation is 1.0. However, with the help of Tweens we can modify it according to our need. Tweens can be of any type.
Basically, how it works is that it returns the value at periods between start and end point. We can change color, size, opacity and others with the help of Tweens for each one. We have Tweens for other purposes also such as CurveTween which can modify an animation’s curve.
Implementing Animations
Since we now have understood how exactly animations work in flutter, we will go ahead and see how we can implement them in our applications but before that we will understand the different types of animations offered by flutter in detail.
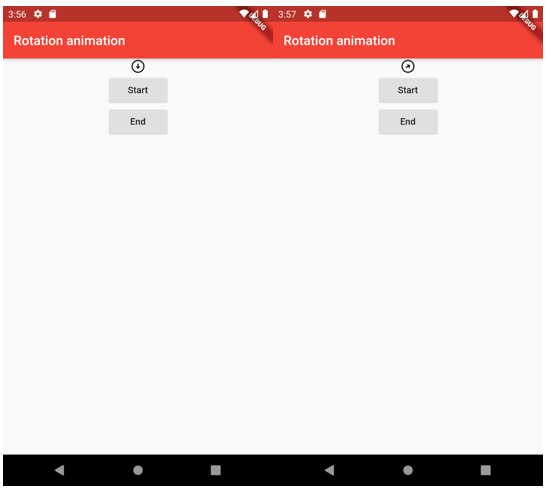
Rotate Animation
As the name itself suggests, rotate animation is responsible for causing rotation in a button, icon or anything else. Let us understand it more with an example:
import 'package:flutter/material.dart';

void main() => runApp(MyApp());

class MyApp extends StatelessWidget
{
@override Widget build(BuildContext context)
{
return MaterialApp( title: 'Flutter Animations', theme: ThemeData(primarySwatch: Colors.red), home: MyHomePage(title: 'Rotation animation'), ); } }

class MyHomePage extends StatefulWidget
{
MyHomePage({Key key, this.title}) : super(key: key);

final String title;

@override _MyHomePageState createState() => _MyHomePageState(); }

class _MyHomePageState extends State<MyHomePage> with SingleTickerProviderStateMixin
{
AnimationController _controller;

@override void initState()
 { _controller = AnimationController( duration: const Duration(milliseconds: 5000),
vsync: this, ); super.initState();
}

@override void dispose() { _controller.dispose(); super.dispose(); }

@override Widget build(BuildContext context)
{
return Scaffold( appBar: AppBar( title: Text(widget.title), ),
body: Center( child: Column( children: <Widget>[ RotationTransition( turns: Tween(begin: 0.0, end: 1.0).animate(_controller),
child: Icon(Icons.arrow_circle_down), ),
RaisedButton( child: Text("Start"), onPressed: () => _controller.forward(), ),
RaisedButton( child: Text("End"), onPressed: () => _controller.reset(), ), ], ), ), ); } }
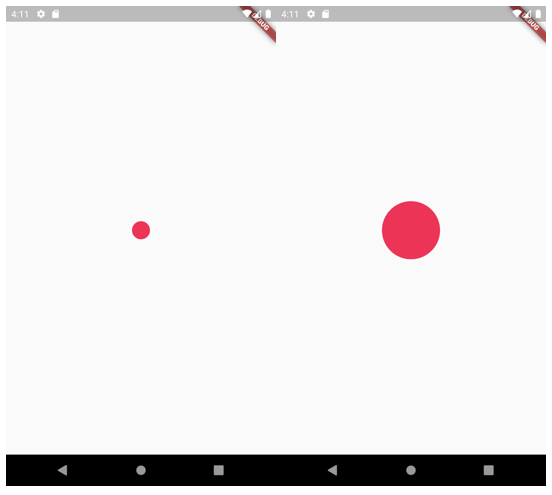
Scale Animation
This animation helps to animate the scale of a widget. Let's understand its working with the help of an example:
import 'package:flutter/animation.dart';
import 'package:flutter/material.dart';

void main() => runApp(new MyApp());

class MyApp extends StatefulWidget
{
@override _MyAppState createState() => _MyAppState();
}

class _MyAppState extends State<MyApp> with TickerProviderStateMixin
{
Animation<double> animation; AnimationController _controller;

@override void initState() { super.initState();

_controller = new AnimationController(vsync: this, duration: Duration(seconds: 3))
 ..repeat(); animation = new CurvedAnimation(parent: _controller, curve: Curves.linear);
}

@override Widget build(BuildContext context)
{
return new MaterialApp( home: new Scaffold( body: new Container( child: new Center( child: new ScaleTransition( scale: animation, child: new Container( decoration: new BoxDecoration( color: Color(0XB22222),
shape: BoxShape.circle), height: 50.0, width: 50.0, ), ), ), ), ), ); } }
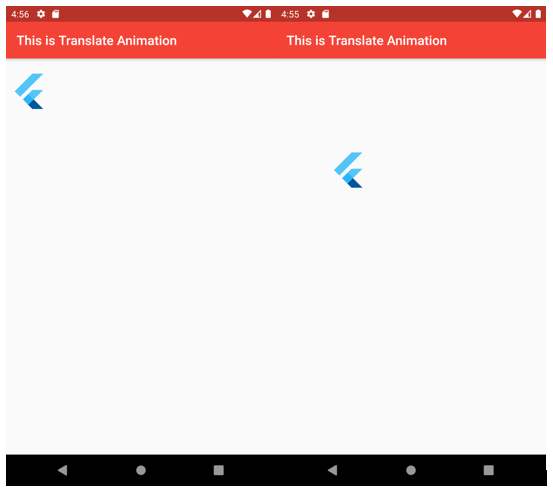
Translate Animation
This animation is responsible for causing the widget to move in the direction provided by the developer such as x-axis and y-axis. Let's understand it with an example:
import 'package:flutter/material.dart';

void main() => runApp(MyApp());

class MyApp extends StatelessWidget
{
@override Widget build(BuildContext context)
{
return MaterialApp( title: 'Translate animation sample', debugShowCheckedModeBanner: false, theme: ThemeData(primarySwatch: Colors.red),
 home: TranslateAnimation(), ); } }

class TranslateAnimation extends StatefulWidget
{
@override _TranslateAnimationState createState() => _TranslateAnimationState();
}
class _TranslateAnimationState extends
State<TranslateAnimation> with SingleTickerProviderStateMixin
{
AnimationController animationController;
Animation<EdgeInsets> animation;
@override void initState() { super.initState();
animationController = AnimationController( vsync: this, duration: Duration(seconds: 3), )..addListener(() => setState(() {}));
animation = EdgeInsetsTween( begin: EdgeInsets.only(left: 5.0, top: 20.0),
end: EdgeInsets.only(left: 80.0, top: 140.0), ).animate(animationController);
animationController.forward();
}
@override Widget build(BuildContext context)
{ return Scaffold( appBar: AppBar(title: Text("This is Translate Animation")),
body: Padding( padding: animation.value,
child: FlutterLogo( textColor: Colors.red, size: 60, ), ), ); } }
AnimatedBuilder
The codes that we have written are totally correct and easy to write, but upon further reflection we will see that the widgets are entangled together and mixed together which will in future make it more complex. That is when AnimatedBuilder class comes in scene.
This class will help us to divide the widgets in such a manner that any widget does not need to know it is rendered in an animation. It also helps in breaking down the build method such that each widget gets a single responsibility.
AnimatedBuilder Class
It can be defined as a widget which is used for building an animation. It is used when the animations are more complex and needs to be broken down in simpler form.
The constructor of this class is given below:
const AnimatedBuilder(
{Key key,
@required Listenable animation,
@required TransitionBuilder builder,
Widget child} )
We are also provided some properties that we can use in AnimatedBuilder. Let's understand them in detail below:
- child: this is a widget which passes the parameter to the builder function.
- builder: it is called when the animation value is modified.
- listenable: it is a type that holds a list of listeners and is used when we need notify about the changes.
- animation: alistenable object.
AnimatedWidget
This is an easier way of separating our animation from our widgets. Flutter is a well-structured framework that provides us with different ways of doing the same job.
We will later on see in detail, the main differences between AnimatedWidget class and AnimatedBuilder class. But for now, let us see what exactly this AnimatedWidget class has to offer to us.
AnimatedWidget Class
Similar to AnimatedBuilder class, this class also uses Animation objects for building animations. Let us now look at the constructor first:
const AnimatedWidget(
{Key key,
@required Listenable listenable} )
There is only one property that is offered by AnimatedWidget class which is listenable that does exactly the same job as it did for AnimatedBuilder class. It is used for listening to the animation updates.
AnimatedWidget vs AnimatedBuilder
There are a few points of difference between the two of them. Apart from that, they basically do the same work in a flutter application.
The differences are given below, let’s see and understand them:
| AnimatedWidget | AnimatedBuilder |
| This class only takes animation as a parameter. | This class takes two parameters which are- child and animation. |
| Basic syntax for AnimatedWidget is: class Sample extends AnimatedWidget It is implemented as a class extending AnimatedWidget. | Basic syntax for AnimatedBuilder is: child: AnimatedBuilder() It is implemented as a widget inside a clas. |
Now that we have seen the main points of difference between the two, there is one more question that comes in our mind which is:
When should we use AnimatedWidget and when AnimatedBuilder?
The answer to that is very simple:
If you wish to have a standalone (which means- to be able to operate independently) animation widget, then we will use AnimatedWidget class. Otherwise, if we need an animation in a nested build method, we will use AnimatedBuilder class.
Conclusion
We understood various animations that were provided to us by flutter. These animations not only make our application look great but also makes it user-friendly and professional. We saw how animation works and how it can be implemented simply and complexly in our flutter codes.
On the whole, animations make our application look better and competent. Using animations should always be encourages.