Flutter State Management
Flutter State Management: State management refers to the management of the state of one or more widgets such as Text Fields, Buttons, and many others.
Before we dive deeper into this very topic, let us look at an example: A State Management App Example- A basic app that lets users add products to the shopping cart.
- There will be a logging page/screen that the users will use to enter their email/username and password. Finally, log into the application.
- The second page/screen shown to the users will be of products and their prices next to it.
- The next page/screen will be of the cart after the user has added some products to it. The screen is very important as it is the last screen of our application.
Here, the user and rest of the information are examples of "state," and how the information flows through the application is "state management."
Let us look below and understand the deeper concept of state management.
What is a “state”?
The answer to this question is that the data responsible for bringing changes in the User Interface (the changes over time) is called a "state."
The state is the local data that a widget can hold, which is available after the widget is rendered/rebuilt.
In other words, a state can be all the variables that are being used in the StatefulWidgets, or the variables used in the entire code, and a store like Flux store and Redux.
The nature of an application at a point in time is called a "state."
Flutter is Declarative
While working with Flutter, we are given access to many important features of it that can be proven very useful to us over time. For instance, we can rebuild certain parts of our user interface instead of changing/modifying those parts.
- Flutter is declarative.
Declarative programming can be defined as a style of constructing/building the widgets of a flutter application in such a manner that we understand the basic logic of that program without knowing the flow of control.
Put it simply; Flutter just works on the user interface as a function of the state.
The declarative programming style is very beneficial for us because there is only one code path for the state of the user interface. We can modify/change our user interface for any given state once, and that will be all.
UI = F( STATE )
Here, the UI is the layout of our application, f() is the build methods, and the state is the collection of data and the state of the application.
There are mainly two types of “state” that we are used in a flutter application:
- App-wide State
- Widget State
App-wide State
The state is an application responsible for affecting the entire application, and the significant parts of our application are called App-Wide state.
The examples of this type of state are Products loading, authentication etc.
Widget State
Also known as the local state, this type of state is responsible for affecting only a single widget and does not affect the other widgets.
An example of this type of state is:
"should we display a loading screen," inputs of a form.
Relation Between “State” And “State Management”
As we already know and understand, a "state" is basically a set of data. If that data changes or modifies, something will change in the User Interface because User Interface only reflects the changes or modifications made in the application. By data in this context here, we mean everything and anything in our application that contributes for creating an application.
I want to give you an example for this: In the application we used above, logging in using our credentials, which included email/username and password, the list of the products shown on the second page/screen, and the third screen/page with our cart information. All of these are just data (therefore, "state").
So, the state is only the data and how that data gets in or gets out is "state management."
Types of state management
We are already familiar with the concept of state management. Let us now understand a little more about that. In Flutter, we have two types of state management concepts.
- Ephemeral state
- App state
Ephemeral state:
This state is also known as UI State or local state. It is a type of state which is related to the specific widget and only contains a single widget. While working with the ephemeral state, we do not need to apply other state management techniques such as Redux, GetX, MobX, etc. All we need to have is a stateful widget.
The most common example of this kind of state is Text Field. Let's understand it in depth with the help of an example:
class MyHomepage extends StatefulWidget
{
@override    MyHomepageState createState() => MyHomepageState();
}
class MyHomepageState extends State<MyHomepage>
{
String _name = "Olivia";
@override    Widget build(BuildContext context)
 {
return RaisedButton(          child: Text(_name),          onPressed: ()
{
   setState(()
{                _name = _name == "Olivia" ? "Cara" : "Olivia";
  });
     },
       );
  }
}
Now in the above example, we see that the _name is the ephemeral state. When the RaisedButton() is pressed, it triggers the setState() function, which finally results in the changing of _name.
Let us have a look at more of the examples to accurately understand which objects/widgets do ephemeral state work:
- The current page in our flutter application.
- The current progress of an animation in our flutter application.
- The currently selected tab in our flutter application.
- The current rating of a product is reviewed by a customer.
In simpler words, according to the official documentation of flutter application development- Ephemeral state (sometimes called UI state or local state) is the state you can contain in a single widget.
App State:
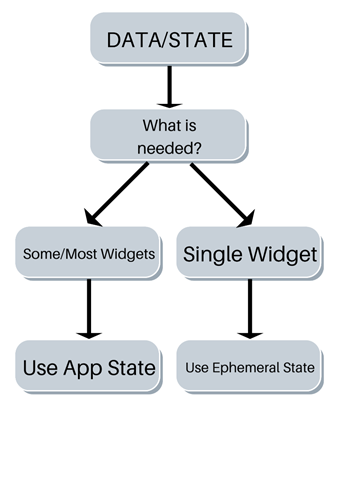
Before we begin with what can App State is, let us try to understand the key difference between Ephemeral and App State with the help of a flow chart:
App State can be defined as a type of state that needs to be repeatedly shared in the various parts of our flutter application. This type of App State is not inside the stateful widget and hence can be used globally.
Mainly, in App State, we use Provider Package. In this package, we largely have three concepts to understand.
- ChangeNotifier
- ChangeNotifierProvider
- Consumer
Let us now understand these three concepts from top to bottom:
ChangeNotifier
As the name suggests, it is responsible for providing change notifications to its listeners. It is provided by Flutter SDK itself, ChangeNotifier is a simple class that helps us to get a notification API by using VoidCallBack for notifications. In the provider package, ChangeNotifier is used for encapsulating the state of the application. In ChangeNotifier, we use the notifyListener() method for notifying the listeners. For simple applications, we use a single ChangeNotifier; however, when we have a complex application, we use multiple ChangeNotifier.
Let us have a look at an example:
class SampleModel extends ChangeNotifier {
.... void onChange() {
  notifyListeners();
}
.... }
ChangeNotifierProvider
We have ChangeNotifierProvider to provide an instance of a ChangeNotifier to its descendant. This is also a part of the provider package. ChangeNotifierProvider listens to the object and rebuilds when some changes/modifications are made in that object.
For example,
void main()
{
 runApp(     ChangeNotifierProvider(
create: (context) => SampleModel(),
 child: MyApp(),
  ),
  );
 }
In order to provide more than one class, we must use MultiProvider.
void main()
{
runApp(     MultiProvider(      providers: [
ChangeNotifierProvider(create: (context) => SampleModel()),
Provider(create: (context) => OtherClass()),      ],
child: MyApp(),
    ),
  );
}
Consumer
The Consumer is very easy to understand the concept of provider package. It does not do any fancy work. As we already know from the previous section, ChangeNotifierProvider listens for any changes made in the object. When it observes some changes made, it rebuilds the widgets with the help of the Consumer.
Let us have a look at the example so as to understand more,
return Consumer<SampleModel>
(
builder: (context, sample, child)
{
return Text("this is the sample");
   },
);
The consumer widget only requires the build() method. That build() method contains three arguments, which are:
- context: this is present in every build() method.
- Sample (model object): this is an instance of ChangeNotifierProvider.
- child: this is used for optimization.
TIP: Always put consumer widgets as deep in the widget tree as possible because we do not want to rebuild huge portions in our user interface just because some part of the code was changed/modified somewhere.
Provider.of
Much similar to Consumer, we are also given access to Provider.of. Sometimes we do not want the Model's data to change the user interface but still need to approach it, and this is when Provider.of becomes operational.
Provider.of does not rebuilt the entire widget from scratch when notifyListeners() is called. Only what we need to do is to set the listener to false as shown in the given example:
Provider.of<SampleModel>(context, listen: false).removeAll();
We have now established that Provider.of and Consumer are very similar as they work for achieving the same target. Let us compare the two of them and understand them in-depth:
Provider.of vs. Consumer
When should we use which?
To answer this in simple terms, we will see the two separately and then draw a comparison. Provider.of does not increase the program's indentation, but on the other hand, the Consumer does that. Provider.of depends on the value given to listen to trigger a new State.build to widgets. At the same time, Consumer always updates to the user interface.
However, both of them update the reference of an instance in which the widgets are using.
Summary
In this article, we learned thoroughly about various new terminologies that we were not familiar with. First, we understood the basic concept of "state" and "state management," and then we further explored their meanings and their classifications. We learned Flutter is declarative, which made it easier for us to understand Flutter more. In-App State, we saw how it uses provider package and what mainly comprises in provider package. Ultimately, we drew a comparison between two parts of the provider package and understood the main difference between the two.