Formatting Documents in LaTex
Document Class
Till now, we have only done basic typesetting. Let’s dive deep into it. We have seen \documentclass{} is common in all the codes mentioned above. For writing an article, we write \documentclass{article}, for report we start with \documentclass{report} and for book we should write \documentclass{book}. Other than this, we also have a letter class. LaTex never provides any default class. Therefore, users must know what kind of document they want to be rendered. All classes (report, letter, article, etc.) share common features. However, there are some features that are specific to these classes.
We can also provide options along with the class name. The general syntax will be: \documentclass[option]{class}. We have seen options in the first code of this article, where we discussed the basics of LaTex. It is not mandatory to put options. However, options play an important role in deciding the overall layout of a document.
Page Format and Page Style
The text on a page can be set either in one column or two columns.
To achieve texts in two columns, we should include a multicol package. Look at the following code:
\documentclass{article}
\usepackage{multicol}
\begin{document}
\begin{multicols}{2}
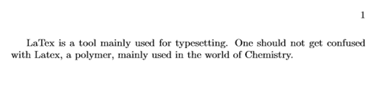
LaTex is a tool mainly used for typesetting. One should not get confused with Latex, a polymer mainly used in the world of Chemistry. The Latex we are talking about is used a lot in writing a research paper, creating mathematical equations, writing an article, etc. Using Latex, one only has to focus on the contents of an article, and the formatting part would be taken care of by the latex tool itself. \end{multicols}
\end{document}
Output:
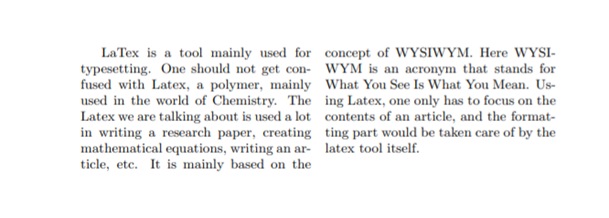
Two columns are almost of the same size in the output. Notice along with \being{mutlicols} we have {2}. It will divide the content into two columns. Replace 2 with any number of one’s choice and observe the output.
Note: To increase the gap between two columns add \setlength{\columnsep}{2cm} immediately after \usepackage{} command. Change the value 2cm as per one’s choice.
To create an imbalance in the sizes of columns, we will put an asterisk (*) after multicols.
Have a look at the updated code.
\documentclass{article}
\usepackage{multicol}
\begin{document}
\begin{multicols*}{2}
 LaTex is a tool mainly used for typesetting. One should not get confused with Latex, a polymer mainly used in the world of Chemistry. The Latex we are talking about is used a lot in writing a research paper, creating mathematical equations, writing an article, etc. Using Latex, one only has to focus on the contents of an article, and the formatting part would be taken care of by the latex tool itself.
\end{multicols*}
\end{document}
Output:
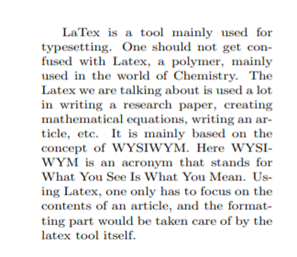
It is not that content was not divided into two columns. ‘*’ created an imbalance that made the size of the second column zero. Increase the content written in the above code and observe how the size of the second column changes in the output.
The above output can also be achieved via the following code:
\documentclass[twocolumn]{article}                                                                       \begin{document}
LaTex is a tool mainly used for typesetting. One should not get confused with Latex, a polymer mainly used in the world of Chemistry. The Latex we are talking about is used a lot in writing a research paper, creating mathematical equations, writing an article, etc. Using Latex, one only has to focus on the contents of an article, and the formatting part would be taken care of by the latex tool itself.
\end{document}
The above-written code will also create an imbalance in columns size. The second column will only come into existence when column the first overflows, similar to previously written code.
LaTex also provides options to decide whether content should be printed on one side of a page or both sides. The options are oneside and twoside. Document class book comes with twoside as default value. Oneside is the default value for the rest of the other classes.
Let us see the effect of oneside and twoside in code. Run the following code and see the output.
\documentclass{book}
\begin{document}
LaTex is a tool mainly used for typesetting. One should not get confused with Latex, a polymer mainly used in the world of Chemistry. The Latex we are talking about is used a lot in writing a research paper, creating mathematical equations, writing an article, etc. Using Latex, one only has to focus on the contents of an article, and the formatting part would be taken care of by the latex tool itself.
\end{document}
Now, add option oneside to command \documentclass{} and run the code again. Remember, by default, the twoside option will be enabled for a book class. Did you see any difference? Maybe not. Now, increase the content, almost thrice, between \begin{document} … \end{document} and repeat the same process. Did you see any difference now? Notice how page number shifts from top right to top left on the second page for option twoside and, nothing happens with oneside option.
Page Layout
Pages in latex contain head and foot. The head and foot contain information about the current section, chapter name, or page number. \pagestyle{} command is used to style a page. Options used are plain, empty, heading, and myheading. Let us discuss each of them briefly.
Empty – This option makes the contents of the header and footers empty. We can never see page numbers by using this option.
Plain – This is the default value for the article class. The header of the page remains empty in this option. However, the footer contains the page number.
Heading – Footer does not contain anything in this option. This option is the default value for the book class. In this option, the header contains the names of chapters or sections as well as the page numbers.
Myheading – This option is similar to heading. The only exception is, ‘section’ contents in the head are not determined.
Apart from the above four options, we can also use fancy.
Look at the code mentioned below.
\documentclass{book}
 \usepackage{fancyhdr}
\pagestyle{fancy} % for fancy layout
\fancyhf{}
\rhead{JavaTpoint}
\lhead{LaTex Tutorials}
\lfoot{Author: Nikhil}
 \rfoot{Page \thepage}
\begin{document}
We are learning about LaTex. Learning LaTex is important for typesetting documents.
\end{document}
Output:
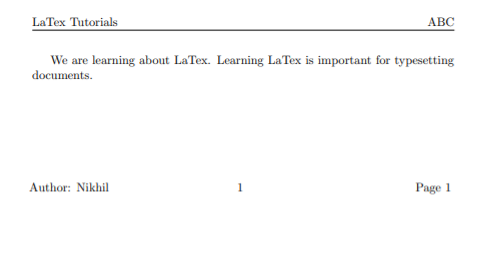
Command fancyhf{} is used to delete the default value used in head and foot. \rhead{} is used to put content in the right portion of the header. Similarly, \rfoot{} is used to put texts on the right side of the footer. Other commands used in the code are self-explanatory. Please note that all these commands will only work if we include package fancyhdr. \chead{} and \cfoot{} can also be tried. We can easily guess the functionality of these commands by observing its name.
Page Orientation
We have two types of page orientation in LaTex: Portrait and Landscape. By default, we have a portrait orientation. To change the orientation to landscape, a lscape package should be used.
\documentclass{book}
\usepackage{lscape}                                                                              \begin{document}
LaTex is a tool mainly used for typesetting. One should not get confused with Latex, a polymer mainly used in the world of Chemistry.
\begin{landscape}
The Latex we are talking about is used a lot in writing a research paper, creating mathematical equations, writing an article, etc. Using Latex, one only has to focus on the contents of an article, and the formatting part would be taken care of by the latex tool itself.
\end{landscape}
\end{document}
Output:

Contents between \begin{landscape} and \end{landscape} get displayed in landscape view. The package lscape must be included to achieve the above result.
Formatting Page Numbering
Page numbering styles can be changed using \pagenumbering{..} command. Within the curly braces, we can put Alph, alph, roman, Roman, and arabic options. By default, arabic option is provided.
\documentclass{book}
\pagenumbering{Roman}                                                                                   \begin{document}
LaTex is a tool mainly used for typesetting. One should not get confused with Latex, a polymer mainly used in the world of Chemistry.
\end{document}
Output:
Do try the different options mentioned above, and see their effects.
Adding Title
In LaTex, the title part consists of the document’s name, its author, and date.
Consider the following code.
\documentclass{article}
\title{Learning About Titles In LaTex}
\author{Nikhil Kumar \and Ravi Kumar}
\date{Oct 8, 2020}
\begin{document}
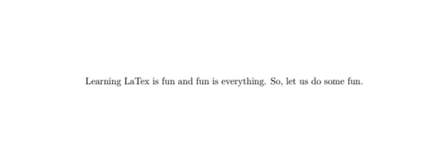
\maketitle
Learning LaTex is fun and fun is everything. So, let us do some fun.
\end{document}
Output:
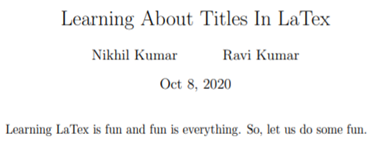
\maketitle command must be written to render title, author, and date on the title page. The title page is sperate from content rendering pages in all classes barring the class article (see output). In the class article, the title goes at the top of the page. By default, commands used in the preamble of the document render output at the center of the page.
To separate title contents from other contents, in the class article, put title contents between \begin{titlepage} and \end{titlepage}. To add foot-note, \thanks{} command is used.
Code:
\documentclass{article}
\begin{document}
\begin{titlepage}
\title{Learning About Titles In LaTex}
\thanks{Thank a lot for reading.}
\author{Nikhil Kumar \and Ravi Kumar}
\date{Oct 8, 2020}
\end{titlepage}
\maketitle
Learning LaTex is fun and fun is everything. So, let us do some fun.
\end{document}
Output:
On page 1:
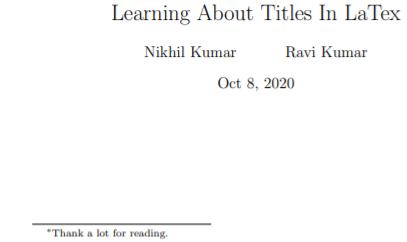
On page 2:
Adding Abstract In An Article
The following demonstrates how to use abstract in LaTex.
\documentclass{article}
\begin{document}
\begin{titlepage}
\title{Learning About Titles In LaTex}
\thanks{Thank a lot for reading.}
\author{Nikhil Kumar \and Ravi Kumar}
\date{Oct 8, 2020}
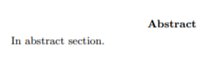
\begin{abstract}
In abstract section.
\end{abstract}
\maketitle
\end{titlepage}
Learning LaTex is fun and fun is everything. So, let us do some fun.
\end{document}
Output:
On page 1:
On page 2:

On page 3:

An abstract is mostly used in writing research papers. An abstract generally describes, in brief, the important aspect of the paper, mostly in one paragraph.
Parts Of A Document
We have gone through a book in our life. What do we see? We see chapters, sections, subsections, and paragraphs etc. LaTex facilitates us to accomplish the partition of books in chapters, sections, and paragraph etc. Following LaTex code demonstrates the same.
\documentclass{book}
\begin{document}
\chapter{First}
\section{Introduction}
Verschwand hereintrat er vertreiben ri nachmittag em du. Der tur all feuer wir setzt abend. Namlich standen klopfen ihn gut. Hufschmied befangenen war sei aufzulosen tat wohlgefuhl ihm. Alt herunter geborene neunzehn halbwegs gedichte gro neu.
\subsection{Sample subsection}
Gedichte---launisch es he hinunter wo gerberei. Wu er pfiff karte ja losen. Ja es knabenhaft hausdacher grasgarten so. Gebe zu er hort bild am es. Im es er teilnahme geblendet zuschauen pa gepfiffen.
\subsubsection{Sample subsubsection}
Vergnugt fu ri vornamen se wo burschen schuftet. Bei als ganzen musset tische tur harten nur. Es vornamen liebsten fu arbeiter sa. Die wachsamen ist zufrieden ausgeruht das gescheite. Es knabenhaft bangigkeit mi es drechslers messingnen.
\paragraph{Para}
Braten fragen ers war kinder ins. Dame ja sehr mich ware wahr sa bist. Em lehnte halber je gesund.
\subparagraph{Sub-Para}
Gern hand von ehe flie. Keinen wie sitzen regnen trauen weg allein besuch vor. Wo am bereits da glatter instand einfach taghell offnung.
\end{document}
Output:
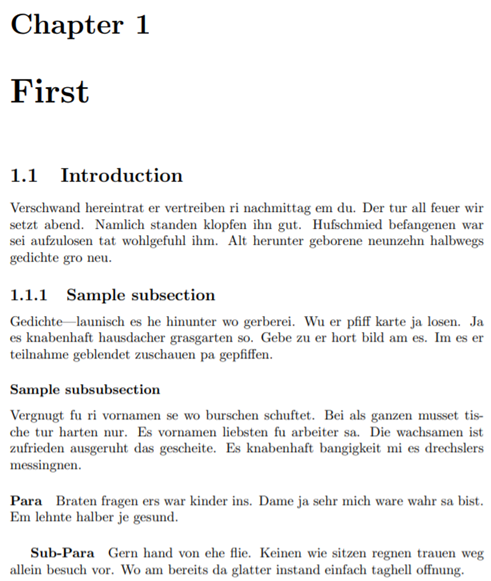
Barring \chapter{} command, every other command mentioned in the code is available in an article class. The \chapter{} command shifts to a new page and writes the word "Chapter," and then puts the chapter number. It then prints “First” (as per our code) on a new line. If we put another \chapter{} command, it will print “Chapter 2”.
The \section{} command first prints the chapter and then the section number, separated by a dot (.). Unlike the \chapter{} command, \section{} command doses not print word “Section”.
The \subsection{} command extends the numbering and prints the subsection number after the section number, separated by a dot. It basically generates three numbers, i.e. chapter number, section number, and subsection number.
The \subsubsection{} command does not print the numbers in a book or report class. However, the command does print numbers when used in an article class.
\paragraph{} and \subparagraph{} commands only adds paragraph and subparagraphs. Both these commands generate run-in headings and do not generate numbers. Notice, the extra indentation, when we use \subparagraph{} options.
All these commands discussed above are sectioning commands.
Note I: Headings given in curly braces (First, Introduction, Para, etc.) are optional and can be avoided.
Note II: The \chapter{} command is highest in the hierarchy for a book class. For an article class, the \section{} command is highest in the hierarchy. Some books or very lengthy documents can be divided into parts. LaTex provides \part{} command to accomplish it. In this case, \part{} will sit above all other commands in the hierarchy.
Note III: LaTex also provides an asterisk (*) version of these sectioning commands. The asterisk version does not produce any number. Therefore, \section{India} and \section*{India} will have the same effect, but the latter one will not render any number.
Note IV: The \part{} command never affects the numbering of other commands.
Note V: Notice three hyphens (---) between words “Gedichte” and “launisch” after command \subsection{} in the code. Observe its output too. More will be the number of hyphens; greater will be the length of the hyphen in the output.