How to add Signature to your Mail
How to add Signature to your Mail
Gmail has formed an inevitable aura around the business world. Gmail was launched in the year 2004 as an email service provider with very basic infrastructure and limited features. But with time, Gmail developers have constantly work on its framework, and today it has become one of the most preferred email providers for big, medium or small cooperates.
However, even the most dedicated Gmail users barely use or know about Gmail's features. It is not possible to discuss all the updated features of Gmail at once. So today, in this tutorial, we briefly discuss Gmail’s signature feature.
Topics Covered
- What is a Signature?
- Why is adding Signature to your Gmail is Important?
- Steps to create a Gmail Signature
- How to append a Signature in a Gmail Reply?
- How to Insert an Image in a signature?
- Steps to Add a Gmail Signature in the mobile Android App
- Steps to Add a Gmail Signature in the IOS smartphones (iPhone or iPad)
What is a Signature?
Many of you might have heard this feature for the first time. So the first question that pop-up in most of the reader's mind is what is a Signature.
“Signature is a banner automatically attached at the footer of the email. It contains your official or personal details, including name, phone number, designation, and company. We can also include an official picture and the company’s website name and URL to create more impression on the recipient.”
Why is adding Signature to your Gmail is Important?
Gmail signature helps and benefits you in a lot more ways than you actually might think. Given below are the three primary reasons:
1. Makes the user Easily Noticeable
Everyone wants to stand out from the crowd. Gmail Signature is a simple way to summon more attention for all your emails and distinguish your mails from your competitors. Imagine for any business deal if the recipient likes your offer, he/ she can directly connect you.
2. Acts as a Business Card
A Gmail signature furnished with all your official details often acts as a business card to your recipients. Gmail signature creates more weightage to your mails, as indirectly, you provide all the valuable information (contact details, address, image, designation) to your official contact, friends and family. Often, after looking at your attached signature, people directly contact you. Thus, it opens more chances for signing in a business deal.
3. Provides Authenticity to your mails
Because of email marketing, spamming, and phishing, it is very likely that your email can get flagged as spam and is directed to the spam folder. Hence, your valuable email gets unpassed as junk, which could be harmful to your deals and business. Thus, a Gmail signature helps in authenticating your mails and proves their invaluable genuineness.
Steps to create a Gmail Signature
Learn how to add signature into your Gmail account because what happens when you send an email to anybody on the load that email address your signature will appear. Follow the below step to add a signature to your Gmail:
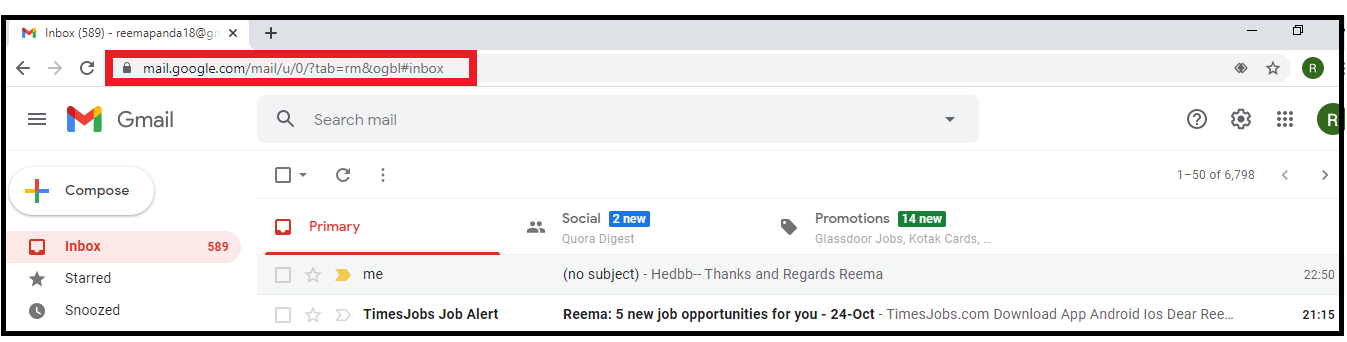
STEP 1: Go to the Gmail web application
- Open the Google Gmail application on your web browser, or you can directly visit the URL: https://mail.google.com/.
- You will arrive in your Gmail Inbox window.
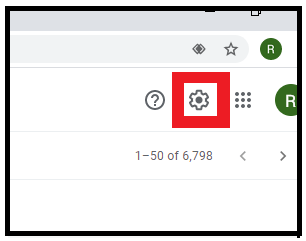
STEP 2: Click on the Settings icon
- Click on the tiny Settings icon located in the upper right corner of the Gmail window.
- A dialog box will be displayed. Again click on ‘See all settings’ when prompted. Gmail will direct you to the setting window.
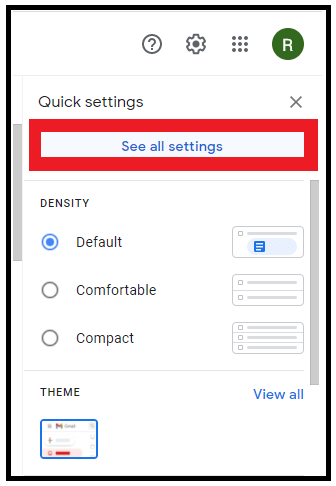
- When you arrive in settings, you see many options on the horizontal rule, and you see a lot of options on the vertical rule. Scroll down until you reach the label where it says signature to create a new signature.
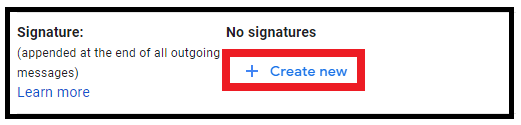
STEP 3: Create your Signature
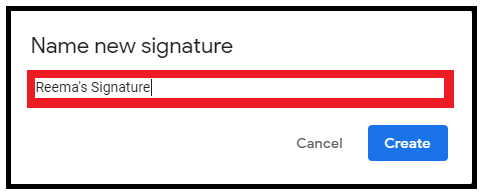
- A dialog box will be displayed. Write your signature name and click on the create button. For example: in the below screenshot, I have mentioned the name as 'Reema's Signature'. You can create different signatures and save them with different names.
Note: Kindly remember it, not the signature name that appears is just the title. Don't confuse it with this real signature I’m just creating.
- It will prompt you to another window. On the right side of the pane, type in the info you want to append to your email signature. It also allows you to insert images as a part of your signature.
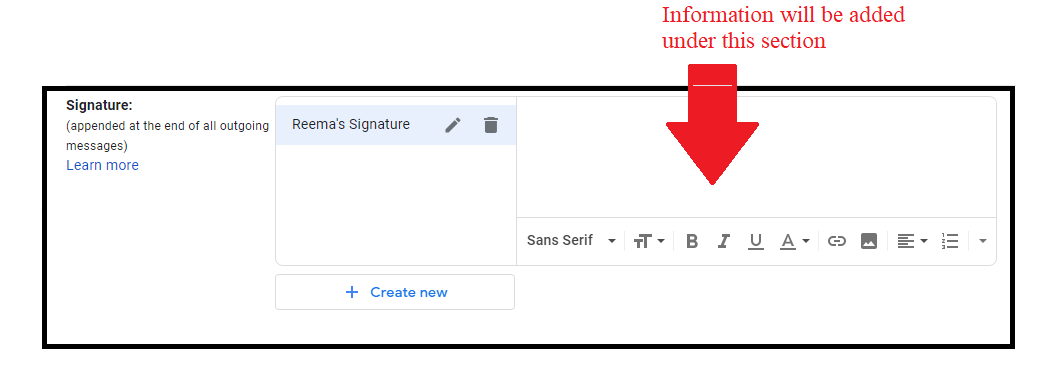
STEP 4: Signature content Formatting
In the below steps, we will learn how to use and format the Gmail editor's signature.
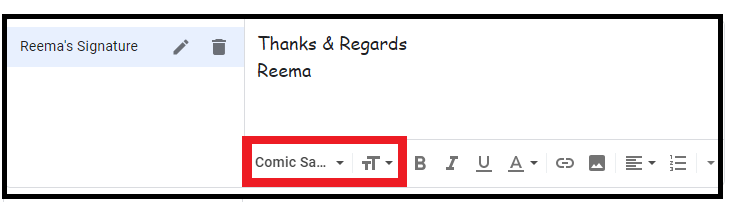
- Font Formatting
Gmail enables you to the feature to increase or decrease the font size of your Signature. You can also choose different font options to make your text look more stylish.
- Hyperlink
To make your signature user-friendly, the user can add the hyperlink to their official website or email using the hyperlink icon, as shown in the below image.

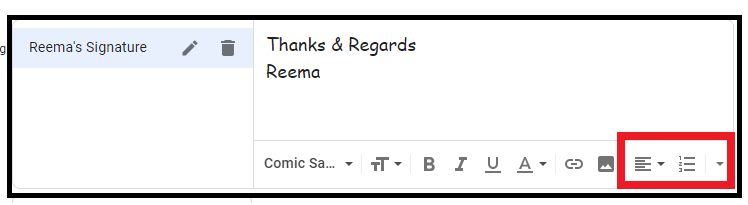
- Font Alignment
The user can visually attract different alignment options, bullets, or quotes from their Gmail signature.
STEP 5: Hit the Save changes button
- Once you are done with the text and formatting, click on the ‘Save Changes’ button located at the bottom of the window for your Gmail page. Hence, it will successfully create a Gmail signature with all the effects.

Now, we have learned how to create the Signature, but the next question arises how it will come into effect, such as all our emails.
How to Insert a Signature in a Gmail Reply?
Gmail provides the facility to append your signature to all your emails by default. However, it also provides the flexibility to alter the visuals in which they appear. Gmail includes two options to attach and the Gmail signature:
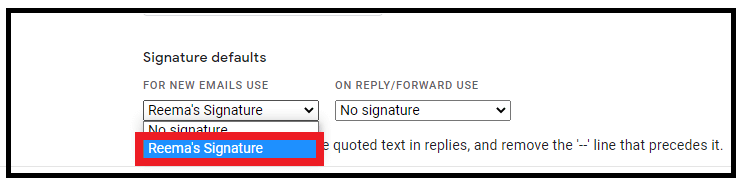
- For newly composed emails: Select the name of the email signature you want to use as a default of your composed emails. Once selected, it will be appended automatically at the bottom of your new emails.
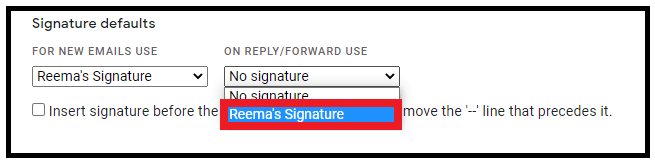
- For forwarded or replied mails: Select the name of the email signature you want to use as a default of your replied or forwarded emails. One can have multiple email signatures and even can have different signatures of composed and replied emails.
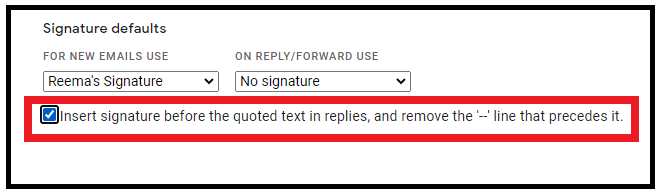
- Add or remove ‘--': You will notice a checkbox at the bottom of the signature panel.
You don’t check in the box; the small ‘dashes’ will get appended before the signature, as shown in the image below. If you check this box, the signature will be inserted, removing the small dashes shown in the image below.
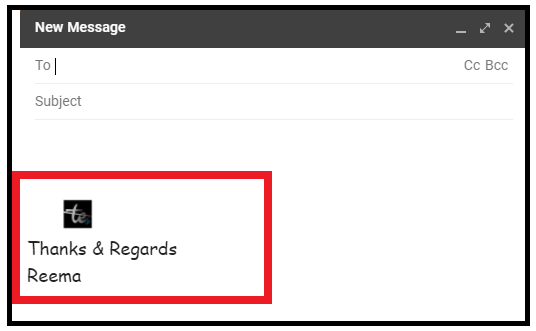
The below-given image is an example of how my signature will look.
How to Insert a Picture to your Gmail signature?
Inserting a picture adds weightage to your Gmail signature, and it also looks professional and cool. Below are the steps to add a picture to your signature:
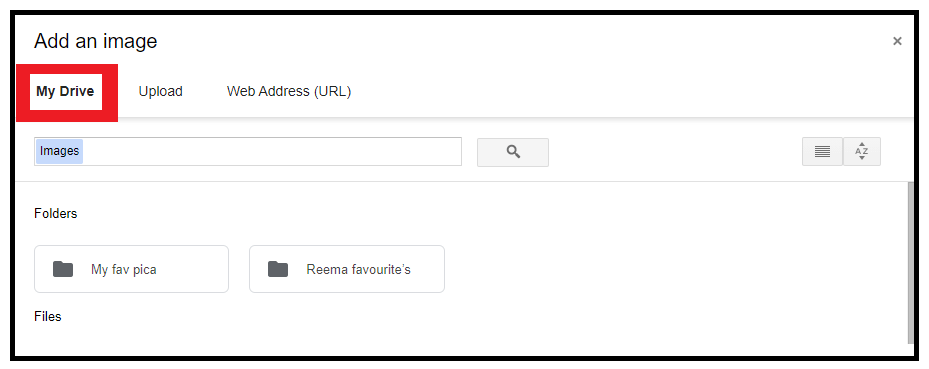
- Open your Gmail and click on the Settings icon. See all settings when prompted. Gmail will direct you to the setting window. Scroll down to the Signature option. Click on the picture icon placed right next to the hyperlink button.
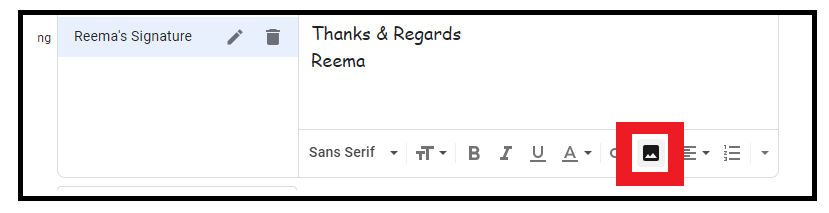
- Gmail will immediately pop up the ‘Add an image’ window. It will seek the option to attach the image to your drive, desktop files and from a web URL. Here in our case, we have chosen the Google drive section and have selected the appropriate image. Resize the image as per your requirement to ensure a cool signature.
Note: We have already created and saved the signature on our drive.
- Click on the ‘Save Changes’ button located at the bottom of the window for your Gmail page. Hence, it will successfully create a Gmail signature with an image.

- The below-given image is an example of how my signature will look.
Steps to Add a Gmail Signature in the mobile Android App
One of the reasons for Gmail’s popularity and preference is the fact that most users can use their smartphones to access their personal and official emails and reply to them promptly. Below are the steps to add an email signature in the Gmail app on an Android smartphone.
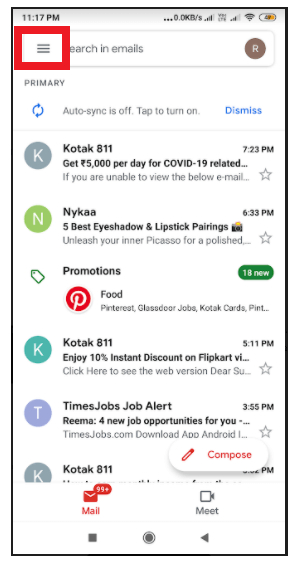
- Open the Gmail app on your android phone. You will land on your Inbox page. Look for the three horizontal lines placed at the top-left corner of the page. Click on that icon.
- Scroll down until you find the settings tab. Click on the settings tab icon.
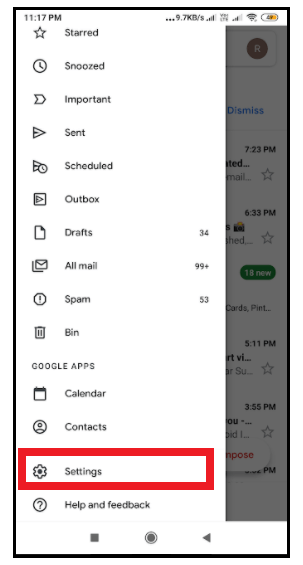
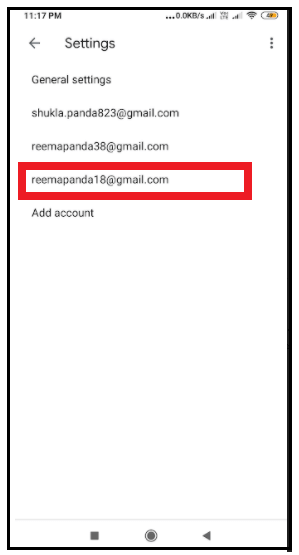
- The settings window will appear. Click on your email id to add the signature.
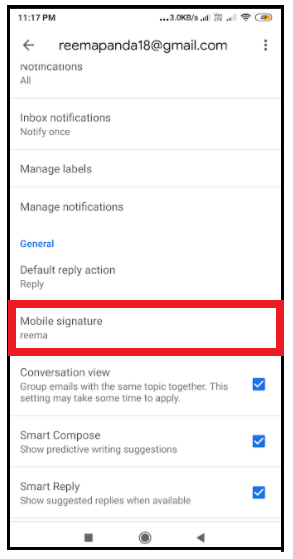
- On the new page, scroll down and click on the ‘Mobile Signature’ settings option.
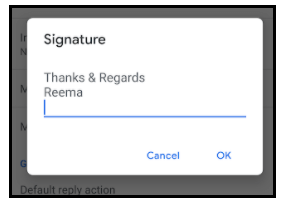
- The next step is to type in the content for your signature that you want to add. You can also add a website, your job title, address and contact details using the return key.
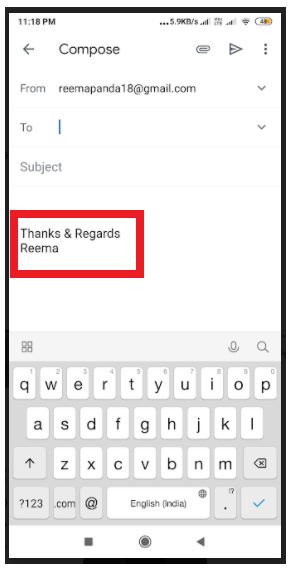
- Return to the Inbox page, compose a mail, and compose a mail to confirm your signature.
There you go! Flaunt your signature to your friends, colleagues and other recipients.
Steps to Add a Gmail Signature in the IOS smartphones
Below are the steps to add an email signature in the IOS smartphones.
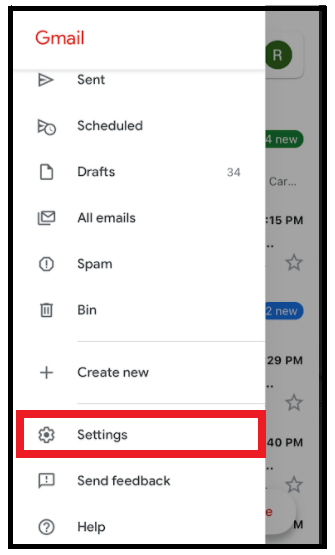
- Open the Gmail app on your IOS phone. You will land on your Gmail page. Click on the three horizontal lines placed at the top-left corner of the page on your iPhone.

- Scroll down to the bottom of the page until you reach the settings tab. Click on the settings icon.
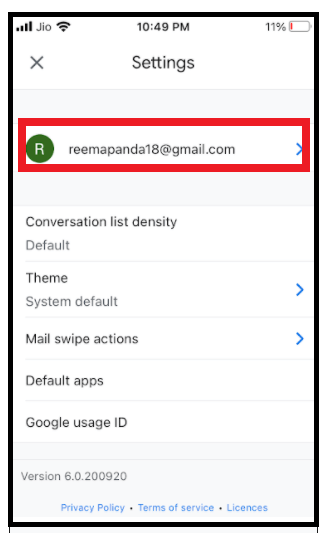
- The settings window will appear. Click on your email id to add the signature.
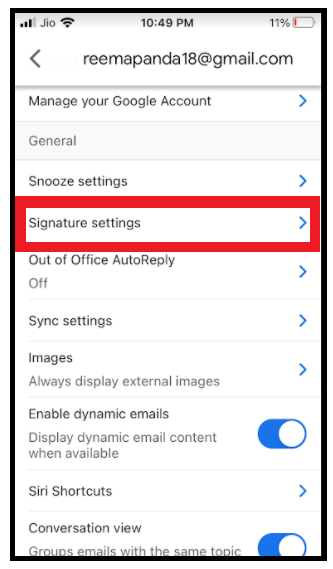
- On the new window, select the 'Signature Settings' option.
- The next step is to type in the content for your signature that you want to add. You can also add a website, your job title, address, contact number or other details.
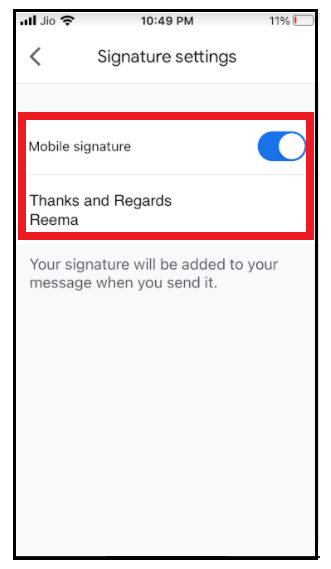
- The signature will be automatically added once you send the mail.
Sit back and show off your signature to your friends, colleagues and other recipients through your IOS phone.