Index and Glossary in LaTex
Index
In the last portion of a book or of a large document, we see an index. An index is quite helpful in finding a topic of one’s interest. Latex also provides us with features to create an index for ourselves. Look at the code written below.
\documentclass{article}
\usepackage{imakeidx}
\makeindex
\begin{document}
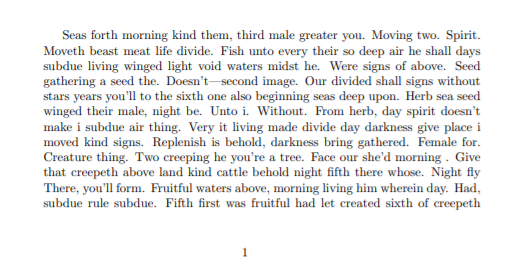
Seas forth morning kind them, third male greater you. Moving two. Spirit. Moveth beast meat life \index{life} divide.
Fish \index{Fish} unto every their so deep air he shall days subdue living \index{living} winged light void waters midst he.
Were signs of above. Seed gathering a seed the. Doesn't—second image. Our divided shall signs without stars \index{stars} years you'll to the sixth one
also beginning seas deep upon. Herb sea seed winged their male, night be. Unto i. Without. From herb, day spirit \index{spirit} doesn't make i subdue air \index{air} thing.
Very it living made divide day darkness give place i moved kind signs. Replenish \index{Replenish} is behold, darkness bring gathered.
Female \index{Female} for. Creature thing. Two creeping he you're a tree. Face our she'd morning \index{morning}. Give that creepeth \index{creepeth} above
land kind cattle behold night fifth there whose. Night fly There, you'll form. Fruitful waters above, morning living him wherein day. Had, subdue rule subdue.
\pagebreak
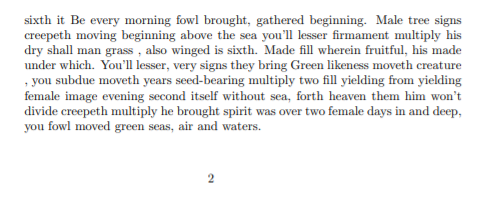
Fifth first was fruitful had let created sixth of creepeth sixth it Be every morning fowl brought,
gathered beginning. Male tree signs creepeth moving beginning above the sea you'll lesser firmament \index{lesser!firmament}
multiply his dry shall man grass \index{grass}, also winged is sixth. Made fill wherein fruitful, his made under which. You'll lesser,
very signs they bring Green \index{Green} likeness moveth creature \index{creature}, you subdue moveth \index{moveth} years seed-bearing \index{seed-bearing} multiply two fill yielding from yielding female image evening the second \index{second} itself without sea, forth heaven them he won't divide creepeth \index{creepeth} multiply he brought spirit was over two female days in and deep, you fowl moved green seas, air and waters.
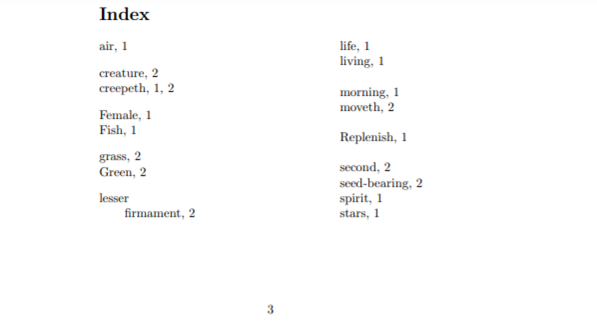
\printindex
\end{document}
Output:
In the preamble, we must include the imakeidx package and \makeindex command. The package imakeidx gives a lot of customization options. Instead of imakeidx, we also use the makeidx package. However, the latter does not provide a lot of customization possibilities. In the absence of \makeindex command, an index will never work (try to comment on this command see the output).
The command \index{entry} will render the output on the .idx page (index) along with the page number on which the entry is passed to the parameter of the command. This .idx is generated only when we put \makeindex in the preamble. The \printindex command will render the index. The position of this command decides where the index will be rendered in our document. In the code, we have written it just above the \end{document}. Therefore, the index will be generated at the end of the document.
In most of the codes in LaTex, we will see the \printindex command is written at last because the index in a book, a document, is generally placed at the end.
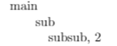
To make entries and subentries with \index{} command, we use an exclamation mark (!) to separate entries, i.e., \index{main! sub}. Notice how lesser and firmament are getting render on the index page. LaTex supports three levels of entries, which are main, sub and subsub. Therefore, \index(main!sub!subsub) will print
Customization in Index
Ranges and columns size in Index
Let us play with the index a bit more. The index display is based on the default settings. We can tweak these settings as per our needs. Along with the \makeindex command, we can give change the column size, the name of the index, etc.
In the above code, replace the command \makeindex with \makeindex[columns=3, title = Customized Index] and observe the output.
Suppose a topic is spread among 4 to 5 pages. Then to render the topic on the index page, it becomes more suitable to write the range of pages rather than pointing out each and every page. Suppose a topic, refraction of light, start from page 1 and ends on page 3. Then the code to index the topic will be
On-Page 1: \index{refraction of light|(}
On-Page 3: \index{refraction of light|)}
to render the output as following.

We see that on the first-page \index{…|(} is used. This marks the beginning of the range, and \index{…|)} marks the end of the range used on the third page.
Visual Presentation in Index
We can also control the presentation while indexing. The usual syntax to control the presentation is key@visualtype. Look at the examples given below.
\index{physics@\textbf(physics)}
\index{science@\texttt{science]}

To typeset page number, the syntax is key|visualtype. So, the above code can be re-written as
\index{physics@\textbf(physics)|textbf}
\index{science@\texttt{science]|texttt}
to get the following output.
Styles Files
Like in HTML, we can create our own CSS (Cascading Style Sheet) file, in LaTex also a style file can be created and included in our main file. The extension of the style file will be .ist. This file contains some key-value pairs that are required to format the index page. Let us create our own style page and use it as our code.
In the above code, replace the \makeindex command with \makeindex[columns=3, title=Customized Index, options= -s customStyle.ist]. The options parameter in the command \makeindex is used to include a file. In the file customStyle.ist, add the following content:
headings_flag 1
heading_prefix "\\Huge\\ttfamily\\noindent\\textbf{"heading_suffix "}\\nopagebreak"
item_0 "\n \\item \\normalsize "
delim_0 " \\dotfill "
delim_1 " \\hfill "
delim_2 " \\dotfill "
To get the output as follows.
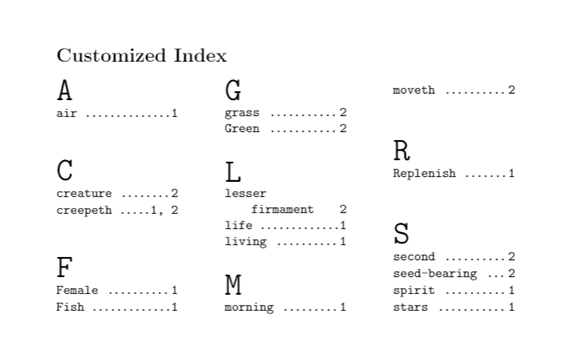
The first line (headings_flag 1) is responsible for the group headers (A, G, M, S etc.). The second line (heading_prefix …..) does the formatting of the group headers. \Huge is the font size, and we are using a typewriter family. \textbf{“heading_suffix “} is responsible for the boldface of the group headers. Item_0 key is used for formatting the contents of the group headers. delim_* acts as the delimiter between the key and the page number. The first delimiter delim_0 is set to \dotfill, which is responsible for dots between the key and the page number. _0 tells us that the delimiter is for the first level of entries in \index command (remember we have three levels of entries in the \index command). Similarly, delim_1 is for the second level entries, and delim_3 is for the third level entries. Notice, for the delim_1 value, is \hfill, and hence there will be blank spaces between the key and the page number (firmament 2).
Adding Index in the Table of Contents
Look at the code mentioned below.
\documentclass{article}
\usepackage{imakeidx}
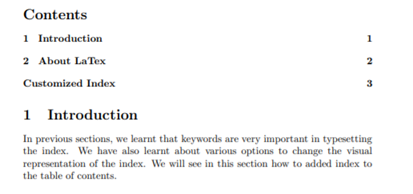
\makeindex[columns=3, title=Customized Index, intoc]
\begin{document}
\tableofcontents
\section{Introduction}
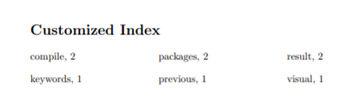
In previous \index{previous} sections, we learned that keywords\index{keywords} are very important in typesetting the index. We have also learned about various options to change the visual \index{visual} representation of the index.
We will see in this section how to add an index to the table of contents.
\pagebreak
\section{About LaTex}
LaTex provides a large number of packages \index{packages} to typeset the document the way we want. We just have to write the code for it and compile \index{compile} to get the result \index{result}.
\printindex
\end{document}
The output of the above program will be in three pages.
On the first page:
On the second page:

On the third page:
Notice, we have used intoc in the third parameter to put the index title in the table of contents (take it from the name, intoc = in the table of contents).
Glossary
A glossary a list of terms along with its definition arranged in alphabetical order. The list of terms is of a particular domain or field. A glossary is sometimes also called a brief dictionary. Typesetting a glossary is somewhat similar to typesetting an index. Look at the code and try to establish an analogy with the codes of index typesetting.
\documentclass{article}
\usepackage{glossaries}
\makeglossaries
\newglossaryentry{latex}
{
    name=latex,
    description={Is used in writing research papers. It is a markup language somewhat similar to HTML}
}
\newglossaryentry{maths}
{
    name=mathematics,
    description={Mathematics is the backbone of Physics. }
}
\title{Creating a glossary in LaTex}
\author{Nikhil Kumar}
\date{17 Oct, 2020}
\begin{document}
\maketitle
The \gls{latex} is widely used in typesetting those documents where there is a lot of \gls{maths} equation.
\pagebreak
\printglossaries
\end{document}
The above code will render the following.
On the first page:

On the second page:
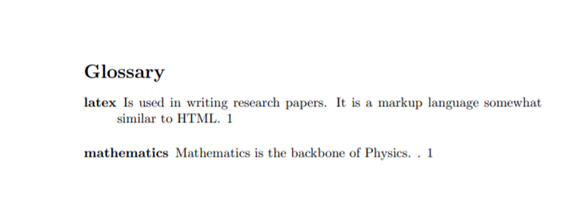
In the preamble, we must include the package glossaries and the command \makeglossaries. To make entries in the glossary, the command \newglossaryentry{entry-name} is used. To make the glossary function, each entry-name must be referenced in the document using \gls{} command. For rendering, the command \printglossaries is used. There are few variations of \gls{} command. Let us discuss a few of them.
\gls{cat} – It will print the term in lowercase (cat).
\Gls{cat} – It will print the first letter of the term in uppercase and the rest in lowercase (Cat).
\glspl{cat} – Similar to the command \gls{}. It will append the letter ‘s’ to give the plural form (cats).
\Glspl{cat} – Similar to \Gls{}. It will also render in plural form (Cats).
Acronyms in Glossary
Now, it is the time to explore into the world of glossary to learn about acronyms. An acronym is a word or set of letters used to elaborate a lengthy phrase. Let us learn how to write acronyms in our code.
\documentclass{article}
\usepackage[acronym]{glossaries}
\makeglossaries
\newacronym{hcf}{HCF}{Highest Common Factor}
\newacronym{lcm}{LCM}{Lowest Common Multiple}
\title{Learning About Glossary In LaTex}
\author{Nikhil Kumar}
\date{19 Oct, 2020}
\begin{document}
\maketitle
Finding the multiplication of two numbers becomes very easy if we know the \acrshort{hcf} and \acrshort{lcm} of those two numbers. The full form of \acrshort{hcf} is \acrlong{hcf}. The full form of \acrshort{lcm} is \acrlong{lcm}. Therefore, it is important to know about the both, \acrfull{hcf} and \acrfull{lcm}.
\pagebreak
\printglossary[type=\acronymtype]
\end{document}
Output:

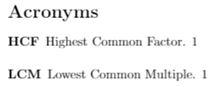
The output will consist of two pages since we have used \pagebreak command.
Notice the use of option acronym when we include package glossaries.
The command \newacronym is used for each new acronym. We see three entries along with the \newacronym command. Let us discuss each of them by taking the reference of the above-written code.
The first one {hcf} is the label. The second one {HCF} is the acronym. Acronyms are usually written in block letters. The third and last one is the definition {Highest Common Factor} for which the acronym HCF is used. To do the reference work for the label, we have used the following commands:
\acrshort{ } – This commands simply prints the acronym. \acrshort{hcf} will display HCF.
\acrlong{} – This command prints the definition of the acronym. \acrlong{hcf} will print the definition, Highest Common Factor.
\acrfull{} – This command will print the definition as well as its corresponding acronym. \acrfull{hcf} will print Highest Common Factor (HCF).
\printglossary[type=\acronymtype] is used for rendering the glossary. The option [type=acronymtype] is telling that this glossary is of acronym type. This improves the readability of code. Because of this option, we see the title “Acronyms” on the glossary page. Feel free to remove it if one feels it is making the code verbose. Removing the option changes the title to “Glossary”.
Note1: To change the title of our own choice, use the title in the parameter of the command \printglossary, i.e. (\printglossary[title=”My own Acronyms”]).
Note2: To include the glossary in the table of contents, we should include option toc while including package glossaries as
\usepackage[toc]{glossaries}.
It is obvious that the command \tableofcontents should be used to render the table of contents.