Difference between Ionic 4 and Ionic 3
The ionic framework is an open-source platform that is used to develop mobile applications. It is also used to build android applications, desktop applications, iOS, and web applications using web technologies like HTML, CSS, Sass, and JavaScript.
The ionic framework team released the latest version of ionic version 4 after more than a year of work. The new version of ionic 4 provides you with important changes in the performance, compatibility with multiple frameworks. Now, you can show the main difference between ionic 4 and ionic 3.
Ionic 4 Vs Ionic 3
| Features | Ionic 4 | Ionic 3 |
| Introduction | The ionic 4 represents a major change, moving from a mobile framework for the angular user to a framework-agnostic approach. | The ionic 3 is an open-source mobile UI toolkit that is used to develop the mobile application to native iOS and Android. |
| Components | Ionic 4 supports Vue.js, React.js, Cordova and web components. | Build with inherent UI components that move forward app development, and it can be deployed virtually anywhere. |
Changes in Package Name
There are some changes in the package name to ionic 4 and the ionic 3. In ionic 4, the package name starts with @ symbol such as @ionic/angular. While the ionic 3 package name does not begin with the @ symbol. The given below syntax explains you the difference between ionic 4 and ionic 3 package name.
In ionic 4: npm install @ionic/angular
 In ionic 3: npm install ionic-angular
Project Structure
The main changes between Ionic 4 and Ionic 3 applications are project design and architecture. It had a specific convention for how the folder structure should look like and how an application should be set up in ionic 3. Whereas, in Ionic 4, the application architecture follows the recommended configuration for each supported framework.
Example: When you create a project with AngularJS, the project structure look like this, as shown below:
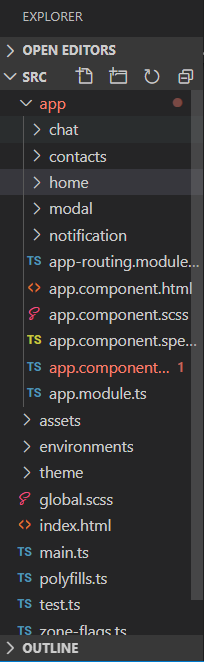
In Ionic 4:
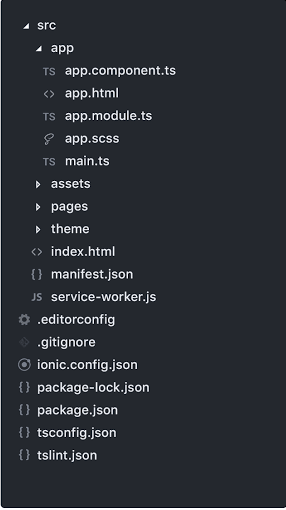
In Ionic 3:
Web Components
The ionic 4 has been completely rewritten to use the Web APIs. Every component of ionic 4 is packaged as a Web Component. Web Components allow the ionic framework to be projected into the future. It is a collection of Web APIs that allows you to create custom, reusable, encapsulated HTML tags to use in web applications. Using the web components, you can create almost everything that can be done with CSS, JavaScript, and HTML.
As every component of ionic 4 will be a web component, they created and open-sourced a tool called Stencil. The Stencil is a compiler that creates fast, reusable UI components and progressive web applications.
Overlay Components
The overlay components like loading, alert, and toast were created synchronously in the ionic 3. Whereas, in ionic 4, they are created asynchronously.
Example: This example explains how you can use the overlay components in ionic 3 and ionic 4.
In Ionic 3: The synchronous overlay component used in the alert on ionic 3, as shown below:
showAlert() {
   const alert = this.alertCtrl.create({
     message: "Hi! This is Tutorial&Example",
     subHeader: "Tutorial&Example"
   });
   alert.present();
 }
In Ionic 4: The asynchronous overlay component used in the loading on ionic 4, as shown below:
async showLoading() {
     const loading = await this.loadingCtrl.create({
     message: 'Loading message'
     });
     loading.present();
     setTimeout(() => {
       loading.dismiss();
     }, 8000 );
  }
 }
Lifecycle Events
The lifecycles events that had been used in the ionic 3 like ionViewDidLoad, ionViewWillEnter, ionViewCanEnter, and ionViewWillUpload will no longer be used in the ionic 4. Ionic 4 used their proper alternative in the ionic application. Now you will use the angular life cycles like ngOnInit and ngAfterViewInit. If you have already programmed at an angular, this will look familiar to you.
Router Link
In Ionic 3, the click event is used to navigate between pages from the html. In Ionic 4, you will use the router link, as used in the Angular applications. It is used in the <ion-button> component.
Example:
 <ion-button [routerLink] =
"['/ item / 123']"> Go to item 123 </ ion-button>
Navigation
There are many changes in the navigation and the routers, which makes it simpler and more understandable. Now, ionic 4 use the Angular Router. It gives more consistent routing experience to the whole application. The angular router is the essential libraries in the angular application.
The Ionic 3 used simple stack-based navigation, where the new pages were placed on top of the stack by pressing. When we wanted to navigate backward, we popped out the last page.
Traditional websites use a linear history, which ensures that the user can go back to a page and press the back button. Applications can take this one step further in the ionic framework by allowing parallel navigation. It means that multiple navigation stacks can be installed and exchanged at any time.
Lazy Loading
As you have learned that the navigation has changed in the ionic 4. The mechanism for lazy loading has also changed.
The angular module is also important to mention that it is no longer essential to import the pages and services in the home.module.ts file, which makes the project much simpler and more organized.
Example: This example explains to you clearly how lazy loading setup worked with the code below.
In Ionic 3
// home.page.ts
 @IonicPage()
 @Component({
   selector: 'page-home',
   templateUrl: 'home.html'
 })
 export class HomePage {
 // home.module.ts
 @NgModule({
   declarations: [HomePage],
   imports: [IonicPageModule.forChild(HomePage)],
   entryComponents: [HomePage]
 })
 export class HomePageModule { }
In Ionic 4
// home.module.ts
   declarations: [HomePage],
   imports: [IonicPageModule.forChild(HomePage)],
   entryComponents: [HomePage]
 })
 export class HomePageModule { }
 @NgModule({
 declarations: [
     HomePage,
 ],
 imports: [
     IonicPageModule.forChild(HomePage),
 ],
 exports: [
     HomePage
 ]
 })
 export class HomePageModule {}
 // app.module.ts
 @NgModule({
 declarations: [
     MyApp,
     HomePage
     ],
 imports: [
     BrowserModule,
     IonicModule.forRoot(MyApp)
 ],
 bootstrap: [IonicApp],
 entryComponents: [
     MyApp,
     HomePage
 ],
 providers: [
     StatusBar,
     SplashScreen,
     {provide: ErrorHandler, useClass: IonicErrorHandler}