Ionic Menu
The Ionic menu is the side-menu navigation that can be slide in from the side of the current view. By default, the menu slides in from the left side, but the side can be overridden. Depending on the mode, the menu will be shown differently, but the display style can be changed to any form of the list available. A sibling of the root content element should be the menu element. You can add any number of menus from the content element.
You can use the <ion-menu> component to add the menu in the ionic app. it makes it easy to create the side menu for the navigation. In the <ion-nav> component, there should be added a local variable, and that can be passed to the <ion-menu> content property. The menus can be controlled from the templates, or programmatically by using the menuController. The content of a menu will be disabled when the menu is dismissed.
There are the following elements of the menu component which are as follows:
- Menu Button
- Menu Controller
- Menu Toggle
- Split pane
Menu Button
The Menu Button is the component that automatically creates the icon and functionality to open a menu on the page.
Menu Controller
It makes it easy to control the menu. The provided methods can be used to show, enable, toggle the menu, and many more. The menu controller will take a reference to the menu by the side, or ID. If the side and id are not passed to it, then it will grab the first menu it finds.
Menu Toggle
The Ionic menu toggle can be used to open and closed the menu. Menu toggle is only visible when the selected menu is active. When it is opened or closed, the menu is active. If the menu is hidden or displayed as a split-pane, then the menu is marked as inactive, and <ion-menu-toggle> componenthides.
Split-pane
It is very useful when you want to create a multi-view layout. It permits the UI component, like menus, to be shown as the view-port with the increase in the width. If the width of the device screen is less than a specific size, the split pane will be failed, and the menu will be disabled. It is ideal for creating an application that will be presented in the browser and will be implemented through the app store on phones and tablets.
Create Menu
Here you see how you can create the side menu in the ionic application.
Step 1: Firstly, you are required to create a new blank ionic project. By default, it contains only one page that is the home page. Now, you are going to create the two other new pages, which makes it easy to use a side menu to move the other pages. The following commands help you to create pages in your ionic application. The commands are given below:
ionic generate page contacts
 ionic generate page chat
Step 2: After executing this command, you create app components. Now you are going to the root component that is app.component.ts. Here you can create a function sidemenu(), which contains an array of objects. You can set the URL and icon of each page.
app.component.ts
import { Component } from '@angular/core';
 import { Platform } from '@ionic/angular';
 import { SplashScreen } from '@ionic-native/splash-screen/ngx';
 import { StatusBar } from '@ionic-native/status-bar/ngx';
@Component({
   selector: 'app-root',
   templateUrl: 'app.component.html',
   styleUrls: ['app.component.scss']
 })
 export class AppComponent {
   navigate: any;
   constructor(
     private platform: Platform,
     private splashScreen: SplashScreen,
     private statusBar: StatusBar
   ) {
     this.sideMenu();
     this.initializeApp();
   }
   initializeApp() {
     this.platform.ready().then(() => {
       this.statusBar.styleDefault();
       this.splashScreen.hide();
     });
   }
   sideMenu() {
     this.navigate =
     [
         {
         title : 'App',
         url   : '/apps',
         icon  : 'apps'
         },
       {
         title : 'Book',
         url   : '/book',
         icon  : 'book'
       },
       {
         title : 'Paint',
         url   : '/paint',
         icon  : 'brush'
       },
       {
         title : 'Contacts',
         url   : '/contacts',
         icon  : 'contacts'
       },
       {
           title : 'Facebook',
           url   : '/facebook.com',
           icon  : 'logo-facebook'
       },
     ];
   }
 }
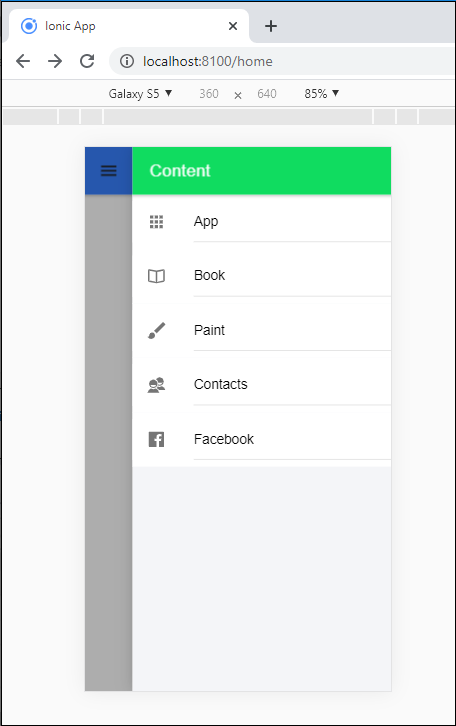
Step 3: In this step, you can add the <ion-menu> element in the HTML file and it can create the side menu in the ionic application. The <ion-menu-toggle> component is used to create the open and close menu in the side menu. When you click on the menu, then it will dismiss the side menu automatically.
app.component.html
<ion-app>
     <ion-menu side="end" menuId="first" contentId="content">
       <ion-header>
         <ion-toolbar color="success">
           <ion-title>Content</ion-title>
         </ion-toolbar>
       </ion-header>
       <ion-content color="light">
         <ion-list *ngFor="let pages of navigate">
           <ion-menu-toggle auto-hide="true">
             <ion-item [routerLink]="pages.url" routerDirection="forward">
               <ion-icon [name]="pages.icon" slot="start"></ion-icon>
                 {{pages.title}}
             </ion-item>
           </ion-menu-toggle>
         </ion-list>
       </ion-content>
     </ion-menu>
     <ion-router-outlet Id="content"></ion-router-outlet>
   </ion-app>
Step 4: You can open and close the side menu after creating the side menu in the main component. You are required to use the <ion-menu-button> component in the html file to every page. It can able to generate icon and functionality to open a menu on every page. You can use the <ion-menu-button> component in the home.page.html.
Home.page.html
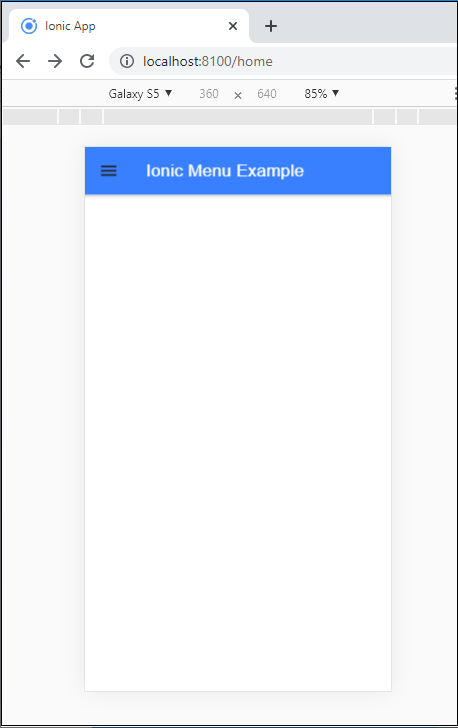
<ion-header>
   <ion-toolbar color="primary">
     <ion-buttons slot="start">
       <ion-menu-button color="dark"></ion-menu-button>
     </ion-buttons>
     <ion-title>
       Ionic Menu  Example
     </ion-title>
   </ion-toolbar>
 </ion-header>
Output: After executing this code, you will get the output, as shown below:
When you click on the menu button, then it opens the side menu at the right side of the screen and shows the following output as shown below:
There are many methods used in the ionic menu component.
| Method | Signature | Description |
| Close() | Close( animated?: boolean) => Promise<boolean> | This method closes the menu. If already menu is closed, or cannot be closed, it returns false. |
| isActive() | isActive() => Promise<boolean> | If the menu is active then it returns true. |
| isOpen() | isOpen() => Promise<boolean> | If the menu is open then it returns true. |
| Open() | open(animated?: boolean) => Promise<boolean> | It is used to open the menu. If already menu is open, or cannot be opened then it returns false. |
| setOpen() | setOpen(shouldOpen: Boolean, animated?: boolean) => Promise<boolean> | This method is used to open or close the button. If the operation is not completed then it returns false. |
| Toogle() | toogle(animated?: boolean) => Promise<boolean> | This method is used to toggle the menu. If operation is not completed successfully then it returns false. |