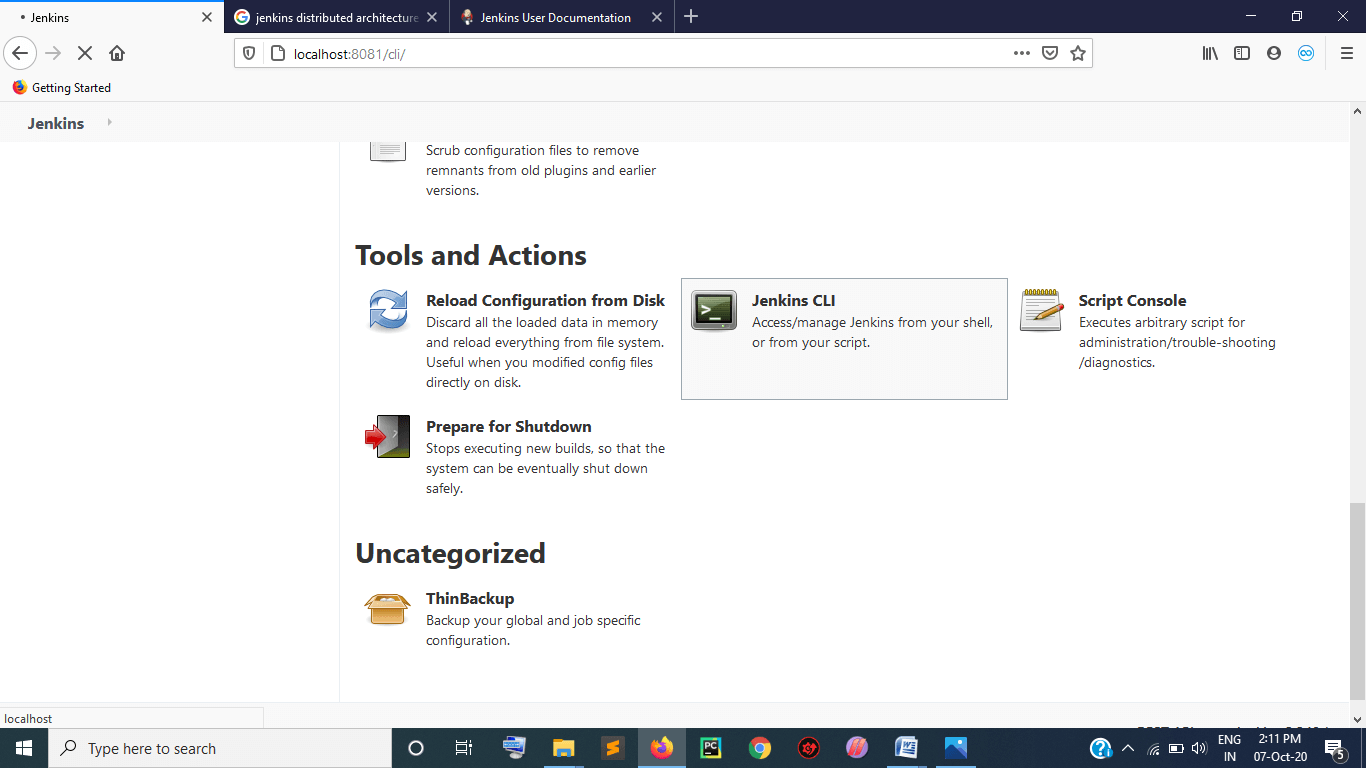
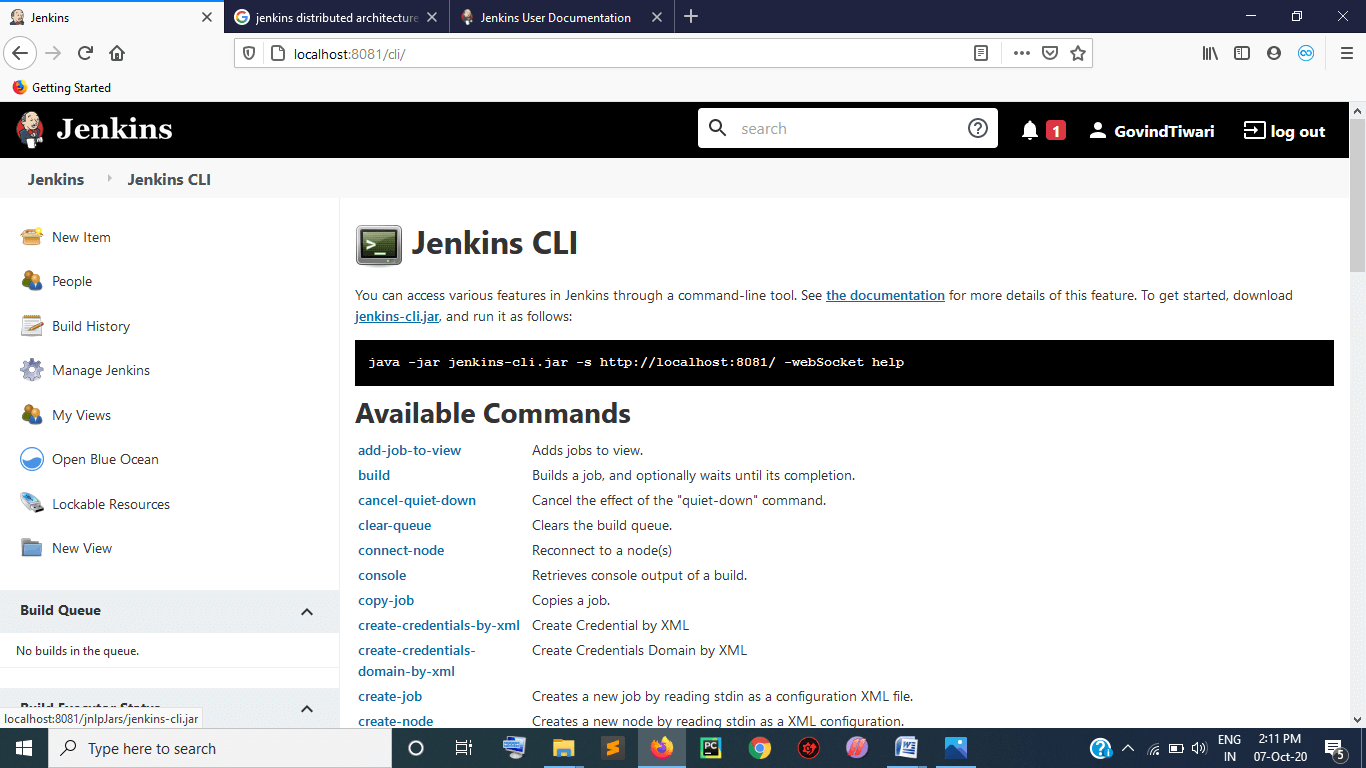
Jenkins CLI
Jenkins CLI: We can perform all the operations and every normal and difficult thing from the Jenkins UI. It is also possible by using the Jenkins Command Line Interface. It is easy to use Jenkins CLI by using some commands. Jenkins CLI improves Jenkin's tool performance. It is an easier and faster way to perform operations on Jenkins by using Jenkins CLI. Jenkins CLI nearly can perform all the jobs related to project like: It can list the jobs, build the jobs, run the jobs etc.
Jenkins tool has built-in Jenkins CLI to use; it permits users and administrators to operate its shell or prompt. Jenkins CLI makes it easy to perform on daily build tasks, their updates and many more things.
Pre-requirements:
To use the Jenkins CLI, first of all, Pre-Requirements to use Jenkins CLI:
- Enable security:
- Go to Jenkins Dashboard and click on Manage Jenkins.
- Click on Configure Global Security.
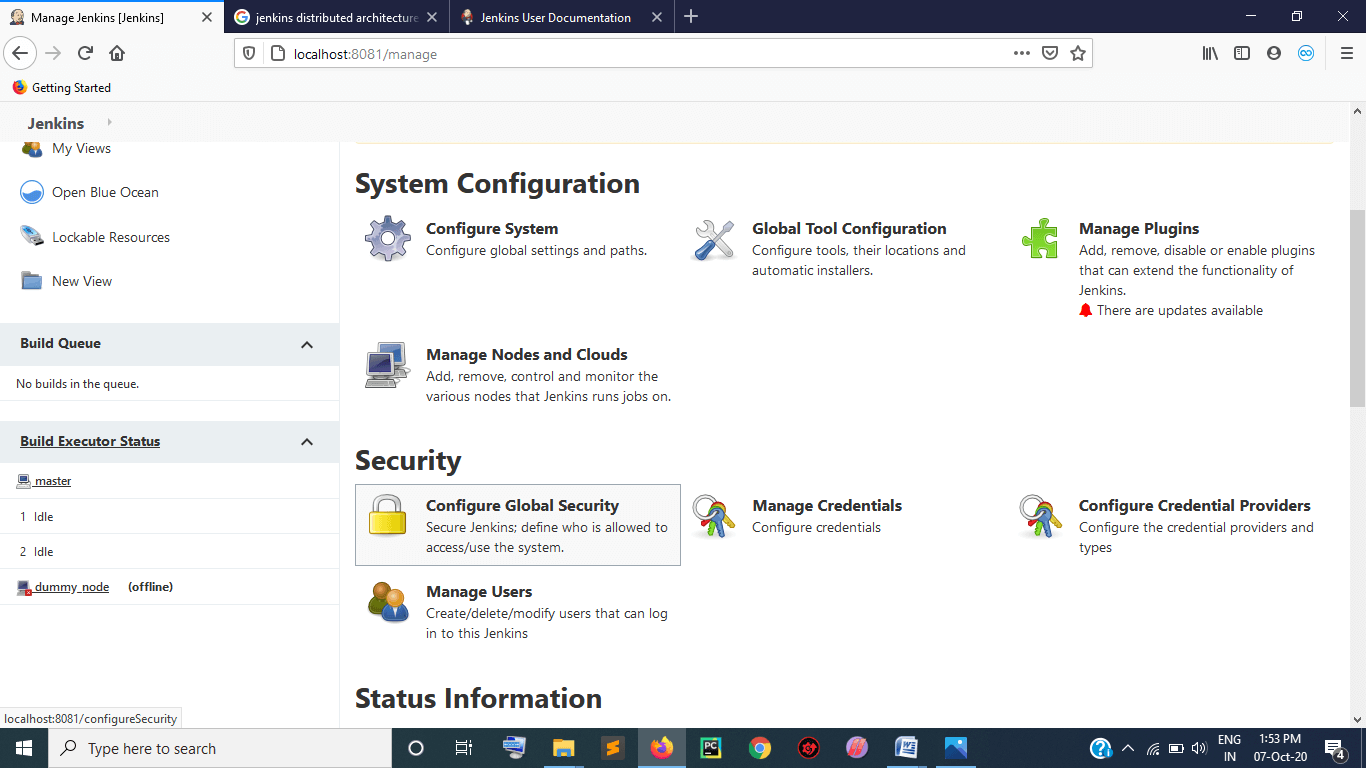
- Here you will get enable security options. Click on the checkbox to enable it.
- Download Jenkins-cli.jar file: You need to download Jenkins-cli.jar from the link given in the Jenkins Dashboard and install it.
>> You can also get more information about authentication by troubleshooting the logs. You will get this feature in the system log of manage Jenkins page.
Now your Jenkins CLI is ready to use. Now you can log in in Jenkins through it by providing user name and password in the command. Some other ways are available to be login like: by using a private key, by using a public key, by using the initial admin password, by using a passphrase and many more.
Few Jenkins command:
Some Jenkins commands are given below, which are useful in the starting time of the Jenkins:
- Help: It provides all help related to Jenkins CLI commands.
% ssh –l kohsuke -p 53801 http://localhost help
- Build: This one is the most important and very useful command of Jenkins CLI. Every Jenkins CLI user used this command. With the help of this command, you can push up or trigger any one from the permitted jobs or pipeline.
Normally, the user triggers the jobs and exits, but you can also perform more operations. It has some additional features that you can apply to jobs or pipelines.
- % ssh –l kohsuke –p 53801 http://localhost help build
- Java –jar Jenkins-cli.jar build JOB [ -c ] [ -f ] [ -p ] [ -r N ] [ -s ] [ -v ] [ -w ]
Parameters:
- JOB: Here, provide the name of the job that you want to execute.
- –c: It checks the changes made in the source control management before starting the building process. If there is no change found, it will not build operation and exit from the pipeline.
- –f: It allows following the build process of jobs.
- –p : It is used to decide the format of the parameters. It provides a key-value format for parameters to store the values.
- –s : It is used to wait for completing or aborting the process. If any abortion occurred, then it allows one to ignore the interruption during the build.
- –v : It can’t be used without –s. It prints out the screen result after completing the process.
- –w: It requests to wait till the next command starts.
- % ssh –l kohsuke –p 53801 http://localhost build build-all-software –f –v
- Console: It is a very useful command to obtain the result (output) for the required pipeline process. With the help of this command, you can obtain the last completed build result. It is used mainly when there is no build number being provided.
- % ssh –l kohsuke –p 53801 http://localhost help console
- Java –jar Jenkins.cli.jar console JOB [ BUILD ] [ -f ] [ -n N ]
- –n N: Displays last N lines.
- % ssh –l kohsuke –p 53801 http://localhost console build-all-software
- Who-am-i: This command is used for making a list of the user's credentials. It also shows all the permissions on which the user can perform the operations. This command will provide the details for the current user only.
- % ssh –l kohsuke –p 53801 http://localhost help who-am-i
- Java –jar Jenkins.cli.jar who-am-i
- % ssh –l kohsuke –p 53801 http://localhost who-am-i
- List jobs: Using this command, you can make a list of all the jobs you need to perform. From.
Java –jar ./Jenkins-cli.jar –s http://YOUR_JENKINS_HOST_NAME list – jobs
- Get job details in XML format:
Java –jar ./Jenkins-cli.jar –s http://YOUR_JENKINS_HOST_NAME get – jobs
- Update job details in XML format:
Java –jar ./Jenkins-cli.jar –s http://YOUR_JENKINS_HOST_NAME create – job.
Jenkins CLI on Mac operating system:
Jenkins CLI also supports operating systems like Mac and Linux.
For Mac: If you want to install Jenkins CLI in the Mac operating system, you can use brew to install it.
brew tap jenkins-zh/jcli
brew install jcli
Brew: It is an installer to install Jenkins or Jenkins CLI on Mac operating system. It is also known as Homebrew. Here are some commands related to brew, and Jenkins is given below:
- To install Jenkins:
Brew install Jenkins
- To install Jenkins latest version:
brew install Jenkins-lts
- To install the Jenkins specific version:
brew install Jenkins-lts@your_version
- To restart the Jenkins services:
brew services start Jenkins-lts
- To update the Jenkins version:
brew upgrade Jenkins-lts
Features of Jenkins CLI:
Install Plug-ins:
You can also install Jenkins plug-ins by using Jenkins CLI by executing the following command:
            Jcliconfig plugin fetch
            Jcliconfig plugin install account
Enable and Disable the plug-ins using Jenkins CLI:
It is also possible to enable or disable Jenkins plug-ins by using Jenkins CLI.
Enable command:
Java – jar jenkins-cli.jar –s http://localhost:8080/ enable-plugin PLUGIN_NAME … [ -restart ]
PLUGIN_NAME: Paste here that plug-in name which you want to enable.
-Restart: It allows Jenkins to restart after enabling the plug-in.
Disable command:
Java – jar jenkins-cli.jar –s http://localhost:8080/ disable-plugin PLUGIN_NAME … [ -quit ( -q ) ]
[ -restart ( -r ) ]
[ -strategy ( -s ) STRATEGY ]
PLUGIN_NAME: Paste here that plug-in name which you want to enable.
-quit ( -q ): It quits the Jenkins tool and allows only to print the error message.
-restart ( -r ): It allows Jenkins to restart after disabling the plug-in.
-strategy ( -s ): It is a command used to perform an action on optional or mandatory dependencies of another enabled plug-in.
STRATEGY: Here, you have to define the procedure that you want to apply on the plug-in. There are three strategies available for it:
- –none: If a mandatory plug-in having some dependencies is existing in the library, and it is enabled, then plug-in cannot be disabled (Default Value).
- –mandatory: All mandatory plug-ins which are dependent on the selected plug-in will be disabled, but alternate of dependent plug-ins will remains enabled.
- –all: All plug-ins will be disabled, which have a partial or full dependency on selected plug-ins will be disabled and alternate dependent plug-ins will also be disabled.
The enable plug-in command was added in Jenkins version 2.136, and the disable command was added in Jenkins version 2.151