What is Kivy?
Kivy framework is a free and open-source Python library developed by the Kivy Organization. Kivy is developed for different kinds of multi-touch devices. Kivy can run on multiple operating systems, like Android, iOS, Linux, OS X, Windows.
Kivy is written in Python language, so before using Kivy, you need an existing installation of Python. One can install various versions of Python, side by side, but Kivy is required to be installed in each Python version before using it.
The latest stable version can be downloaded from the official website:
https://kivy.org
Kivy Architecture
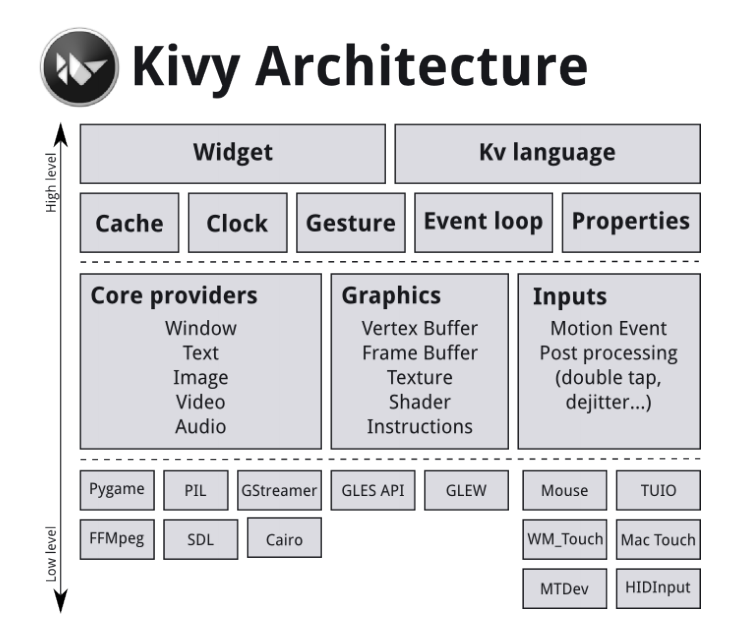 Core Providers
Kivy uses abstraction for its basic tasks, called
Core tasks, and this includes opening a window, displaying images and text, playing audio, spelling correction, getting images from a camera, etc. These
core tasks depend on the hardware and operating system, so there is different and specific APIs for different operating systems. So
core providers are the piece of code that act as an intermediate communication layer between a specific operating system and the Kivy framework.
Graphics
Kivy uses abstraction wherever possible, and Kivy's graphics API is another example that uses abstraction for OpenGL. There are many advantages of using graphics API, as Kivy issues hardware accelerated drawing commands using OpenGL, on the lowest level. The graphics API has the ability to automatically optimize the drawing commands that the application code issues. All the widgets of the Kivy framework use graphics API because this is implemented on the C level for performance reasons.
Input Provider
As the core providers provide functionality for core functions, input provider provides the facility for input handling. The input provider adds support for input devices such as Apple's trackpads, TUIO, etc. and someone wants to add support for a new input device, then simply a new class is required that can read input from that device and transform them into Kivy's basic events.
Core Package
The core package provides commonly used features, for example:
Clock: The clock can be used to schedule timer events. It supports one-shot timers as well as periodic timers.
Cache: This feature can be used to store anything that is used frequently.
Gesture Detection: The gesture recognizer can be used to detect various kinds of strokes, such as circles or rectangles; even it can be trained to detect our own strokes.
Kivy Language: The Kivy(KV) language is used to describe user interfaces in an easy and efficient manner.
Properties: These property classes are different from Python properties, and these classes link the widget code with the user interface description.
UIX Module
The commonly used widgets and layout are contained in the UIX Module that can be used to create user interfaces quickly.
Widgets: The widgets are the user interface elements that receive MotionEvents. Widgets can be added into the program to provide some functionality, such as buttons, sliders, lists, etc.
Layouts: The widgets are arranged using Layouts. For example, Grid layouts or Box layouts can be used to position the widgets and layouts can be nested too.
Modules
The modules can be used to provide some extra functionality to the program, just like some add-ons are added to customize the web browser. Modules are readymade and can be written our own.
Touches(Input Events)
All different types of input types and sources such as touches, mice, TUIO, etc. are represented by instances of the
Touch() class. A 2D onscreen-position can be associated with any individual input event. A touch instance can be in one of the following three states:-
Down: A touch is said to be down only once, at the moment where it first appears.
Move: A Move happens whenever the 2D position of touch changes, and it can be in this state for a potentially unlimited time.
Up: A touch goes up at most once, or never, because in practice, wealmostreceive an up event.
Event Dispatching
When an input is received, Kivy sends out one event per touch. Depending on the state of the touch(Down, Move, Up), the event is dispatched to the root widget, which in turn call the event handler to handle the touch event.
A small example to describe the touch event in Kivy framework:
 defon_touch_down(self, touch):
                                for child inself.children[:]:
                                                ifchild.dispatch(‘on_touch_down’, touch):
                                                                return True
Points to remember before installing Kivy Framework
- Kivy requires one compulsory dependency named Cython to run. The Cython dependency version, according to Kivy version is given below:
Kivy Version Cython Version
1.10.1dev 0.27.3
1.10.0 0.25.2
1.9.1 0.23.1
1.9.0 0.21.2
Way to use Cython:
$ sudo pip install –U --force-reinstall Cython==<version number>
- A Python 2.x interpreter (2.7 <= x < 3.0) or 3.x(3.3 <= x)
- If you require additional features, then you can download specific libraries.
Some of them given below:
Feature name Dependency or Library name
Windowing SDL2
Audio/video playback Gstreamer 1.x
Spelling correction PyEnchant
Camera input OpenCV 2.0
Image and text display Pillow
Downloading and Installation of Kivy Framework
- The latest stable version can be downloaded from the official website: https://kivy.org
- Make sure Python is installed in the system before installing Kivy, open the command line, and make sure python is available by typing:
python --version
Installation of Kivyframework on Window based system:
Step 1: You should have latest pip and wheel:
Python –m pip install --upgrade pip wheel setuptools
Step 2:
Install the dependency:
python –m pip install docutils pigments pypiwin32 kivy.deps.sdl2 kivy.deps.glew
Step 3: Install Kivy:
python –m pip install kivy
Installation of Kivy framework on Linux(Ubuntu, Mint, Bhodi)
Step 1: Add Kivy PPA:
$ sudo add-apt-repository ppa:kivy – team/kivy
Step 2: Update packages list of apt:
$ sudo apt update
Step 3: Install Kivy dependencies
$ sudo apt-get install python3-kivy
Installation of Kivyframework on OS X
Step 1: Install necessary packages using homebrew:
$ brew install pkg-config sdl2 sdl2_image sdl2_ttf sdl2_mixer gstreamer
Step 2: Install kivy using pip:
$ pip install Cython==0.26.1 kivy
Why Kivy?
Kivy has something different that makes users think about this newcomer.
Some of these features can put a light on it:
Fresh: As Kivy says that it is made of today and tomorrow. It means kivy doesn't carry past; even kivy doesn't have something to carry on. Kivy is a new framework, and it doesn't have legacy tools or system, in contrast, its other counterpart has. So it helps in exploring possibilities with its lightweight libraries.
Fast: Kivy implements many time-critical functionalities on the C level to leverage the power of existing compilers. And by using intelligent algorithms and GPU, it makes both application development, and application execution speeds up. As today GPU becoming more powerful, thus it increases performance considerably.
Flexible: Kivy can run on a variety of different devices. Kivy support all major operating systems, i.e., Windows, Linux, OS X, and also Kivy can run on Android-powered smartphones and tablets, and that proves Kivy's flexibility. Kivy can adapt to new technologies quickly and can be used in combination with several different third-party solutions. To name a few, Kivy support Windows' WM_TOUCH, Apple's multi-touch capable devices such as trackpads and mice, can be used on OS X, and you can use HID kernel input events on Linux.
Focused: As Kivy is developed using the Python programming language, applications can be written with a few lines of code and having Python's incredibly versatile and powerful features, and that makes Kivy more focused towards its goal. Even the Kivy community has developed its own
Kivy language, which is used mainly to create sophisticated user interfaces. Kivy language allows in set up, connection and arranging of application elements more quickly.
Free: Kivy is developed under the community project, and its use is totally free, the user doesn't have to pay a single penny for it.You can use Kivy commercially without paying anything to anyone, even you can sale your kivy based application and earn money, and there is no objection by Kivy community as itis free for all.
How to create an application with Kivy framework?
If you want to build an application with the Kivy framework, follow the steps given below:
Step 1: The
App class- sub-class it.
Step 2: Now, implement its
build() method, so that it can return a
Widget instance (Widget instance is the root of the widget tree).
Step 3: Now instantiate this class, and call its
run()method.
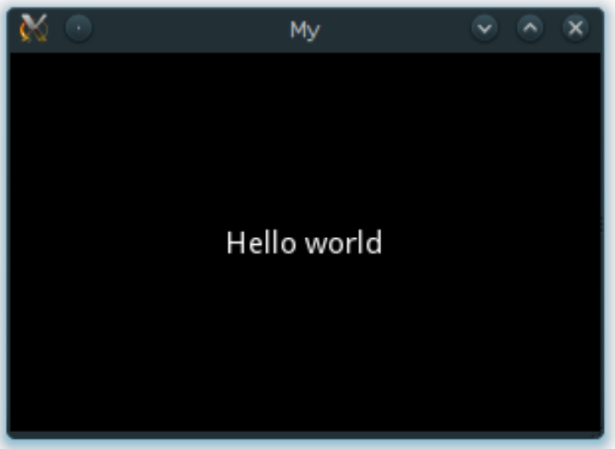
A simple kivy application example:
importkivy
                kivy.require(‘1.10’) # use your current kivy version here!
                fromkivy.app import App
fromkivy.uix.label import  Label
classMyFirstApp(App):
defbuild(self):
return Label(text=’Hello kivy’)
if _ _name_ _ == ‘_ _mainApp_ _’:
MyFirstApp().run()
- Now save this file as py and run it.
How to run the kivy application?
Let’s see the above example and follow some instructions according to different operating systems:
For Linux users:
$ python mainApp.py
For Window users:
$ python mainApp.py
# or
C:\appdir>kivy.bat mainApp.py
For Mac OS X users:
$ kivy mainApp.py
- After running on window, open a new tab in the browser and the output will look like this:
Kivy App Life Cycle
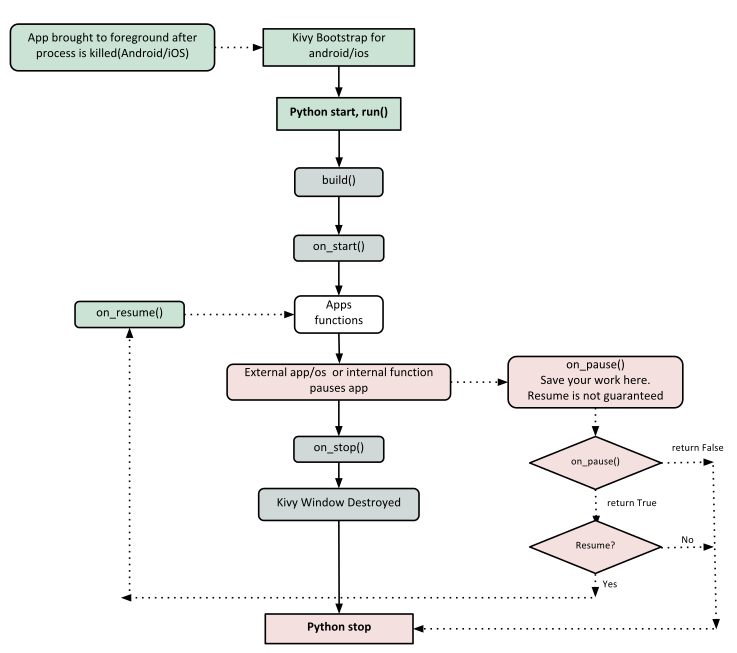
To run an application, the entry point is the
run()method. We have created an app named “
MyFirstApp.run()."
Now let's start exploring our app line by line, and begins from line no.3:
f
romkivy.app
import App
It says that the base class of our app should inherit from the
Appclass, and it is present in the kivy
_installation_dir/kivy/app.py
On the next line:
from kivy.uix.label
import Label
Here, the
uixmodule is the section that holds the user interface elements like layouts and widgets.
On the next line:
classMyFirstApp(App):
Here, we define the base class of our kivy application.
On the next line:
def build(self)
As per the Kivy app life cycle process, this is the function where we should initialize and return our
Root Widget.
On the next line:
returnLabel(text=’Hello Kivy’)
Here, we initialize a label with the text- ‘Hello kivy' and return its instance, and this label will be the
Root Widget of this app.
On the next lines:
If _ _name_ _ == ‘_ _mainApp_ _’:
MyFirstApp().run()
This is the final point where the class
MyFirstAppis initialized, and it's
run() method called, and starts our kivy application.