Migration Class CodeIgniter
The CodeIgniter framework provides the migration class that helps the web developers to create and handle databases in a structured and streamlined manner. The migration classes are very useful when more than one developer is working on the same project. If any developer has created a migration file or changed a database query, the developer must notify the other to run the migration file. It tracks information based on past history in migration and what changes are needed to run against production machines the next time you deploy it.
Database table migration is used to track which migration is already running and which files are required to update in your application. So, call $this->migration->current() function that helps which migration version should be run. And the current migration version is found in the application/config/migration.php.
Loading a Migration Class
Like other libraries in the CodeIgniter application, you must load a migrate class in the Controller file such as:
Syntax
$this->load->library(‘migrate’);
Once the class is loaded, you can use a migrate object as shown:
$this->migrate
Type of the Migration file
There are two ways to use the migration files name:
- Sequential: As the name defines, a sequential filename begins with 001 (numeric), and each number must contain three digits with a string name and no gaps between them. For example, 001_add_data.php.
- Timestamp: Each migration filename uses a timestamp that follows the YYYYMMDDHHIISS format. It also helps to track the information at which time the database file was changed. Example 20201031104401_add_data.php is the migration file name.
Note: If you have selected a migration file type using a timestamp and created a file with a sequential format, the migration file will execute, but no table is created in the database.
How to get a timestamp in Codeigniter?
If you want to get timestamp data, you have to follow the syntax as shown below:
echo date('ymdhis'); And execute this statement in the controller, and then it shows the result- 200417020541.
Migration Method name
There are two methods available in the Migration class:
- up() method: The up () method is used in the migration file to indicate what should be created when the migration file is run in the application.
- down() method: A down() method is the opposite of the up() method, which is used to undo all the operation that performed during the up() method. For example, suppose you have created a student table using the up() method, and if you want to undo all the changes in the migration file, you can use down() method.
To set a Migration
You need to know that the Codeigniter contains a migration file that is stored in the application/config/migration.php file. In that file, you need to make small changes to run the migration file such as:
Step1. By default, a migration file is disabled for security purposes. So, when you are going to use a migration file, set $config[‘migration_enabled’] to TRUE, and when its work has been finished, again set it to False.
Step2. You can set migration type in two ways –
- Set $config[‘migration_type’] = ‘timestamp’ as 201410311028_add_emp.php,
- Or set it $config[‘migration_type’] = ‘sequential’ as 001_add_emp.php
Stpe3. $config[‘migration_table’] = ‘migrations’. By default, the table name is migrations that keeps the current status of the table defined in the database. It also allows you to rename migration tables.
Step4. $config[‘migration_auto_latest’]: It defines whether you want to update the migration to the latest version.
Step5. $config[‘migration_version’] = 0; It defines the migration version of the file and if you are using a timestamp, you must pass a timestamp value such as, $config[‘migration_version’] = 200417020541;
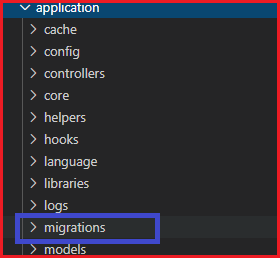
Step6. $config[‘migration_path’]: It defines where the migration file should be placed in the codeigniter application. By default, it uses $config[migration_path’] = APPPATH.’migrations/’; Therefore, if you have not ‘migrations’ folder in your Codeigniter, you must create this directory under the application folder, as shown below.
Now create a 200417020541_create_student.php file and save it to the following path application/migrations/200417020541_create_student.php folder. After that, write the following program in the migration file.
200417020541_create_student.php
<?php
 defined(' BASEPATH ') OR exit('No direct script access allowed');
 class Migration_Create_students extends CI_Migration
 {
     public function up()
     {
         $this->load->database();
         $this->dbforge->add_field(array(
             'stud_id' => array(
                     'type' => 'int',
                     'constraint' => 3,
                     'unsigned' => TRUE,
                     'auto_increment' => TRUE
             ),
             'stud_name' => array(
                     'type' => 'varchar',
                     'constraint' => '100',
             ),
             'stud_email' => array(
                 'type' => 'varchar',
                 'constraint' => '100',
         ),
             'stud_course' => array(
                     'type' => 'varchar',
                     'constraint' => '100'
             ),
             'stud_address' => array(
                 'type' => 'varchar',
                 'constraint' => '100',
         ),
     ));
     $this->dbforge->add_key('stud_id', TRUE); // add stud_id as a primary key
     $this->dbforge->create_table('students', TRUE); // create students table
 }
 }
 ?>
Create a Migration_controller.php controller file and save it to the following path application/controller/Migration_controller.php folder. After that, write the following program in the controller file.
Migration_controller.php
<?php
 defined(' BASEPATH ') OR exit('No direct script access allowed');
 class Migration_controller extends CI_Controller
 {
         public function index()
         {
               echo "<title> Tutorial and Example </title>";
                 $this->load->library('migration'); // load migration library
                 if ($this->migration->current() === False)
                 {
                         show_error($this->migration->error_string()); /* if current version is not found, it returns an error message. */
                 }
                 else
                 {
                     echo "<h2> Migration table has been created </h2>";
                 }
         }
 }
 ?>
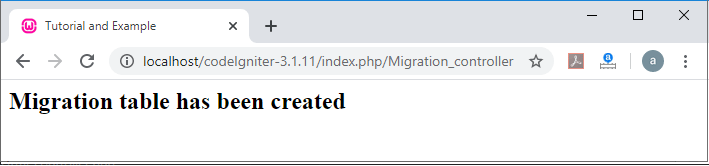
To run the program in the localhost by invoking the URL localhost/CodeIgniter-3.1.11/index.php/Migration_controller/add function; it shows the output,as shown below.
If you want to check that your table is created in the database or not, go to phpMyAdmin and select the database that you provided during the creation of the migration file and then, you will see the image below.
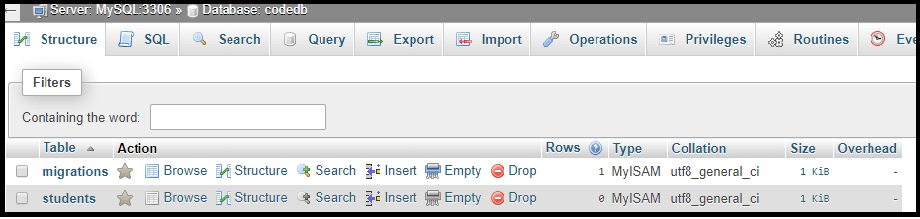
In this image, there are two tables: - migrations and students.
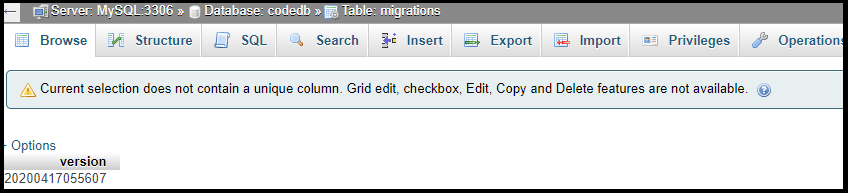
A migrations table that contains the version of the migrated table in the database, as shown below.
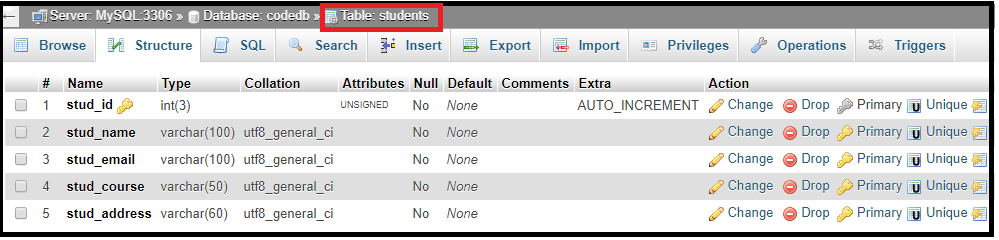
Whereas, the table of students shows the structure of the table as defined in the file 200417020541_create_student.php. You can also check the structure of the students table by clicking on the database table that shows the image below.
Delete table from the Database:
If you want to delete the migration table, create a Migration_controller.php file in the application/controllers folder and write the following program as shown below:
Migration_controller.php
<?php
 defined(' BASEPATH ') OR exit('No direct script access allowed');
 class Migration_controller extends CI_Migration
 {
 public function down()
         {
         echo "<title> Tutorial and Example </title>";
         $this->load->library('migration'); // load migration class
         $delete_table = $this->dbforge->drop_table('students'); // pass the table name
         if($delete_table == true)
         {
         echo "Your table has been successfully deleted ";
         }
         else
         {
                 echo "Table is not deleted";
         }
         }
 }
 ?>
To run the program in the localhost by invoking the URL localhost/CodeIgniter-3.1.11/index.php/Migration_controller/down; it shows the output,as shown below.
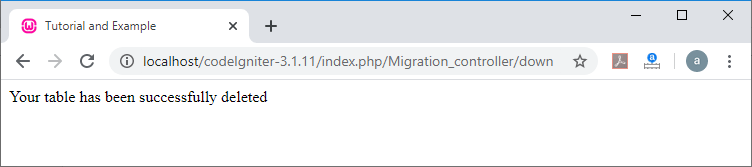
You can also see if the table of students has been removed from the database. In that database, you will find only the migration table which stores the version number and the last update details, which is given below.

Class References:
There are various class references available in the migration class:
- current(): As the name suggests, it is used to show the current version of the migration file that is set to $config["migration_version"] in application/configuration/migration.php.
- error_string(): As the function defines, it is used to display an error message that was detected while running the migration file.
- find_migrations(): A find_migration () function is used to return all migration files in the array format that found in the migration_ path.
- latest(): It works similar to the current () function except that it returns the latest string version on the success of the migration found in the filesystem.
- version(): A version() function is similar to current(), except that it is used to set the specific version to a migration file.
Syntax
$this->migration->version(6);