Mouse and Keyboard Controls in Selenium WebDriver
Mouse and Keyboard Controls in Selenium WebDriver
In this tutorial, we will learn about how to handle mouse and keyboard event using action class in selenium WebDriver.
Action Class in Selenium WebDriver:
Action is an advance class available in interactions package, which is used to perform user interactions operations like a double click, right-click, and drag and drop, etc.
So, whenever we create an object actions class, we should pass driver object, because an action class required browser object (driver) to have a control on the browser.
Action class method:
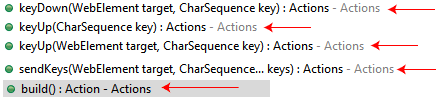
Some of the action class methods in the selenium WebDriver are given below-
To access the action class in selenium web driver first, we have to create an object to the action class
Actions act=new Actions(driver);
After that, we will use the action class control,
Here,
build(): It is used to compile multiple actions at a time and ready to perform.
perform(): this method is used for every action class controls or method because it will take care of the execution of the action class controls.
Note: whenever we are using action class in selenium WebDriver, we will compulsory use the build() and perform() methods.
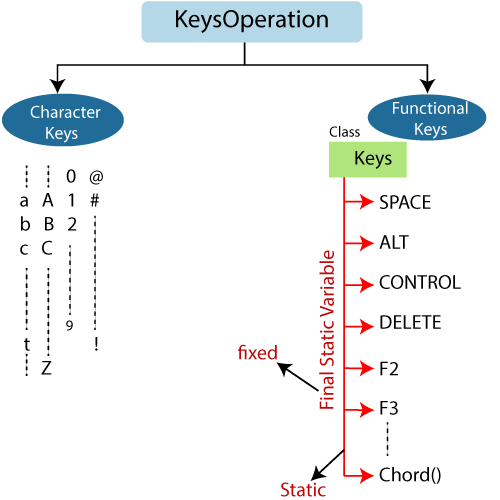
Keyboard event method available in action class of selenium WebDriver:
Some of the following are the keyboard controls of action class:-
| Keyboard control | Description | Command | Syntax | Example |
| sendKeys(): | It is also available in the action class, which is used to perform the function keyboard operation by taking help of the key class. | senKeys(WebElement target,charSequence...key):Actions | wb.sendKeys(“value of keyborad operation”); Here, wb is the object of the action class. | wb.sendKeys(“abc”) Where abc is the character keys. |
| keyDown(): | It is used to send the key press without releasing it. | keyDown(WebElement taget, CharSequence key):Actions | wb.sendKeys(“value of keyborad operation”); | wb.sendKeys(Keys.ENTER,Keys.ALT); Where Alt and Enter keys are the functional key operation of the keyboard. |
| keyUP(): | It is used to perform a key release. | keyUp(WebElement target, CharSequence key):Actions | wb.sendKeys(“value of keyborad operation”); | wb.sendKeys(Keys.SHIFT,Keys.CONTROL); Where Shift and Control keys are the functional key operation of the keyboard. |
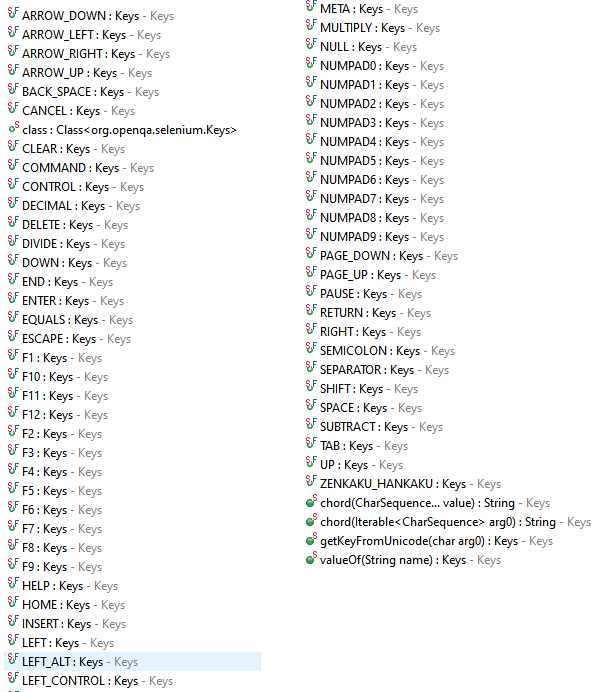
Some of the key class methods are as follows,
Let us see one sample test case, where we are handling the keyboard operation using an action class in selenium WebDriver.
In this example, we are working with the concurrent keyboard operations,
Open the Eclipse IDE and the existing test suite new_test, which we have created in WebDriver Installation section of the WebDriver tutorial.
Then, right-click on the src folder and create a new Class File from New → Class.
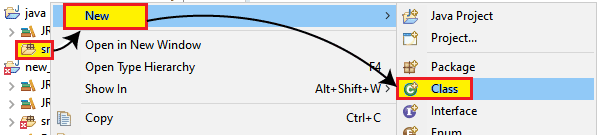
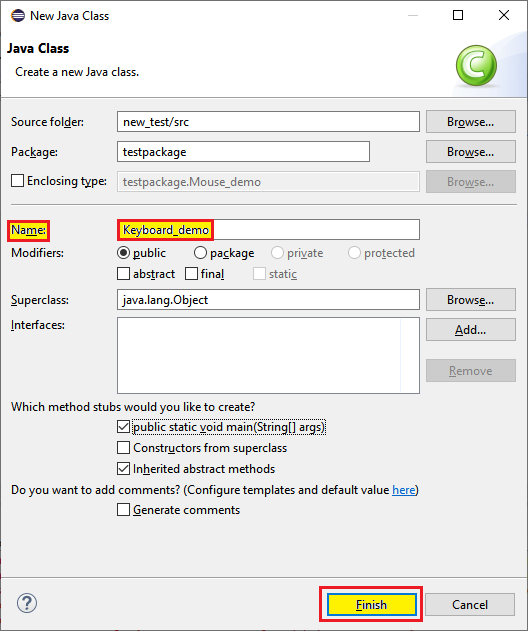
- Give the Class name as KeyBoard_demo and click on the Finish button.
For our testing purpose, we are using the login page of yahoo to perform all the keyboard operations in selenium WebDriver,
In this test case, we will automate the following test scenarios:
| Steps | Action | Method Used | Input | Excepted Result |
| 1. | Open the Firefox Browser. | System.setProperty() | The Firefox browser must be opened. | |
| 2. | Navigate to the yahoo login page. | get() | https://login.yahoo.com/ | The yahoo home page must be displayed. |
| 3. | Identify the username textbox. | Username=admin | The username textbox should be identified, and the value should be passed. | |
| 4. | Create an object of the action class and using the action class taking the mouse control. | doubleClick() | The action class object should be created, and the mouse event will be performed in the browser. | |
| 5. | Execute the keyboard operation. | sendKeys() Keys.chord Keys.CONTROL Keys.TAB | Keyboard operations should be performed. | |
| 6. | Close the Browser | close() | The browser should be closed. |
Step1:
To launch the Firefox browser, we need to download the geckoDriver.exe file and set the system property to the path of geckoDriver.exe file.
Here is the code for setting the system property for the Firefox:
//set the system property of gecko driver
System.setProperty("webdriver.gecko.driver","C:\\Users\\JTP\\Downloads\\geckodriver-v0.25.0-win64\\geckodriver.exe");
// create driver object Firefox browser
WebDriver driver=new FirefoxDriver();
Step2:
Now, we will navigate to the desired URL:
//navigate to Amazon home page.
 driver.get("https://login.yahoo.com/");
Step3:
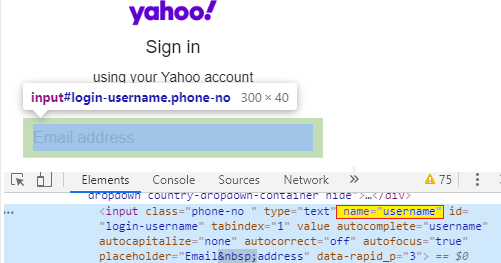
First, we will identify the username textbox on the yahoo login page, so right-click on the username textbox, and select the Inspect option, which is as shown below.

The developer tool window will be launched with all the specified code used in the development of the username textbox, and copy the value of its name attribute. i.e., “username.”
Here the sample code,
//identify the username textbox
WebElement wb=driver.findElement(By.name("username"));
wb.sendKeys("admin");
Thread.sleep(2000);
Step4:
Now, we are moving our next steps, where we are creating the action class object and use the mouse control.
Here the sample code,
//create object to action class
Actions act= new Actions(driver);
//using action class control, take the mouse control
act.doubleClick(wb).perform();
Step5:
After creating the action class object, we will execute the key operation,
Here the sample code,
//execute the keyboard operation
act.sendKeys(Keys.chord(Keys.CONTROL,"c")).perform();
Thread.sleep(3000);
System.out.println("key operation is performed 1");
act.sendKeys(Keys.TAB).perform();
Thread.sleep(3000);
System.out.println("key operation is performed 2");
Step6:
Finally, we terminate the process and close the browser.
 //Close the browser
 driver.close();
Our final test script look like this:
package testpackage;
import org.openqa.selenium.By;
import org.openqa.selenium.Keys;
import org.openqa.selenium.WebDriver;
import org.openqa.selenium.WebElement;
import org.openqa.selenium.firefox.FirefoxDriver;
import org.openqa.selenium.interactions.Actions;
public class Keyboard_demo {
public static void main(String[] args) throws InterruptedException {
// System Property for gecko Driver
System.setProperty("webdriver.gecko.driver","C:\\Users\\JTP\\Downloads\\geckodriver-v0.25.0-win64\\geckodriver.exe");
// create an object for FirefoxDriver class.
WebDriver driver=new FirefoxDriver();
driver.get("https://login.yahoo.com");
//identify the username textbox
 WebElement wb=driver.findElement(By.name("username"));
 wb.sendKeys("admin");
 Thread.sleep(2000);
 //create object to action class
  Actions act= new Actions(driver);
 //using action class control, take the mouse control
  act.doubleClick(wb).perform();
 //execute the keyboard operation
 act.sendKeys(Keys.chord(Keys.CONTROL,"c")).perform();
 Thread.sleep(3000);
 System.out.println("key operation is performed 1");
 act.sendKeys(Keys.TAB).perform();
 Thread.sleep(3000);
 System.out.println("key operation is performed 2");
 //close the browser
 driver.close();
 }
 }
Note: Here, chord() is used to perform the concurrent keyboard operation on the browser.
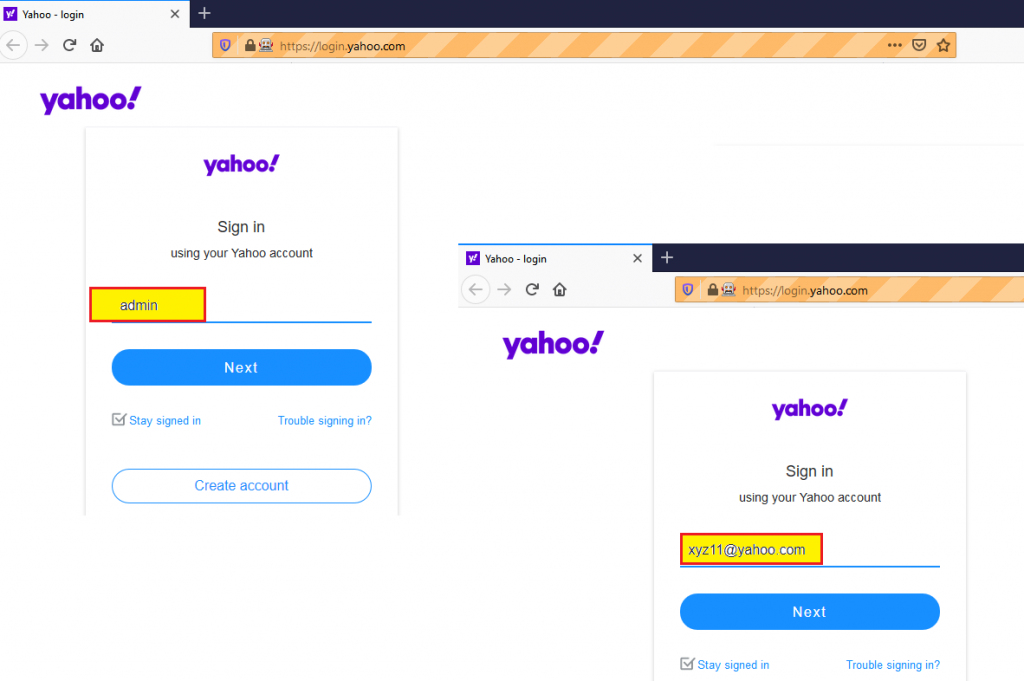
After running this above test script successfully, it launched the Firefox browser and automated all the test scenarios, which is as shown below:
Example2 (AUTO-SUGGESTION EDIT BOX)
In this example, we will try to work with the autosuggest edit box, and then we will also capture all the suggestions available in the edit box in the console window of Eclipse IDE.
Follow the below steps,
For our testing purpose, we are taking the Google Search Home Page to write the data into the auto suggestion edit box.
- Open URL https://www.google.com
- Identify the Google search box of the Google home page.
- Identify the auto-suggestion box.
- Capture all the data which comes under the autosuggestion box.
- Close the browser.
Follow the same process as to set the system property for the Google Search browser.
- Now, we will navigate to the desired URL:
//navigate to Google Home page
 driver.get("https://www.google.com ");
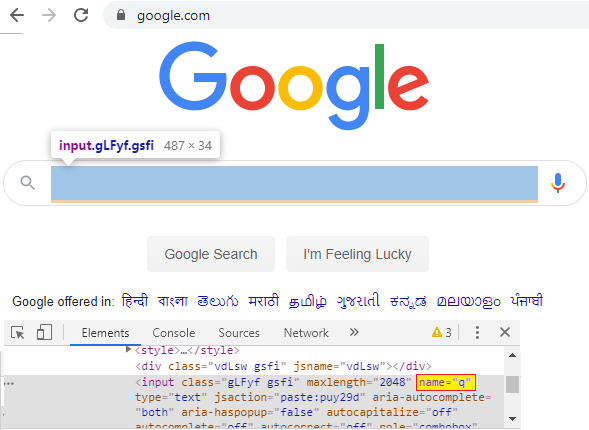
- First, we will identify the Google search box on the Google home page and select the Inspect element field.
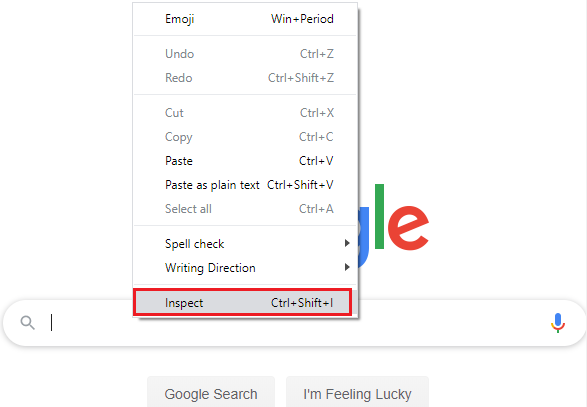
The developer tool window will be launched, with all the specific codes used in the development of the Google search box.
And copy the value of name attribute, i.e. “q.”
Here, the sample code:
//write data in to the auto suggest edit box
 driver.findElement(By.name("q")).sendKeys("wipro jobs");
 Thread.sleep(3000);
- Now, we are moving our next step, where we are capturing the data that comes in the autosuggestion box.
- Before capturing the data comes under the autosuggestion box, we will identify the auto-suggestion box with the help of customize XPath locator.
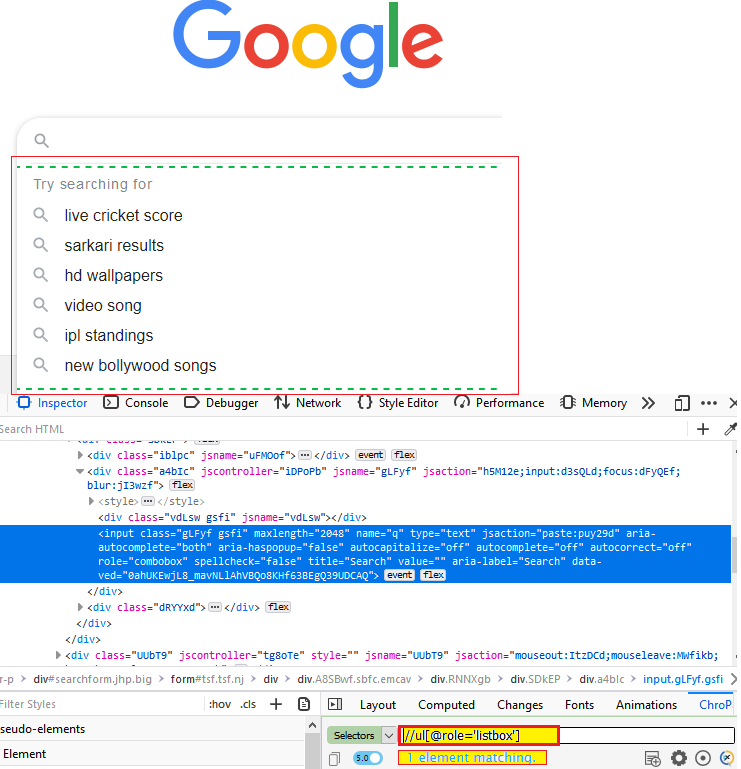
Here the sample code,
//capture all the operation from the auto suggest
 List<WebElement>lst=driver.findElements(By.xpath("//ul[@role='listbox']/li"));
 Thread.sleep(3000);
 //display all the auto suggestion option name
 for(int i=0;i<lst.size(); i++)
 {
 System.out.println(lst.get(i).getText());
 }
- And after that, we are creating an action class object and press the ENTER key operation.
Here the sample code,
//create object to action class
 Actions act=new Actions(driver);
 //pass the enter key operation
 act.sendKeys(Keys.ENTER).build().perform();
 Thread.sleep(3000);
- Finally, we terminate the process and close the browser.
 //Close the browser
driver.close();
Our final test script look like this:
package testpackage;
import java.util.List;
import java.util.concurrent.TimeUnit;
import org.openqa.selenium.By;
import org.openqa.selenium.Keys;
import org.openqa.selenium.WebDriver;
import org.openqa.selenium.WebElement;
import org.openqa.selenium.chrome.ChromeDriver;
import org.openqa.selenium.interactions.Actions;
public class Auto_suggest {
public static void main(String[] args) throws InterruptedException {
// System Property for gecko Driver
System.setProperty("webdriver.chrome.driver", "C:\\Users\\JTP\\Downloads\\chromedriver_win32\\chromedriver.exe");
//create driver class object
WebDriver driver = new ChromeDriver();
//maximize the browser
driver.manage().window().maximize();
//delete all the cookies
driver.manage().deleteAllCookies();
//navigate to the url
driver.get("https://www.google.com");
//write data in to the auto suggest edit box
driver.findElement(By.name("q")).sendKeys("wipro jobs");
Thread.sleep(3000);
//capture all the operation from the auto suggest
List<WebElement>lst=driver.findElements(By.xpath("//ul[@role='listbox']/li"));
Thread.sleep(3000);
//display all the auto suggestion option name
for(int i=0;i<lst.size(); i++)
{
System.out.println(lst.get(i).getText());
}
//create object to action class
Actions act=new Actions(driver);
//pass the enter key operation
act.sendKeys(Keys.ENTER).build().perform();
Thread.sleep(3000);
//close the browser
driver.close();
}
}
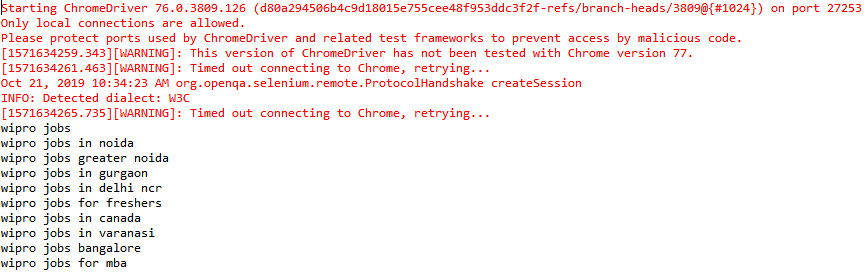
- After running this above test script successfully, it launched the Google Chrome browser and automated all the test scenarios, which is as shown below:
And
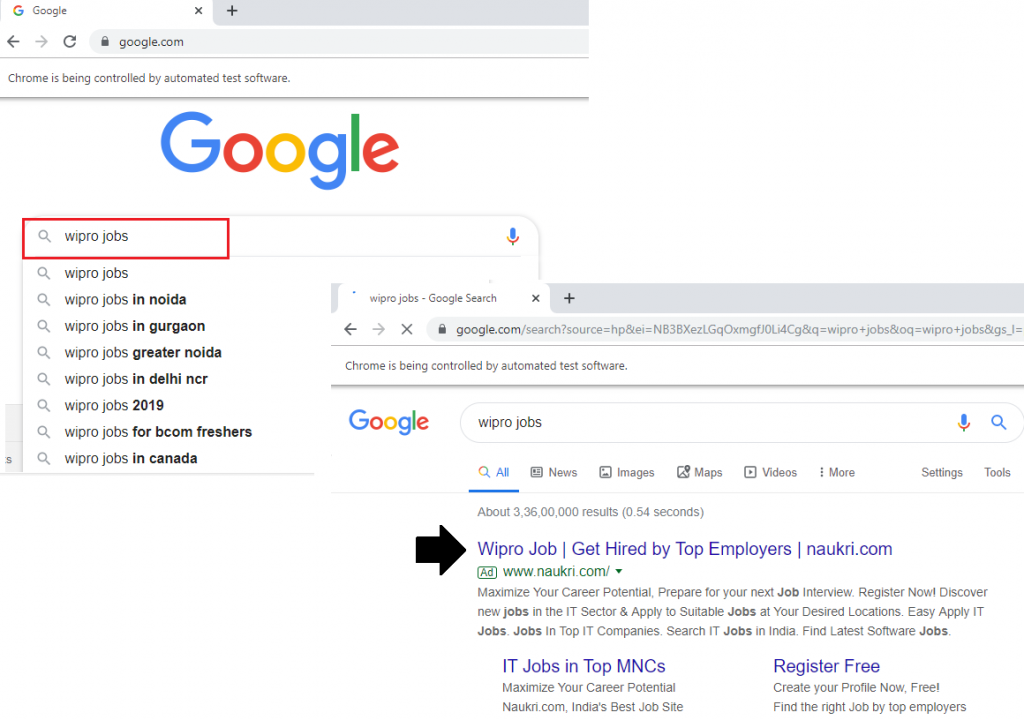
And capture all the auto suggestion which is as shown below:
Mouse Event Handling
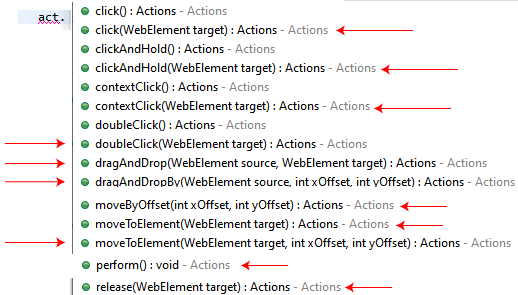
Mouse event method available in the action class:
Following are the mouse control methods of the action class:-
| Mouse controls | Description | Commands |
| click(): | It is used to click on the element at the current mouse location. | click(WebElement target):Actions |
| doubleClick(): | It is used for double click on the element at the current mouse location. | doubleClick(WebElement target):Actions |
| contextClick(): | It is used for context click (right –click) operation on the browser. | contextClick(WebElement target):Actions |
| clickAndHold(): | This method is used for clicks at the mouse location (without releasing it). | clickAndHold(WebElement target):Actions |
| dragAndDrop(): | This method is used to drag the element from the source and drop it to the target. | dragAndDrop(WebElement source,WebElement target):Actions |
| dragAndDropBy(): | It is used to click and hold the location of the source element, and moves by a given offset. | dragAndDropBy(WebElement source ,intxOffset, intyOffset):Actions |
| moveToElement(): | It is used to take a mouse cursor to the middle of the element. | moveToElement(WebElement target):Actions |
| moveByOffset(): | It is used to moves the mouse from its current position or (0, 0) by the given offset. | moveToOffset(int xOffset, intyOffset):Actions |
| release(): | It is used to release the left click mouse operation which is in the pressed state. | release(WebElement target):Actions |
Let us see one sample test case, where we are handling the Mouse operation using an action class in selenium WebDriver.
Firstly, open the Eclipse IDE and the existing test suite new_test, which we have created in WebDriver Installation section of the WebDriver tutorial.
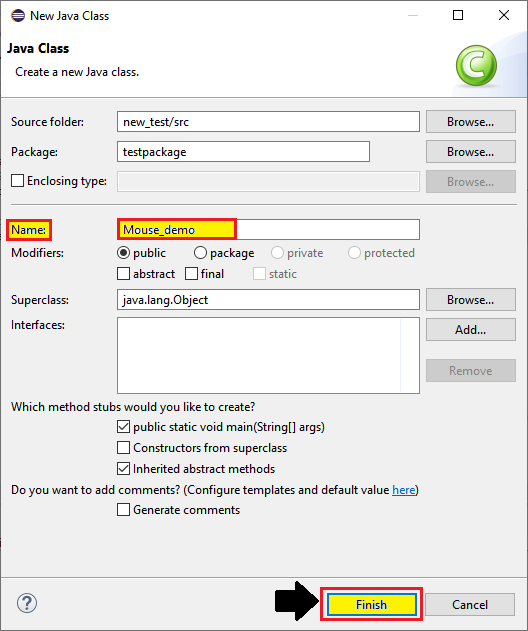
Then, right-click on the src folder and create a new Class File from New ? Class.

- Give the Class name as Mouse_demo and click on the Finish button.
For our testing purpose, we are using the Amazon Home Page to perform all the mouse events in selenium web driver,
In this test case, we will automate the following test scenarios:
| Steps | Action | Method Used | Input | Excepted Result |
| 1. | Open the Firefox Browser. | System.setProperty() | The Firefox browser must be opened. | |
| 2. | Navigate to the Amazon home page. | get() | https://www.amazon.in/ | The Amazon home page must be displayed. |
| 3. | Identify the Best sellers link using XPath Locator. | The Best sellers link should be identified. | ||
| 4. | Create an object of the action class and using action class taking the mouse control. | moveToElement() | The action class object should be created, and the mouse event will be performed in the browser. | |
| 5. | Close the Browser | close() | The browser should beclosed. |
We are creating our test case step by step to give you a complete understanding of mouse control Commands in WebDriver.
Step1:
To launch the Firefox browser, we need to download the geckoDriver.exe file and set the system property to the path of geckoDriver.exe file.
Here is the code for setting the system property for the Firefox chrome:
//set the system property of gecko driver
System.setProperty("webdriver.gecko.driver","C:\\Users\\JTP\\Downloads\\geckodriver-v0.25.0-win64\\geckodriver.exe");
// create driver object Firefox browser
WebDriver driver=new FirefoxDriver();
Step2:
Now, we will navigate to the desired URL:
//navigate to Amazon home page.
driver.get("https://www.amazon.in");
Step3:
First, we will identify the Best Sellers link on the Amazon home page, so right-click on the hyperlink field, and select the Inspect option to identify the web link, which is as shown below.
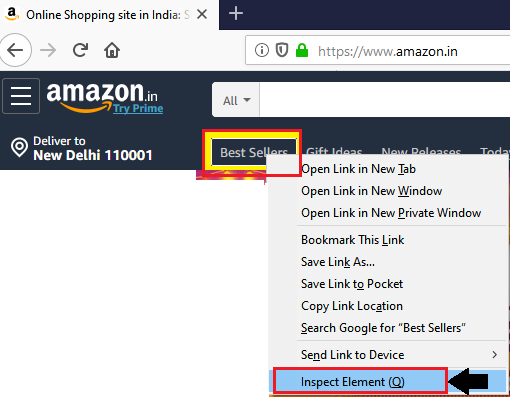
For locating the hyperlinks on the web page, we will go to the chropath and copy the value of relative XPath locator, and notice that the Html code belongs to the best seller hyperlink got highlighted in the developer tool window, which is as shown in the below snapshot:
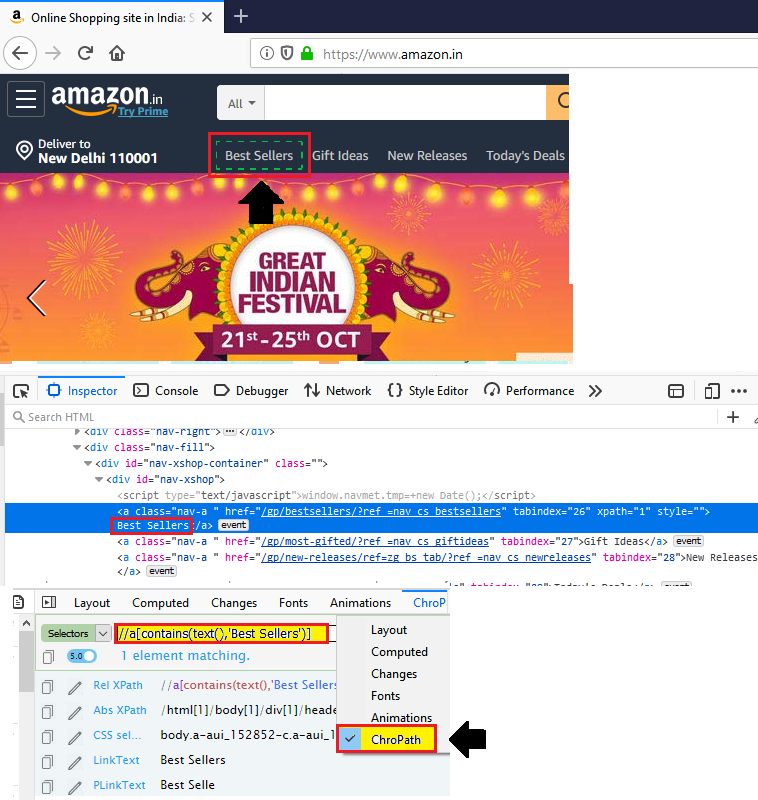
 //identify the element
 WebElement wb=driver.findElement(By.xpath("//a[contains(text(),'Best Sellers')]"));
Step4:
Now, we are moving our next steps, where we are creating the action class object and used the mouse control.
 //create object to action class
  Actions act= new Actions(driver);
 //using action class control, take mouse control
 act.moveToElement(wb).build().perform()
 wb.click();
 Thread.sleep(3000);
Step5:
Finally, we terminate the process and close the browser.
 //Close the browser
driver.close();
Our final test script will look like this:
package testpackage;
import org.openqa.selenium.By;
import org.openqa.selenium.WebDriver;
import org.openqa.selenium.WebElement;
import org.openqa.selenium.firefox.FirefoxDriver;
import org.openqa.selenium.interactions.Actions;
public class Mouse_demo {
public static void main(String[] args) throws InterruptedException {
// System Property for gecko Driver
System.setProperty("webdriver.gecko.driver","C:\\Users\\JTP\\Downloads\\geckodriver-v0.25.0-win64\\geckodriver.exe");
// create an object for FirefoxDriver class.
WebDriver driver=new FirefoxDriver();
driver.get("https://www.amazon.in");
//identify the element
WebElement wb=driver.findElement(By.xpath("//a[contains(text(),'Best Sellers')]"));
//create object to action class
Actions act= new Actions(driver);
//using action class control, take mouse control
act.moveToElement(wb).build().perform();
wb.click();
Thread.sleep(3000);
//close the driver
driver.close();
}
}
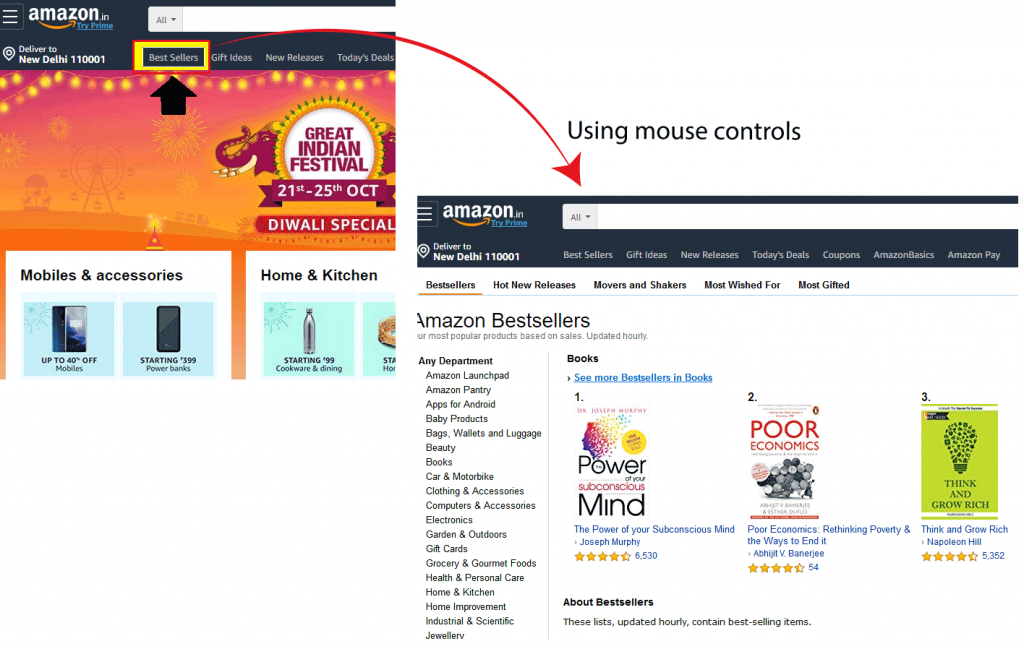
After running the above test script successfully, it launched the Firefox browser and automated all the test scenarios, which is as shown below:
Example2 (Right-Click Operation):
In this example, we will try to perform right-click operation with the help of the action class in selenium web driver.
Follow the below steps,
For our testing purpose, we are taking the Google Home Page application.
- Open URL https://www.google.com.
- Identify the Gmail link, which is present in the right corner of the Google home page.
- Perform right-click operation on it.
- Close the browser.
- Now, we will navigate to the desired URL:
//navigate to Google Home page
driver.get("https://www.google.com ");
- First, we will identify the Gmail link in the Google home page and select the Inspect element field.
The developer tool window will be launched, with all the specific codes used in the development of the Gmail Link.
And copy the value of Link Text, i.e., “Gmail.”
Here, the sample code:
//identify the Gmail link
WebElement lnkwb=driver.findElement(By.linkText("Gmail"));
- Now, we are moving our next step, where we are creating the action class object.
//create object to action class
Actions act=new Actions(driver);
//pass the enter key operation
act.contextClick(lnkwb).sendKeys("T").build().perform();
Thread.sleep(3000);
- Finally, we terminate the process and close the browser.
 //Close the browser
 driver.close();
Our final test script will look like this:
package testpackage;
import java.util.concurrent.TimeUnit;
import org.openqa.selenium.By;
import org.openqa.selenium.Keys;
import org.openqa.selenium.WebDriver;
import org.openqa.selenium.WebElement;
import org.openqa.selenium.firefox.FirefoxDriver;
import org.openqa.selenium.interactions.Actions;
public class Right_click_operation {
public static void main(String[] args) throws InterruptedException {
// System Property for gecko Driver
System.setProperty("webdriver.gecko.driver","C:\\Users\\JTP\\Downloads\\geckodriver-v0.25.0-win64\\geckodriver.exe");
// create an object for FirefoxDriver class.
WebDriver driver=new FirefoxDriver();
driver.manage().timeouts().implicitlyWait(20,TimeUnit.SECONDS);
//navigate to the URL
driver.get("https://www.google.com");
//identified the Gmail link
WebElement lnkwb=driver.findElement(By.linkText("Gmail"));
//create object to action class
Actions act=new Actions(driver);
//pass the enter key operation
act.contextClick(lnkwb).sendKeys("T").build().perform();
Thread.sleep(3000);
//close the browser
driver.close();
}
}
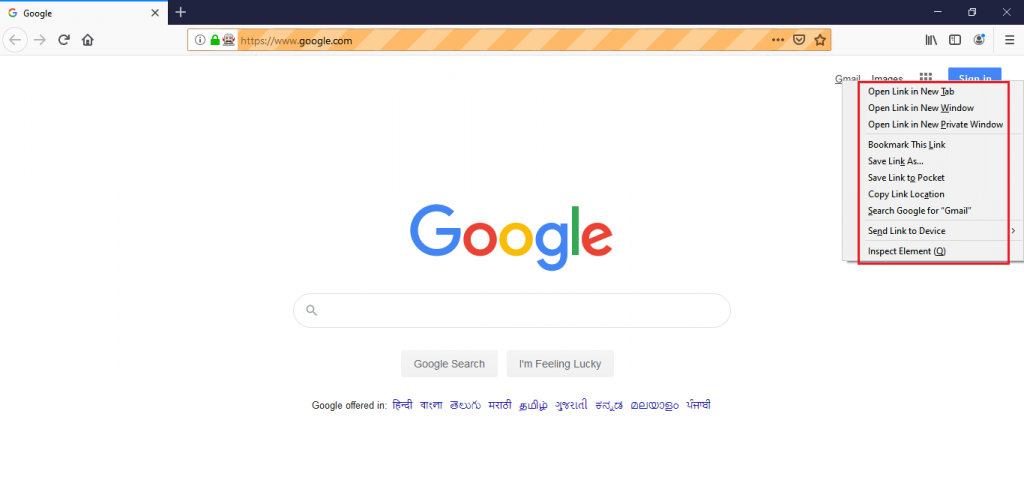
- After running this above test script successfully, it launched the Firefox browser and automated all the test scenarios, which is as shown below: