How to remove duplicate values from excel?
Remove duplicate values from excel
Duplicate values occur when the same date or set of values is repeated in your Excel sheet. While working with Excel sheets many a time, the user mistakenly copies data or rows. Duplicate values happen to be a problem that can lead to errors; thus, degrading the result. This can be a very monotonous, time-consuming, and repetitive task, but Microsoft Excel provides different tricks to make the duplicates elimination process simpler.
Remove Duplicate Values
Excel provides an inbuilt feature to find and remove the duplicate value. Execute the below steps for identifying and deleting values in Excel:
- Select your data in Excel or directly press the shortcut keyword CTRL + A.

- In the Excel Ribbon tab, select data tab-> Data Tools -> Remove duplicates

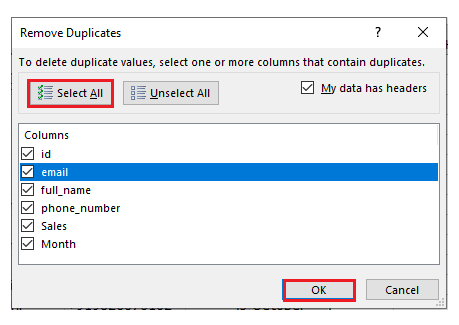
- The Remove Duplicates dialog box appears. The first row is deselected by default. You can select it by unchecking the ‘My data has headers’ option. The next step is to check all the ‘Columns’ options and click on OK.
- A prompt will pop up, displaying the figures of duplicate values found and removed and the remaining unique values.

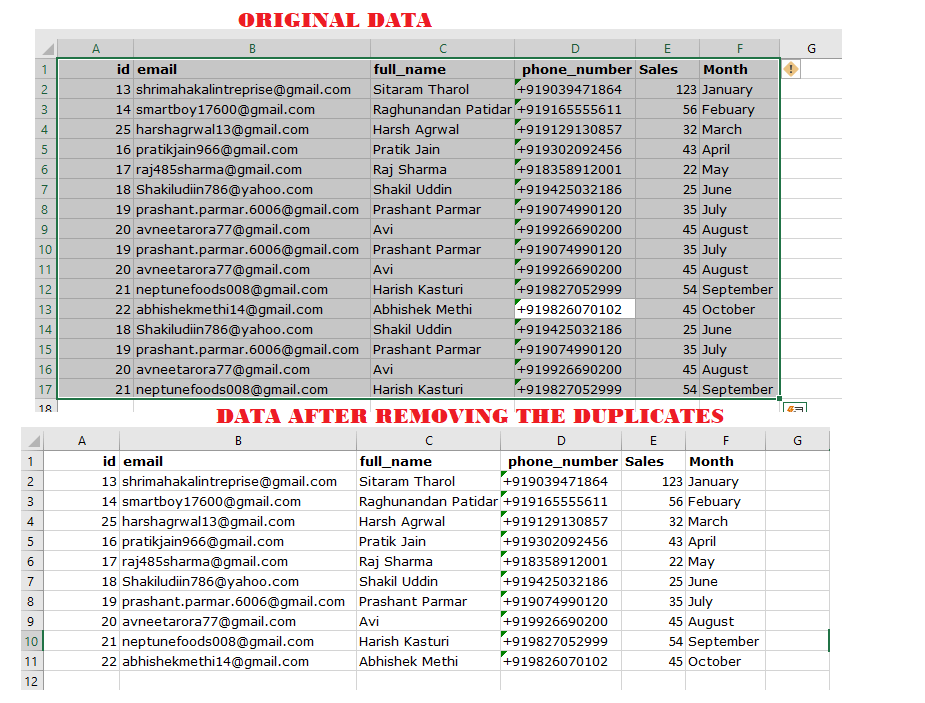
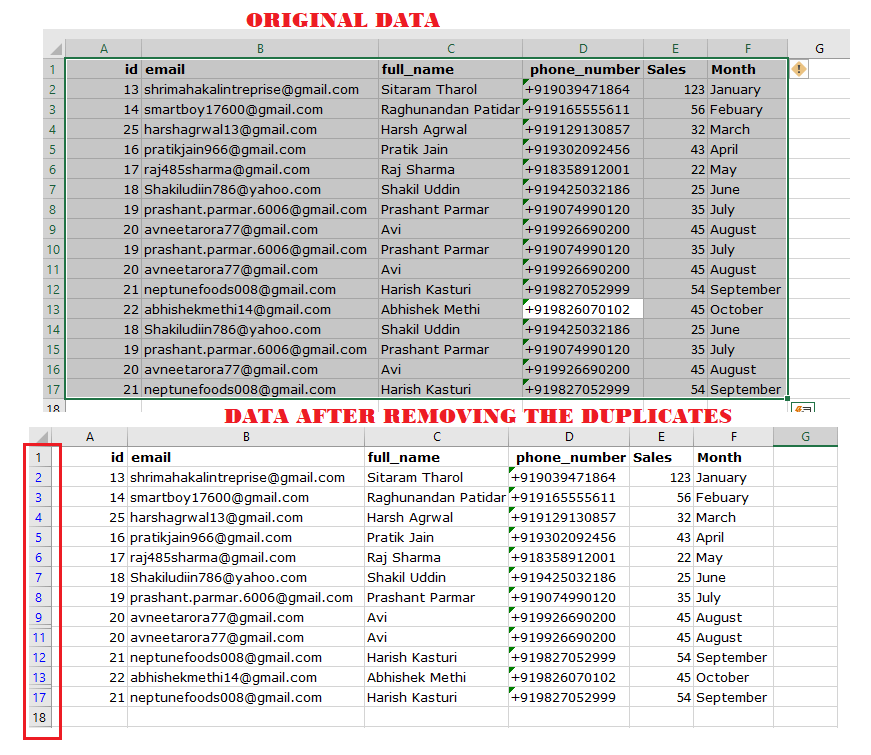
- Excel will remove all the duplicate values. The identical value that indexes first will be kept, and rest all the duplicated will be removed. In the below image, we have compared both the data for your reference.
Excel Advanced Filtering Method
The second way to get rid of the duplicate values is by using the Advanced Filtering method. This method was added to the Microsoft Excel version 2003. It is a handy method of eliminating duplicate data and, at the same time, creating a copy of the Excel data. But advanced filters will only be able to perform this on the entire table. Let’s learn the step by step process for executing this method:
- The first step is to select your data in Excel or directly press the shortcut keyword CTRL + A.
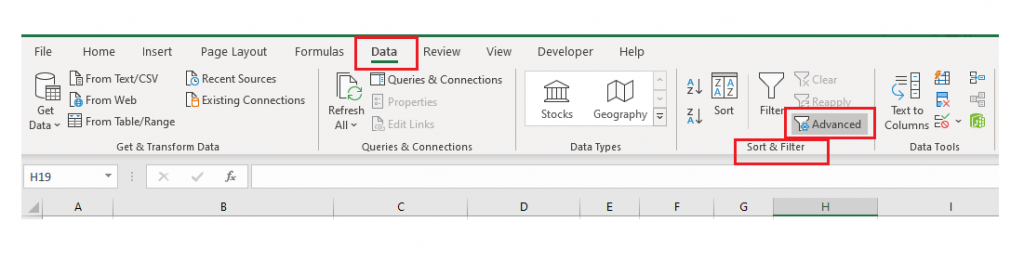
- From the Excel ribbon toolbar, select Date-> Sort & Filter -> Advanced.
- The Advanced Filter window will pop up. The ‘Action’ comprises two values, i.e., filter and copy. Here we have selected the filter option. If you want, you can either choose the Copy action to replicate the source data to another location. Filtering the data list will hide rows containing any duplicates while copying to another location will create a copy of the data.
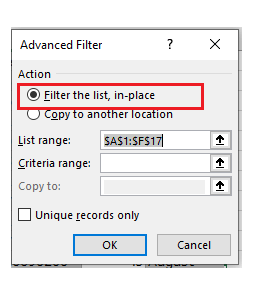
- By default, the listed range is automatically filled by Excel (as per the selected cells). But still, the user can adjust the listed range as per his requirements. Although it contains the first row in the listed range, but this method atomically detects the first row for headers. You have to remove the duplicated from the first row manually.

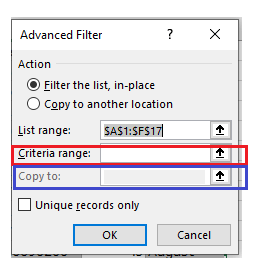
- The Criteria range is optional can be left blank. This option is used to set any chosen criteria for a specific cell range. The ‘Copy to’ field option is filled to allocate the space where the data will be stored. But as we have not selected the ‘Copy action’ so here it is omitted.
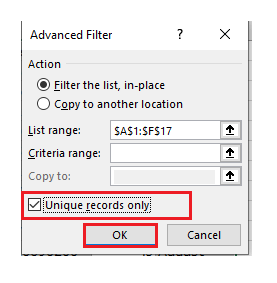
- Check the box for Unique records only. It will remove all the duplicate value and will only restore the unique data. Click on OK.
- All the duplicate values have been eliminated from the Excel sheet. You will notice the row number containing the duplicate data has also been removed.
Removing Duplicates Using a Formula
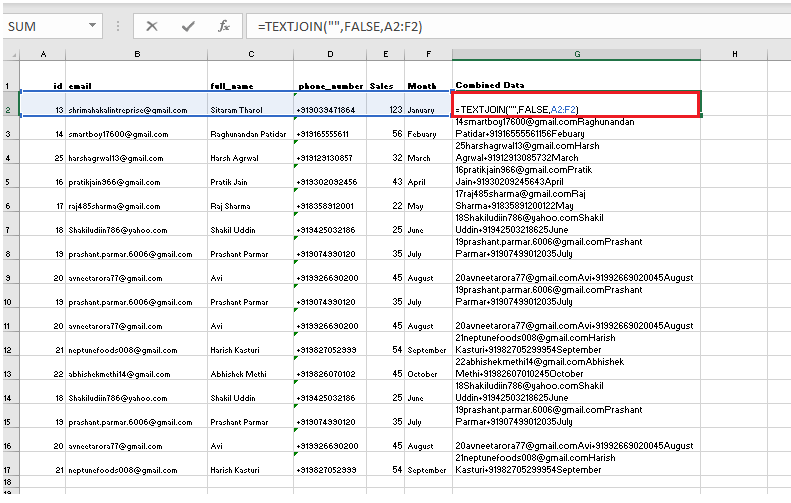
Microsoft also provides an alternative formula method to help you find and remove duplicate values from your Excel data. To use this method, an additional helper column is added that combines all the data from different columns. Let’s check the steps to execute the formula method:
- The first step is to add a new column wherein we will combine the data from all the columns, and based on the combined details we will define the duplicate values. There are two formula
a.) to directly concatenate all the columns into a single column by using the ampersand operator
Formula used: = [@id] & [@email] & [@full_name] & [@Sales] & [@Month]
b.) The above formula becomes length for a long list of columns. The TEXTJOIN formula can be used as an alternate to concatenate the column’s data.
Formula used: =TEXTJOIN("",FALSE,Col1:ColN)
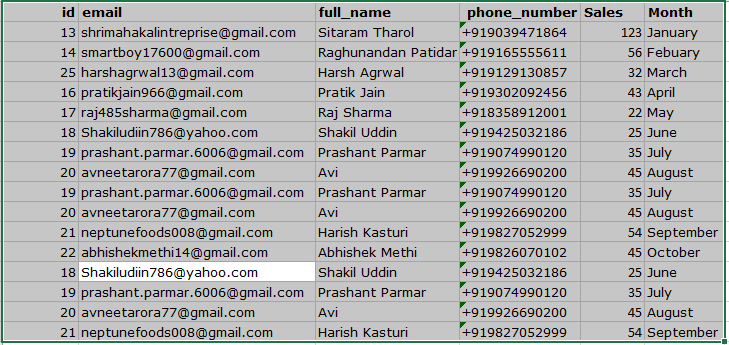
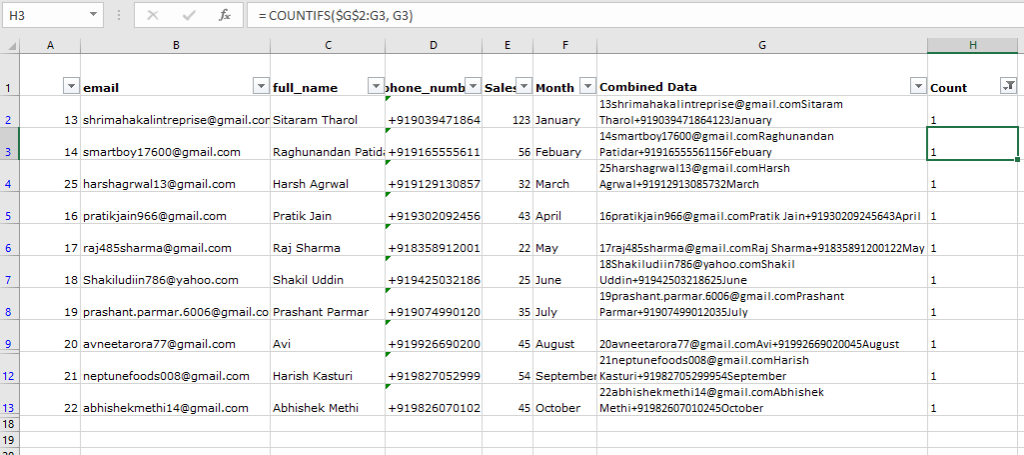
In the below data we have used the TEXTJOIN formula.
- Now, we will add another column to count the number of times the similar values appear in the Excel data. We will use the COUNTIF function.
Formula Used: = COUNTIFS($G$2:G2, G2)
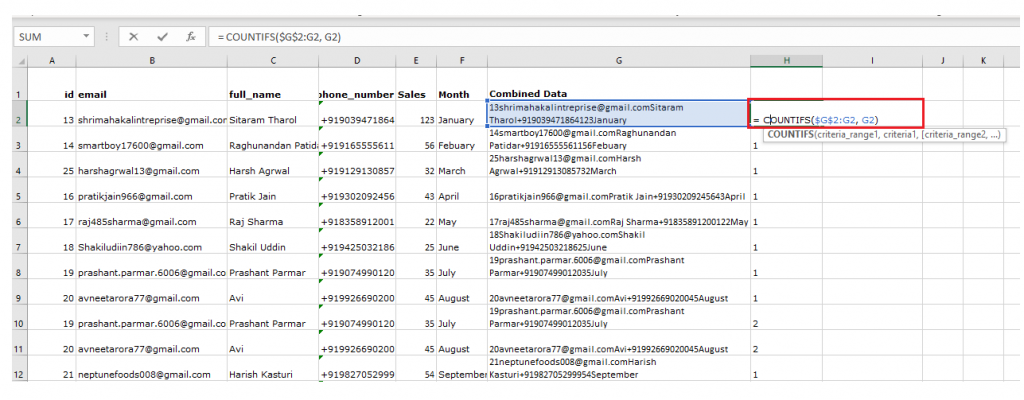
Explanation for the Formula: The COUNTIFS formula will calculate the count of the data. If the count is equal to 1, it signifies that the data is unique, but if the count is equal to 2 or more, it signifies that it is a duplicate value and has to be removed.
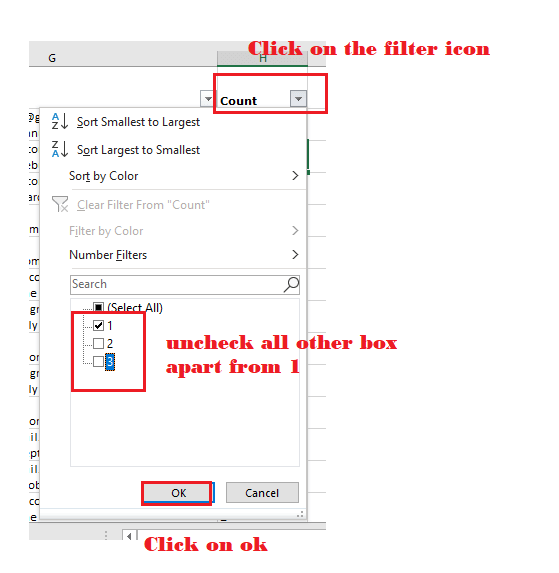
- The third step is to add filters to your Excel data. Under Excel ribbon tab select Data tab -> Sort & Filter-> Filter command or you can directly use the keyword shortcut CTRL + SHIFT + L.

- The filter icon will appear on the top of the headers. You can click on it and select 1. Filtering on 1 will segregate all the unique values and will hide all duplicates values.
- Select the unique data (directly use keyboard shortcut Alt + ;) and paste anywhere in your workbook.
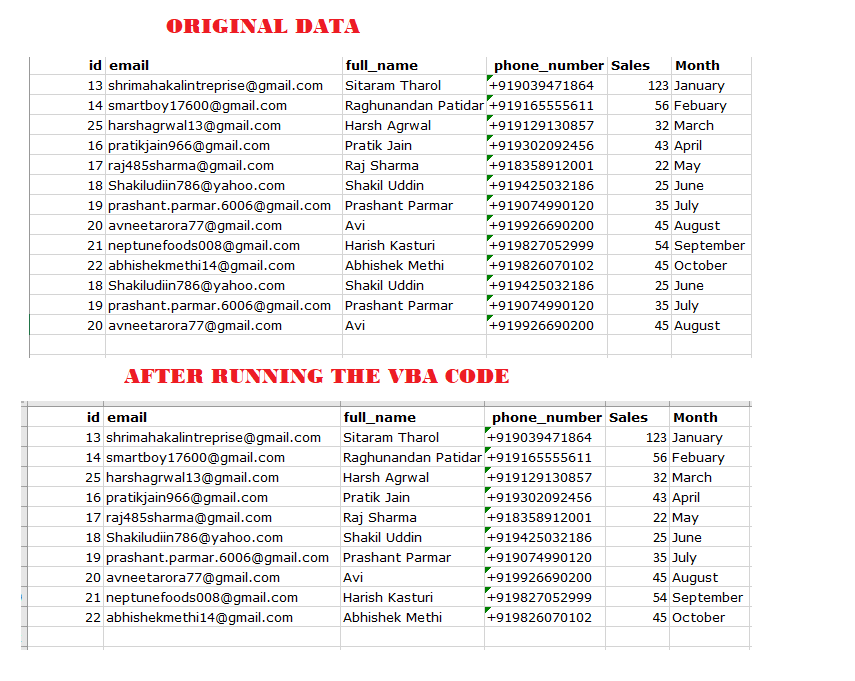
Removing Duplicates using VBA.
Life will be easier if the duplicate excel values are deleted with a click of a button. There is a pre-defined command in VBA for removing duplicate values within your excel data. Follow the below steps to execute your below code.
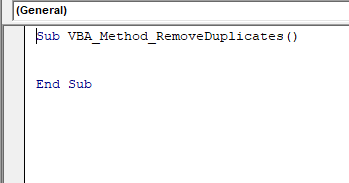
- Start your code with Sub procedure and declare your code name.
Program:
Sub VBA_Method_RemoveDuplicates()
 End Sub
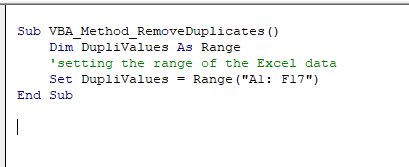
- Declare the range variable and specify the excel data range.
Program:
Sub VBA_Method_RemoveDuplicates()
     Dim DupliValues As Range
     'setting the range of the Excel data
     Set DupliValues = Range("A1: F17")
 End Sub
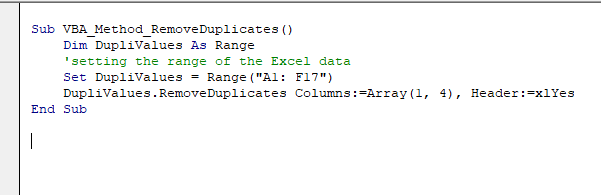
- Now, we will use the RemoveDuplicates method. It has two parameters, i.e., Column (wherein we will specify the column to remove duplicates) and Header (it specifies whether the list has header values or not and takes two values xlYes and xlNo).
Program:
Sub VBA_Method_RemoveDuplicates()
     Dim DupliValues As Range
     'setting the range of the Excel data
     Set DupliValues = Range("A1: F17")
     DupliValues.RemoveDuplicates Columns:=Array(1, 4), Header:=xlYes
 End Sub
Output: