Salesforce Creating and Retrieving Data in UI
Creating and Retrieving Data in UI
The customization that we are going to build would interact with the database.
Let us walk through how a user would create, edit, and view a new Account in our dev org.
Creating and Editing
The pages in the standard UI for both creating and editing records are on the same page. While creating custom interfaces, we can override each individually, providing a separate page, or even the standard page.
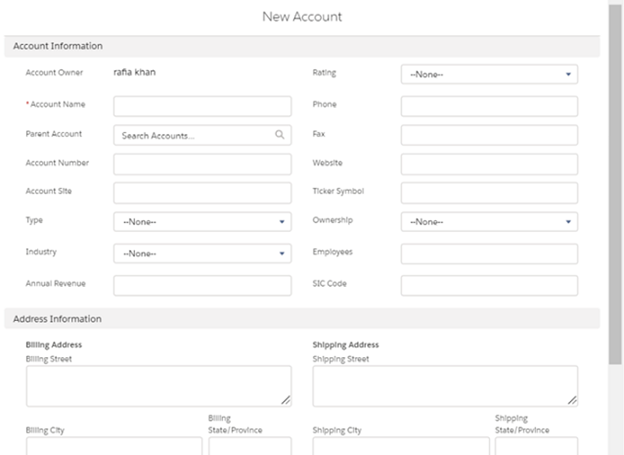
To create a new account, click on the Accounts tab and then the “New” button, which is on the right side of the window.

We should see a form-looking screen with the standard Account fields.
The vertical red bar which is next to “Account Name” indicates that this is a required field, and it is explained with a legend in the section header on the top right.
This only requires a user to fill out the Account name to save a new Account Record. Some-out-of-the-box functionality included with the platform to “Copy Billing Address to Shipping Address”.
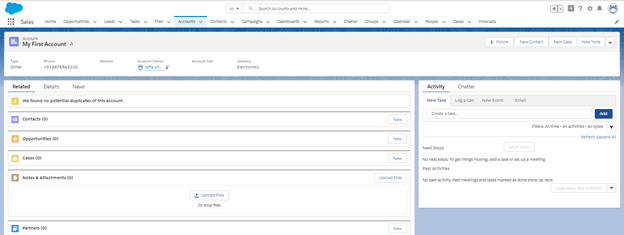
Once we filled our data and hit save, we will be automatically taken to the new record that we have just created.
The Chatter feed at the top and a Related List is used for Contacts.
Related Lists are created when Relational type fields like as a Lookups and Master-Details are created.
A Relational field exists on Contact and points to Account. This is technically a Master-Detail type field, but it is a unique one that is not required like other Master-Detail Fields, and we cannot use the Roll-up Summary formula, but Contacts can be still deleted when their parent Account is eliminated, and their sharing settings are inherited.
Related lists are very useful because they allow us to create associated records quickly. In this case, we can quickly create Contact for this Account record simply by clicking “New Contact”.
Note: Clicking on “Save” while creating a new record that takes us to the view page for the newly created record.
Clicking “Save and New” will accept us to edit another page. We can continue this multiple times, with the final “Save” taking us to the view page for the final record created.
Querying Data
Now, we have created some data (an Account record), and we have seen how to view details about that one record.
Viewing multiple records at once is also possible. To view List Views, which can be filtered, we have to click merely the tab for the object that we wish to view records. We can see a drop-down list of available List Views toward the top of the view area.
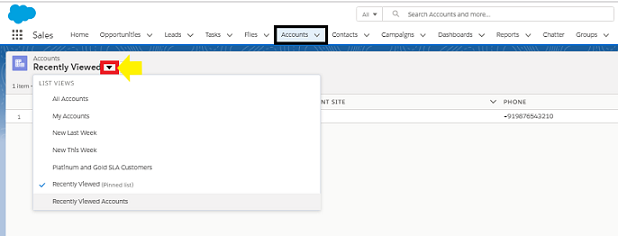
We can also create a new view by clicking the “Create New View” link or edit the existing one with “EDIT”. This takes us to a screen where we can adjust the filters and columns for the given view, but for now, click “Go!”
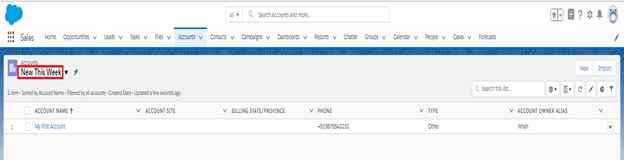
This will show us a list of all Accounts created.
A query, or a “question”, can be issued to the database to retrieve data that matches our criteria.
A query would be same: “Show me <specific data> from all <object records> where <my criteria>”.
In database systems, a query can also be used to create, modify, and delete tables as well as insert, modify, and delete data. In Salesforce, queries are always read-only.
SOQL
The SOQL (Salesforce Object Query Language) is the language that is used to query to the Salesforce database. SOQL is used when the object and the field for which we are querying are known. SOQL is also used more than SOSL in day-to-day development for customizations.
In SOQL, the query to find our recently created Account record will look like this:
Select Id, Name, BillingState from Account where Name = ‘My First Account’.
To open the dev console, we have to click on our name at the top right of our screen and then Developer Console.
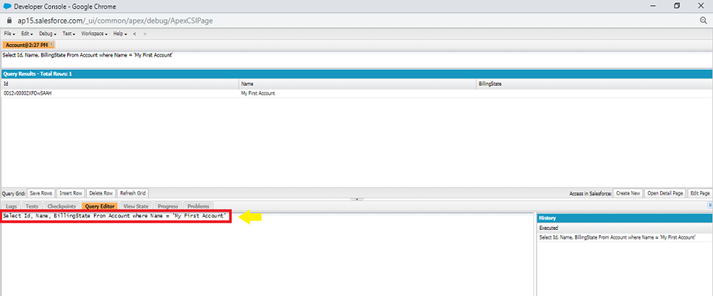
Once it opens, click on the “Query Editor” tab and enter in the query to the top-box where it says “Enter SOQL or SOSL query:” and click “Execute”.
We should see one result that matches the Account recently created unless we define the Billing Address State Field column that would be blank in the query return.
SOSL
Salesforce Object Search Language (SOSL) is used when we don`t know which of the object or fields our results may be in. We could use SOSL to search against Leads and Contacts for records.
Find {Rafia *} In Name Fields Returning Lead(name, phone), contact(ID, name, email)
The above query, would search both Leads and Contacts for all records where the particular type “name” is searched for Rafia * (* is a wildcard SOSL that means it can contain one or many characters. If we know that only one character missing, we can use ? Instead).
If a record name (Rafia) is found in Leads or Contacts, it will be returned with the name and phone number. If it is a Lead, then it is returned with the ID and name. If it is a Contact, then it will be returned with an email.
A record named Rafia would not be returned as a result of this query. We have to keep in mind that SOSL returns a list of records.
Since we are querying against different objects, it needs a way to differentiate resulting records by object type.
The box (SOSL return) contains multiple lists (containers) of different types of chips, Leads, and Contacts, and each represents a record.