Spell Check in Excel
Spell Check in Excel
Microsoft Excel facilities the complete features for examining the work with text. It provides the basic properties for the proper functioning of text, including the spell-check property. The Microsoft Excel spell-check facility is not the same as Microsoft Excel.
It does not facilitate the advanced text features, unlike grammar rectification or underlining of misspelled spelling or auto-correction of the spelling. Excel supports only the basic spell-check version. This feature is often downplayed as Excel is used mostly for numbers and data manipulation. But it still provides more credibility by minimizing your efforts for individually correcting the text data, thus, reducing the chances of spelling errors.
In the below section, let’s understand the execution of Excel spell-check feature:
How to do spell-check in Excel?
There are two ways to execute the spell-check property in Excel (for every Excel versions):
- Ribbon Button
- Keyword Shortcut
Ribbon Button
- Keep your cursor on the spell from where you want to start the spell-check.
- On the review tab-> Select the Spelling option.
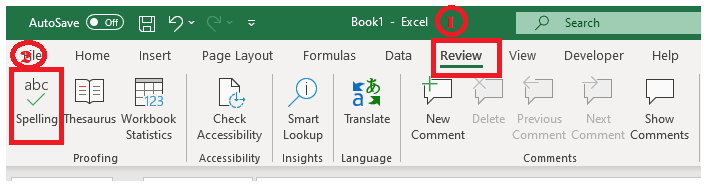
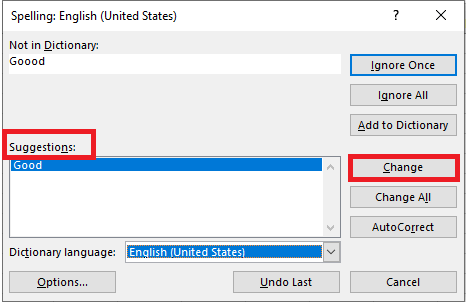
- A dialogue box will appear. Choose the correct option in the suggestion bar and click on the ‘change’ button. And you will notice that the incorrect word will be automatically replaced with the correct one.
- If your sheet contains another error, the spell-check dialogue will again open immediately, suggesting the correct spelling.

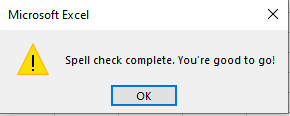
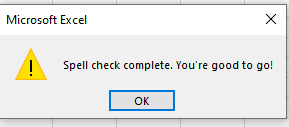
- When the spell-check for the entire sheet is completed, Excel will throw a notification stating, “Spell check complete. You’re good to go!”.
Keyboard Shortcut
To activate spell-check on your worksheet, the user can directly press F7 (keyboard shortcut). Create an Excel sheet and select the cell or range of cells and press the keyboard key F7 or for some systems where F7 has been allotted different task press fn (function) key along with F7.
If text is not a mistake
If the text is not a mistake
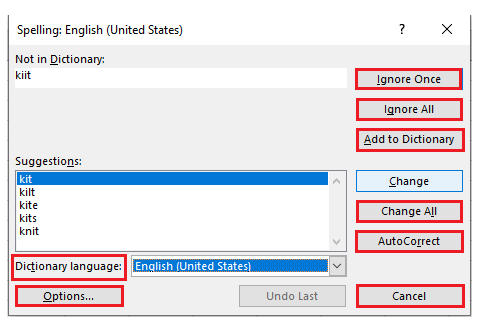
There are many words that are not there in the English dictionary but are not mistakes. There are many methods, functions, shortcuts, or expressions used, which are, by default, considered as a mistake by Excel spell-check. If the text is not really a "mistake," the user can also pick one of the given options:
- Ignore once- This is used to ignore the current text mistake, and this action is performed only once.
- Ignore all- It is used to ignore all the mistakes at once present in the Excel sheet. It saves time and effort of the user.
- Add to Dictionary- If your sheet encounters the word which is not present in the dictionary, but you intend to use it. In that case, you can add that word to the dictionary. This option ensures that the same word won't be treated as a mistake in the future.
- Change All- This option is used to replace all the mistakes same as the current one with the selected suggestion.
- AutoCorrect- This option enables Excel to correct the mistake automatically, which it sees fit.
- Dictionary language- To set another proofing language, select it from the Dictionary language dropbox.
- Options- It is used to review or modify the spell check settings as per your needs and requirements.
- Cancel- This option is used to stop the correction process and close the spell-check dialog box.
Default Setting of Spell-check
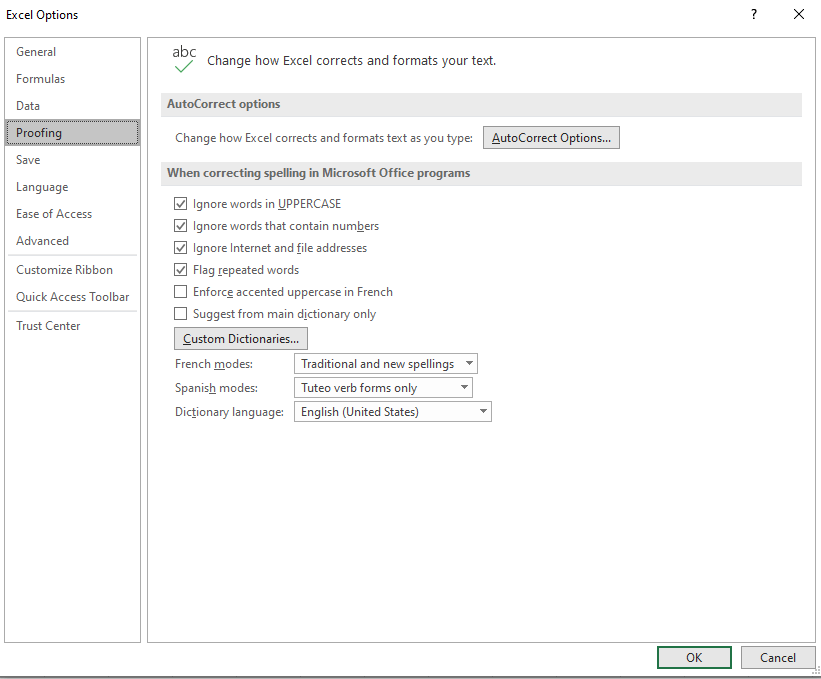
The spell-check dialog box has some default settings which are as follows:
- It ignores the text that is written in the upper case. For example, if the cell has a word GOOD, it will not be considered as an error.
- It ignores the text, which contains numbers in it. For example, if any cell has a word Good123, it will not be considered as an error.
- It ignores IP/file addresses or internet codes.
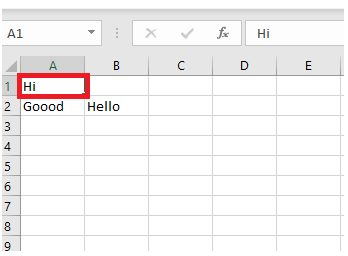
- It flags an error for the repeated words. Hence, DOES NOT ignore repeated. For example, if you have- “Good Morning, Welcome to to my world!” – then the extra ‘to’ will be marked as an error. And the spell-check window will immediately ask you to omit it.
All the above changes are the default settings, and you can change them any time as per your need. Select the option button present at the bottom of the spell-check box to change the setting, select the options button. And the below-given dialog box occurs where you can make the necessary changes.
How Does
Spell Check Works in Excel?
The Excel spell-check works a bit differently for two selection criteria:
- If the user starts with the A1 cell.
If the user selects the foremost cell, i.e., A1, the checking will begin with all the text contained cells in the first row (from left to right). If any cell contains an error, it will display the spell-check dialog box. When the first row is finished, it will automatically jump to the second row, check the text of all the cells in the second row and will jump to the third row, and so on.
- If the user selects any random cell
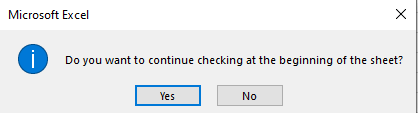
If you randomly select any cell in the worksheet, let’s say C3, then the checking will go through the cells of the same row from left to right and then will move to the row below it. Once all the text-based cells are done with the checking for all the cells after C3, it will display a prompt that asks the user whether he wants to continue checking at the beginning of the sheet.
Spell-check for Entire Workbook
Imagine how easy and short the excel life would be if all the sheets are checked automatically. To execute spelling check, follow the below given steps:
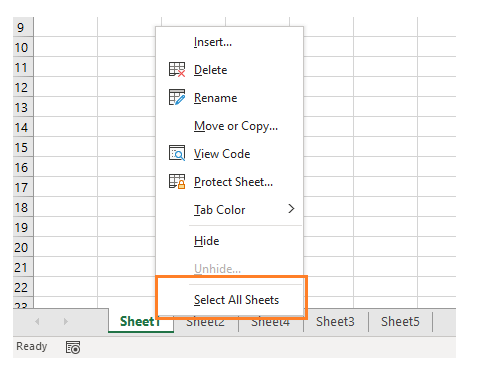
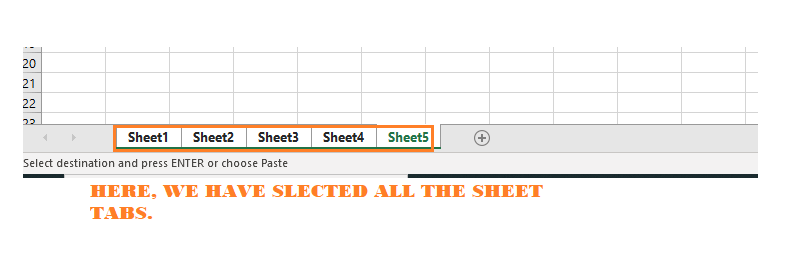
- Select any sheet tab and right-click on it. A dialog box will pop up pick Select all Sheets from the context menu.
- After you have selected all the sheets, press F7 or click the Spelling button under the review ribbon tab.
Spell-Check for Multiple sheets
When a user has multiple sheets, so to individually check every sheet will be time-consuming. To reduce those efforts, one can directly check several sheets for spelling mistakes at a time. The steps for applying spell-check for Multiple sheets are as follows:
- Add multiple sheets in your worksheet with some data. Now, with the help Ctrl key, select the multiple sheet tabs that you want to check.
- Either click on the spelling option under the review ribbon tab or directly press the shortcut key (F7) to activate the spell-check option.
- Excel will automatically check spelling mistakes, and one by one, all the mistake notification will pop up in the window.
- Once all the sheets are checked, Excel will notify you with a confirmation message.
Spell-check using Excel VBA Macro
Now we will see how to practice spell-check with the VBA. It will make it simpler and with a single button click all the sheets will be checked. Open the VBA editor and in the module section we will right the below given macro code:
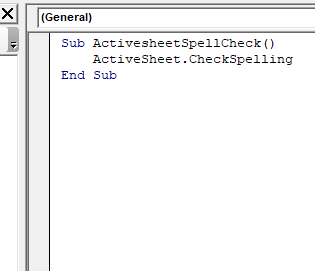
- To do spell-check in the ActiveSheet
Program:
Sub ActivesheetSpellCheck()
ActiveSheet.CheckSpelling
End Sub
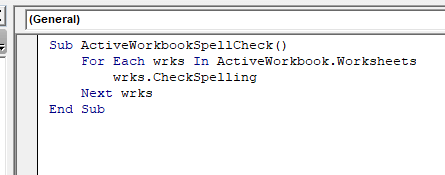
- To do spell-check in the Active Workbook
Program:
Sub ActiveWorkbookSpellCheck ()
For Each wrks In ActiveWorkbook.Worksheets
wrks.CheckSpelling
Next wrks
End Sub