Vue.js Reactive Interface
Vue.js Reactive Interface
Vue reactive interface is one of the important features of the Vue.js framework. Vue.js offers an option to apply the reactivity interface on the properties that are dynamically added. Now, we are going to create a Vue Instance, and then add a watch property to the Vue instance.
Example: This example explains how we can use the Vue.js reactivity interface in the Vue.js application.
Index.html
<!DOCTYPE html>
 <html>
   <head>
     <meta charset="utf-8">
     <meta name="viewport" content="width=device-width,initial-scale=1.0">
     <title>Vue.js Reactive Interface</title>
     <script src="https://unpkg.com/vue/dist/vue.js"></script>
   </head>
   <body>
     <div id="app">
       <p style = "font-size:30px;">Item: {{ items }}</p>
       <button @click = "items++" style = "font-size:25px;">Click Here</button>
       </div>
    </body>
 </html>
Main.js
import Vue from 'vue'
 import App from './App'
 import router from './router'
 Vue.config.productionTip = false
 var vm = new Vue({
    el: '#app',
    data: {
       items: 0
    }
 });
 vm.$watch('items', function(nval, oval) {
    alert('Item is incremented :' + oval + ' to ' + nval + '!');
 });
 setTimeout(
    function(){
       vm.items = 25;
    },2500
 );
Output: After executing this code, we will get the output, as shown below:
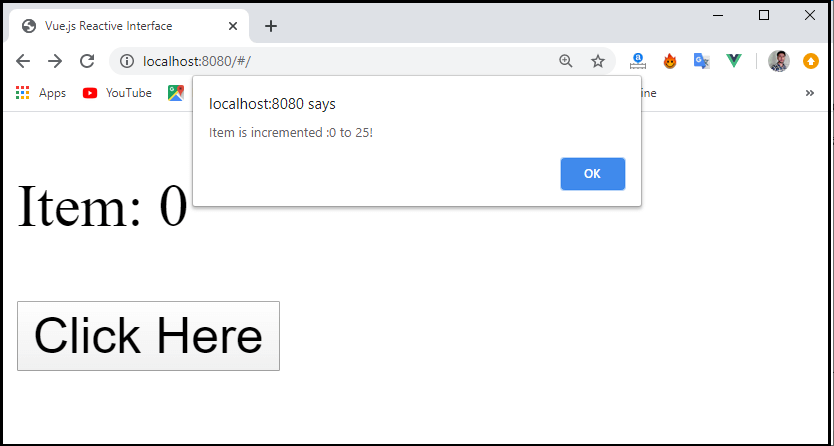
Now, it is required to use the $watch property to add watch outside the Vue instance. Here, we added an alert message that shows the value changes to the item property. Also added a timer function i.e., setTimeout function, which sets the item value to 25, and time is set for 2500 milliseconds.
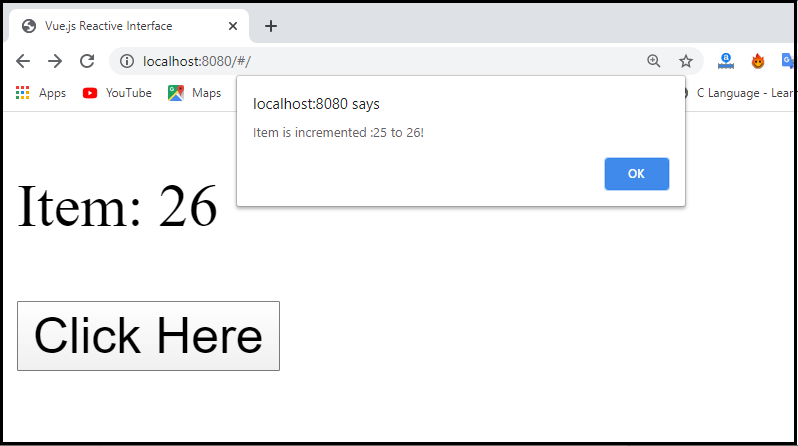
In the above screenshot, we can see the number of items with the “Click Here” button and also saw an alert message. When we click on the “Ok” button of alert message, it increases the number of items, as shown below:
Vue.js cannot identify the property of addition and deletion. The best way to classify the property is always to define the properties, which are required to be reactive upfront in the Vue instance. If we want to add the properties at run time, we can use the Vue.set and Vue.delete methods.
There are various methods of the Vue reactivity Interface, which is very useful in the Vue.js application. Some of the popular methods are as follows:
Vue.set
The vue.set method is used to set an attribute on an object. Vue.js cannot detect the addition or deletion property in the Vue component. It is because Vue conducts the conversion process of getter/setter during the initialization of instances. A getter/setter property must be available in the object of data in order for Vue to convert it and make it reactive. We can have the following syntax to use the vue.set method:
Syntax:
vue.set( target, key, value )
Here the target, key, and value are used for:
Target: It could be an object or an array.
Key: It could be a string or a number.
Value: It could be of any type.
Example: This example explains how we can use the vue.set method in the Vue.js application.
Index.html
<!DOCTYPE html>
 <html>
   <head>
     <meta charset="utf-8">
     <meta name="viewport" content="width=device-width,initial-scale=1.0">
     <title>Vue.js Reactive Interface</title>
     <script src="https://unpkg.com/vue/dist/vue.js"></script>
   </head>
   <body>
     <div id="app">
       <p style = "font-size:25px;">Items: {{ products.id }}</p>
          <button @click = "products.id++" style = "font-size:30px;">Click Here</button>
       </div>
    </body>
 </html>
Main.js
import Vue from 'vue'
 import App from './App'
 import router from './router'
 Vue.config.productionTip = false
 var myproduct = {"id":2, name:"book", "price":"20.00"};
 var vm = new Vue({
    el: '#app',
    data: {
       items: 2,
       products: myproduct
    }
 });
 vm.products.qty = "2";
 console.log(vm);
 vm.$watch('items', function(nval, oval) {
    alert('Item is incremented :' + oval + ' to ' + nval + '!');
 });
Output: After executing this code, we will get output, as shown below:
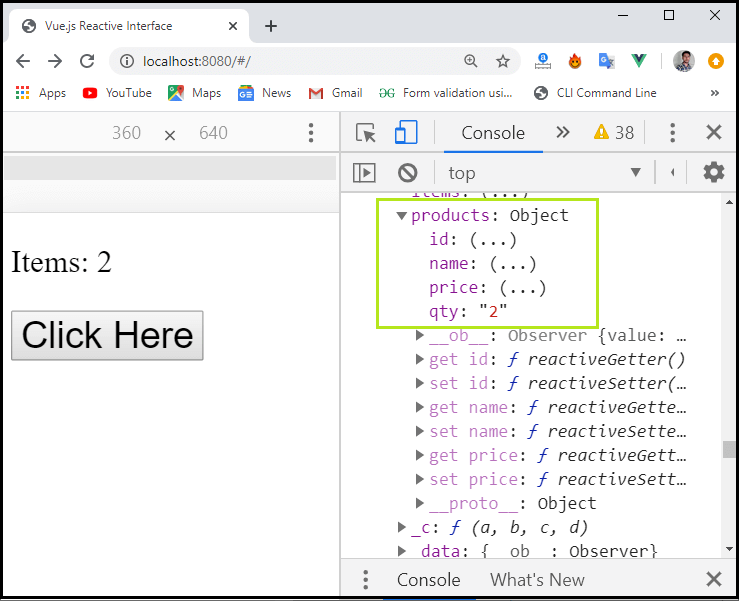
In the above screenshot, we can see that there is an item quantity, which is 2. We can also see this item quantity in the console. In the console, we can see the get/set method, which is available for the id, name, and price, but these methods are not available for the quantity.
Now, let's take the same example using quantity, id, name, and price.
Example:
Main.js
import Vue from 'vue'
 import App from './App'
 import router from './router'
 Vue.config.productionTip = false
 var myproduct = {"id":1, name:"fruites", "price":"30.00"};
          var vm = new Vue({
             el: '#app',
             data: {
                item: 1,
                products: myproduct
             }
          });
          Vue.set(myproduct, 'qty', 2);
          console.log(vm);
          vm.$watch('item', function(nval, oval) {
             alert('Items is incremented :' + oval + ' to ' + nval + '!');
          });
Output: After executing this code, we will get the output, as shown below;
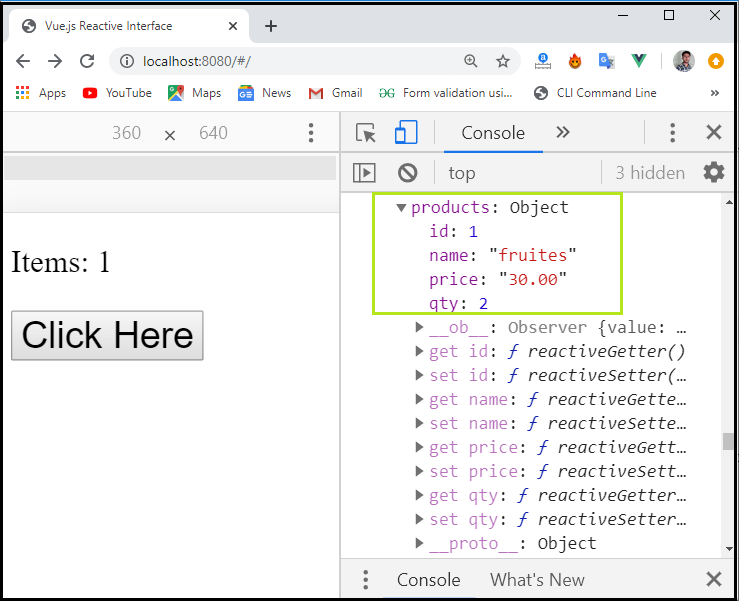
In the above screenshot, we can see all the details about the item like as id, price, name, and quantity.
Vue.delete
The Vue.delete method is used to dynamically delete the property. We can have the following syntax to use the vue.delete method:
Syntax:
vue.delete( target, key )
Here the target and key are used for:
Target: It could be an object or an array.
Key: It could be a string or a number.
Example: This example explains how we can use the vue.js delete method in the Vue.js application.
Index.html
<!DOCTYPE html>
 <html>
   <head>
     <meta charset="utf-8">
     <meta name="viewport" content="width=device-width,initial-scale=1.0">
     <title>Vue.js Reactive Interface</title>
     <script src="https://unpkg.com/vue/dist/vue.js"></script>
   </head>
   <body>
     <div id="app">
       <p style = "font-size:30px;">Items: {{ products.id }}</p>
          <button @click = "products.id++" style = "font-size:30px;">Click Here</button>
       </div>
    </body>
 </html>
Main.js
import Vue from 'vue'
 import App from './App'
 import router from './router'
 Vue.config.productionTip = false
 var myproduct = {"id":1, name:"fruites", "price":"42.00"};
 var vm = new Vue({
    el: '#app',
    data: {
       item: 1,
       products: myproduct
    }
 });
 Vue.delete(myproduct, 'name');
 console.log(vm);
 vm.$watch('item', function(nval, oval) {
    alert('Items is incremented :' + oval + ' to ' + nval + '!');
 });
Output: After executing this code, we will get the output, as shown below:
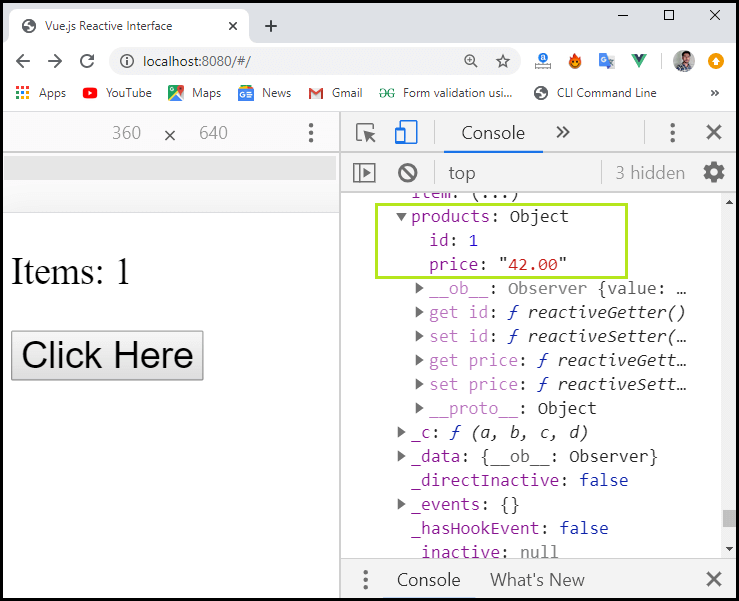
In the above example, we can see that how we can delete the data from an array. Here, the vue.delete method is used to delete the name from the array.
Vue.delete(myproduct, 'name');
After deletion, we can see only the id and price in the console, as the name is deleted from the array.