Google Classroom Tutorial
What is Google Classroom?
The Google Classroom was introduced by Google on 12th August 2014. It is an open-source web-based tool. It is also referred to as a paperless classroom, specially designed for teachers and students. They both can use it to share the files. It is helpful for the teachers as well as students because the teacher can assign the assignments to the students, and also collect the assignment after the completion. This application boosts learnings on the E-Platform (Electronic Platform).
The essential objective of Google Classroom is to develop, grade, as well as distribute the assignments and no use of papers. The Google Classroom application is also associated with other Google tools such as Google Docs and Google Drive.
Features of Google Classroom
There are some features of Google Classroom as follows-
- Simple to Set up
- Easy to Use
- Provides a Paperless Environment
- Assignments
- Announcement
- Communication
- Privacy
- Instant Interaction between teacher and student outside the classroom
- Mobile Application
- Google Calendar
Uses of Google Classroom
Here, we have the following uses of Google Classroom.
- This application is used to provide the grades to student’s assignments.
- A teacher can share the assignments to their students with the help of Google Classroom.
- It is used as a digital way to organize, grade, collect, and distribute the assignments to the students. The teacher can also review the assignments and check who has completed the assignment at the given time.
- With the help of Google Classroom, a teacher can easily post important announcements for the students. These announcements are available for students in the mail.
- The student can also comment on the announcement post.
- Google Classroom helps the students to create the presentation slides, and other students can comment on the slides.
- It also allows students to develop and organize an assignment within the given date.
- This tool provides a digital platform; the student can access the study material and assignments, the teachers provide.
- This tool also facilitate with a platform to facilitate the students to interact with their teachers.
- This tool is used to enhance learnings digitally without any physical presence.
Setup of a Google Classroom
It is the first step to set up an account in Google Classroom. Use an internet connectivity to easily setup the Google Classroom. We can sign-in into the Google Classroom with the help of three different accounts. These accounts are listed below.
- Personal Account
- Student Account
- G Suite Account
How to Sign in Google Classroom
The student and the teachers both have their gmail accounts. They can easily sign-in the Google Classroom by following these steps.
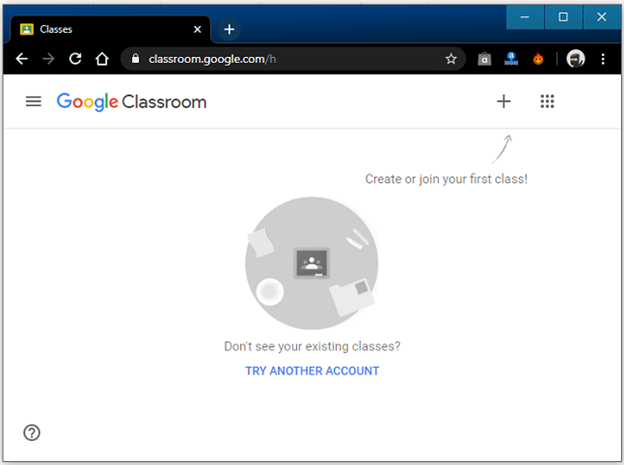
Step 1: Firstly, click on the browser to open it on the computer or laptop. Here, we have used Chrome browser, as shown in the below snippet.
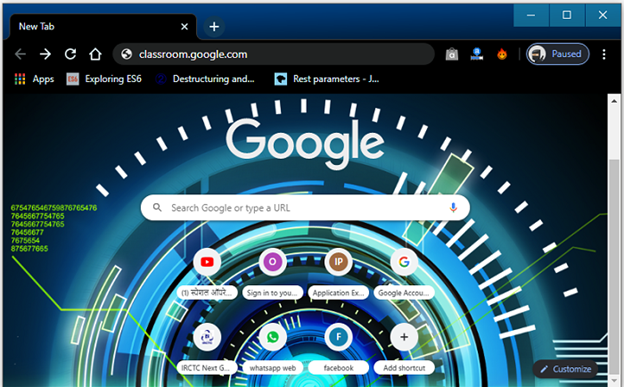
Step 2: Now, type Classroom.goole.com in the address bar and press Enter. It will look like the following.
Step 3: Now, click on the Go to Classroom button.
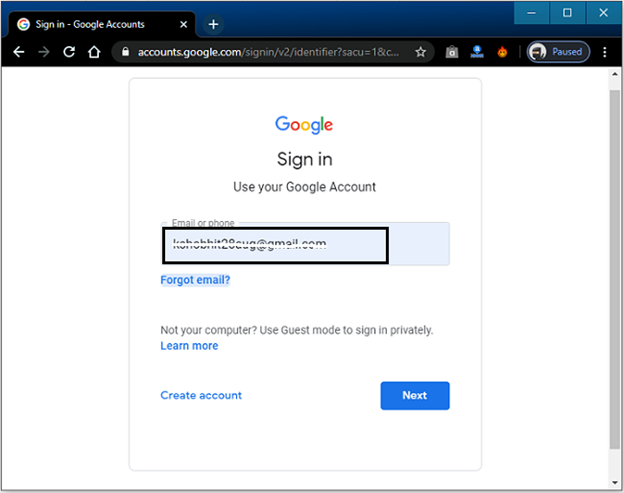
Step 4: Here, enter the email of the google account or phone number and then click on the Next button, and we get the following.
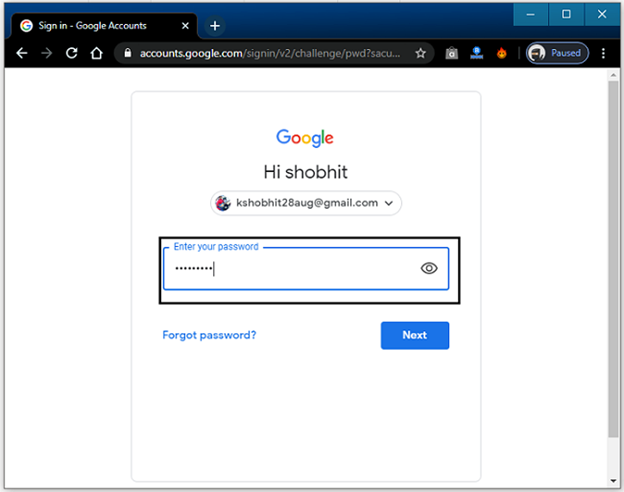
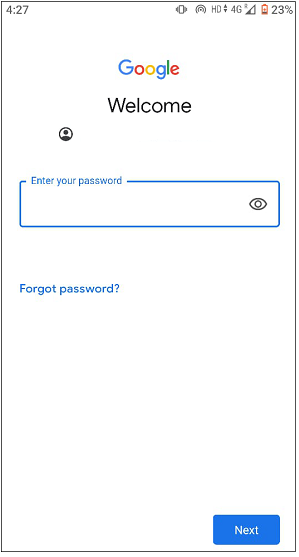
Step 5: Now, enter the google account password in the text field and again click on the Next button.
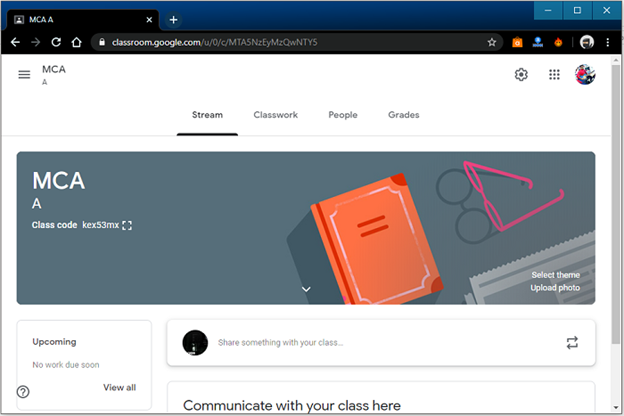
Step 6: After clicking on the Next button, log in to Google Classroom. Now, we will get the following page on the screen.
Sign in to Google Classroom with an Android Mobile
We can also use Google Classroom in the Android mobile. We have to install and download the Google Classroom application with the help of the following steps.
Step 1: In the Android devices, find out the Google Play Store and tap on it.
Step 2: Search for the Google Classroom application and click on the install button.After clicking on the install button, the app is successfully installed in the device.
After completion of installing and downloading process, we need to sign in. Here, we have some steps by which we will sign in easily.
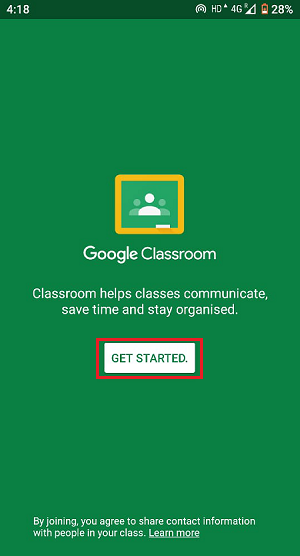
Step 1: First, open the Classroom app.
Step 2: Now, tap on the Get Started button.
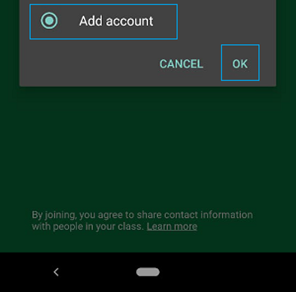
Step 3: Select the Add Account option to associate Google Classroom with Google account and then tap on OK.
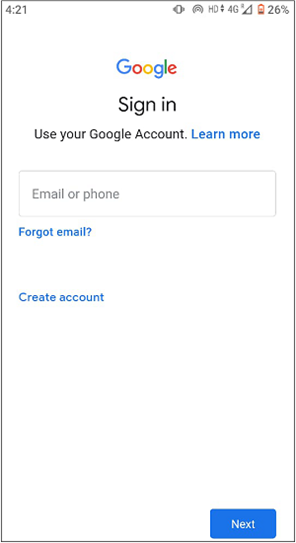
Step 4: Now, enter the email address of the account and then click on the Next button.
Step 5: Enter the Password of the Google account and tap on the Next button. We will get a screen as follows.
Step 6: After clicking on the Next button, we will successfully log in to the Classroom app. We get the following screen on the mobile phone, as shown below.

Working with Google Classroom
A Google Classroom home screen consists of the following features. Both student and teacher can view the page. It will look as follows.
- Create or Join a Class
- Classroom Menu
- Account Setting
- Google Apps
- Help and Feedback
How to Create a Class?
A user or teacher can easily create a class in the Google Classroom tool to provide the assignments to their students. First, the user needs to create a Google classroom class after the successful sign in the google account.
Here, we have some following steps through which we can create a class in Google Classroom.
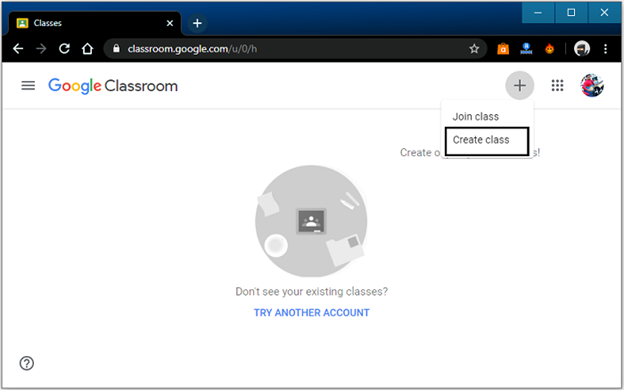
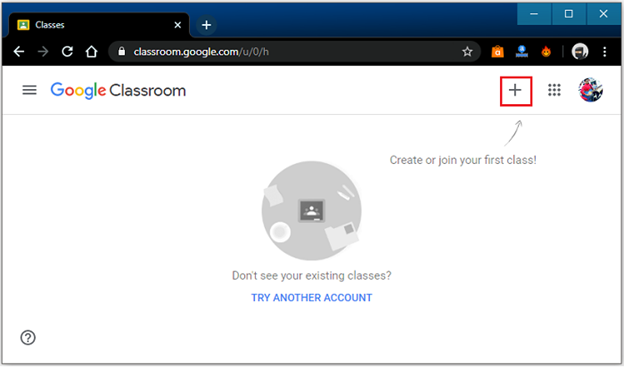
Steps 1: First, click on the Add (+) buttonplaced on the top-right corner on the home page. It will look like the following snippet.

Step 2: Now, choose and click on the Create Class option.
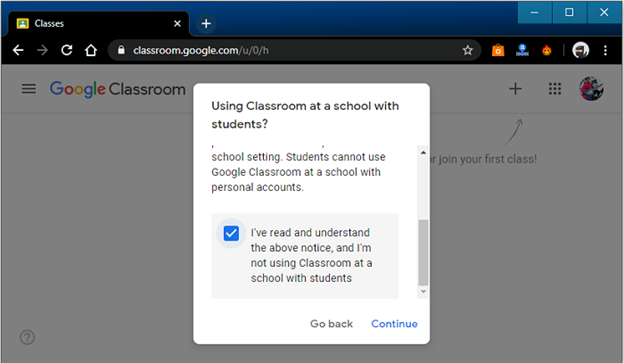
Step 3: Now, select the checkbox and then click on Continue. We will get the following screen.
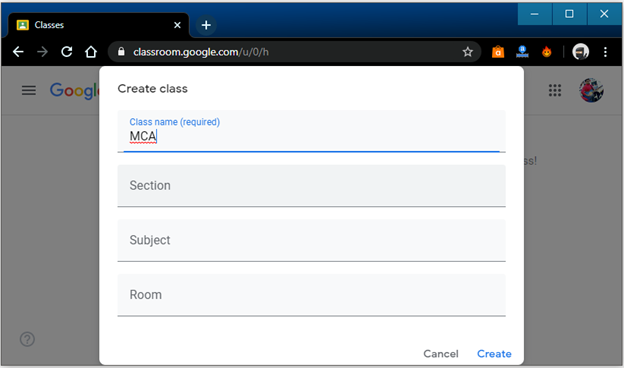
Step 4: Now, we need to fill the following fields, as shown in the below snippet.
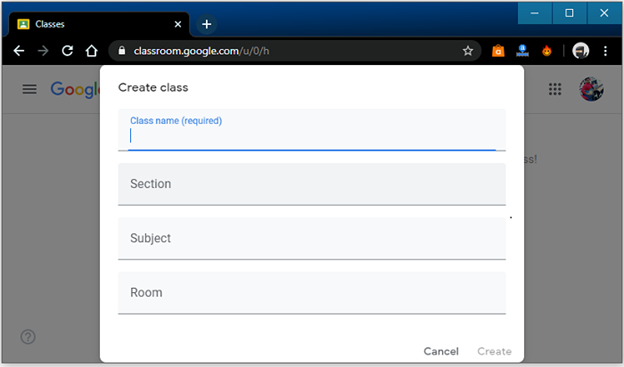
Step 5: In the first field, enter the Class name, which is mandatory to fill. We will get the following screen.
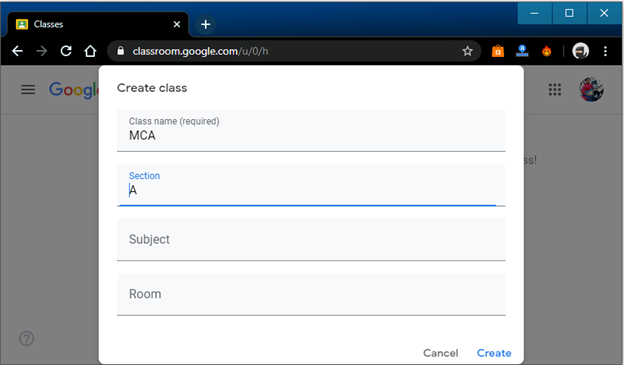
Step 6: Enter the Class name and fill out the Section field. Click on the field and enter the data in it. We got the following snippet.It is an optional field to fill.
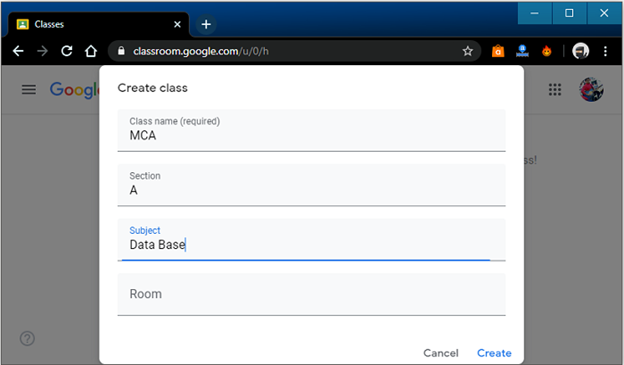
Step 7: Now, fill and enter the Subject by clicking on the Subject field. In the page, we entered the Database subject, as shown in the below snippet.
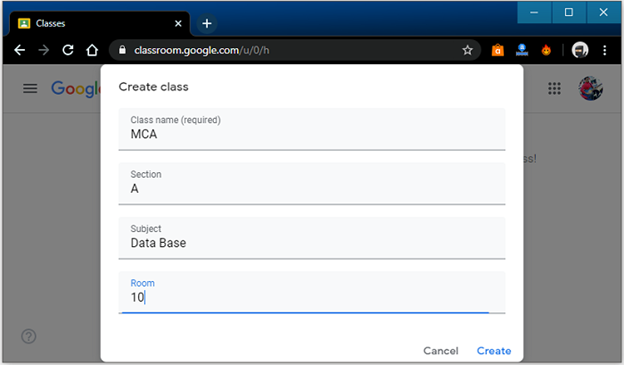
Step 8: After entering the subject, we need to fill the room number. It is not mandatory to fill. After it, we will click on the Create button.
After clicking on the Create button, the class is created in Google Classroom, and we will get the following screen.
After the successful class creation, Google Classroom produces a code by using it we can invite the students, and also share the assignments and announcements between the students.
How to Join a Class
As a student, if we want to join a class, which is generated by the teacher, then sign in to the Google Classroom account with the help of an email.
Here, we have the following two methods by using which we can join a class.
- With the help of Class Code
- With the help of an invitation
With the help of a Class Code
The Class code is referred to as the code generated by Google Classroom at the time of Class Creation. The teacher shares this code with the students. They can join the Google Classroom with the help of this code.
Here, we have some steps which help us to join a class with the help of given Class code.
Step 1: First, click on the Add (+) button on the top-right corner of the home page. It will look like the following snippet.
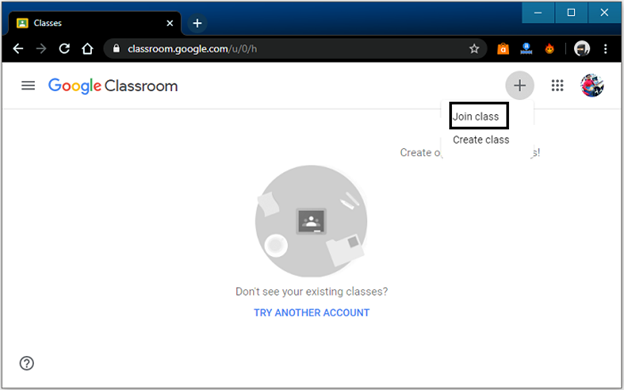
Step 2: Now, choose and click on the Join Class option.
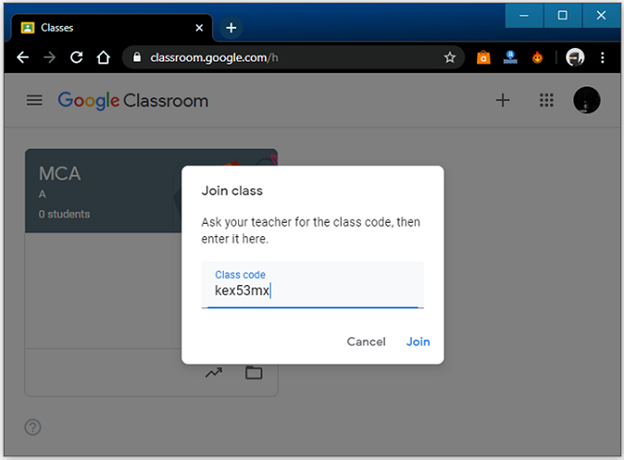
Step 3: Now, enter the Class code provided by the teacher and then click on the Join button, as shown in the following snippet.
Step 4: After clicking on the Join button, we successfully joined the class. Now, we can access the announcements and assignments provided by the teacher. If we successfully joined a Google Classroom class on one device, then we can access the Classroom on the other devices too.
With the help of an invitation
We can also join a class by accepting the invitation. After signing in the Google Classroom, we are required to follow the steps to join a classroom by invitation.
Step 1: First, log in to the Google account on which we have received an invitation.
Step 2: Now, click on the invitation in the mail. After it, we need to click on the Join class.
Step 3: Now, we have successfully joined a class of Google Classroom with the help of an invitation.
How to Invite a Student to Class?
We can easily invite or add the students to a class. For inviting or adding some students to join a class, follow the below-mentioned steps.
Step 1: Firstly, sign in to the Google Classroom with the help of Google account.
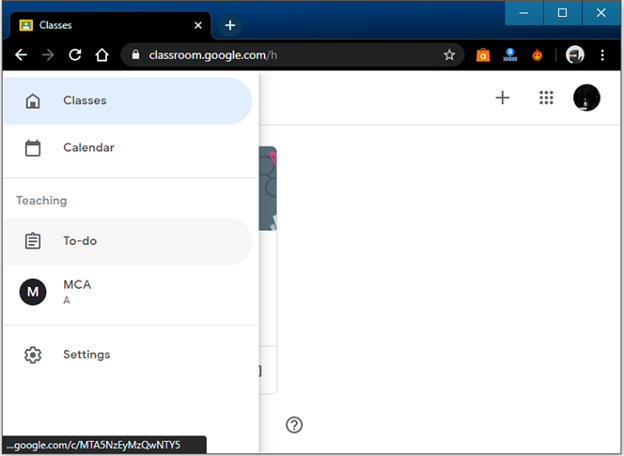
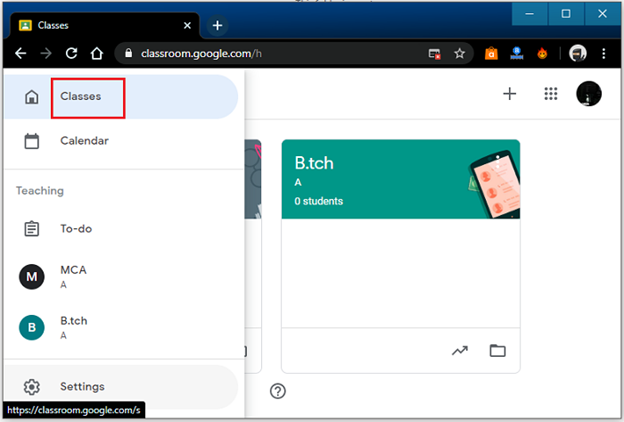
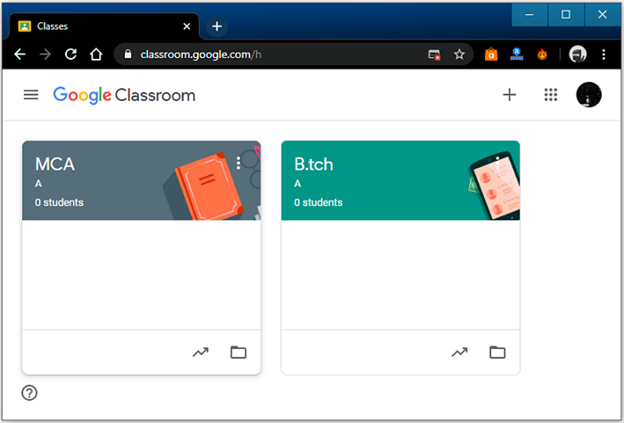
Step 2: After successfully logged in, open the classroom menu and select the classes option. We will get the following screen.

Step 3: Click on the particular class in which we want to add the students. We can also add a group of students.

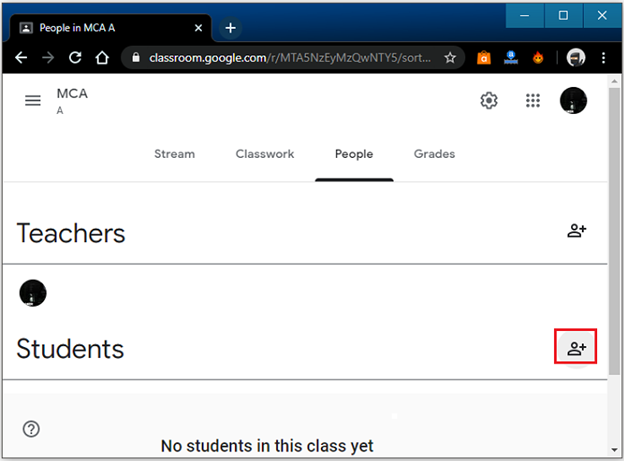
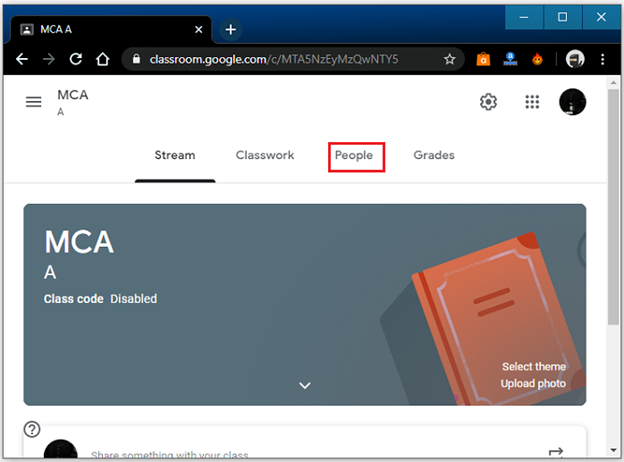
Step 4: After selecting the class, we will click on the People tab at the top of the screen. It will look like the following snippet.

Step 5: After clicking on the People tab, click on the add student button. It is shown in the below snippet.
Step 6: Now, enter the name or email address of the student and click on the search result. After clicking on it, tap on the invite button.
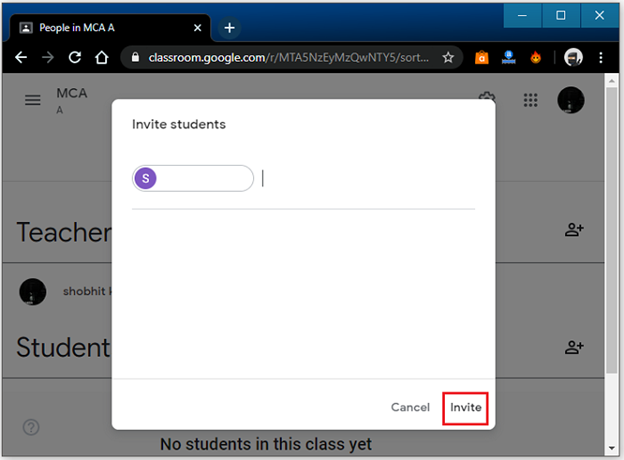
Step 7: We can also add more students in a single class. To perform this, repeat steps 5 and 6.
Step 8: After successfully inviting, the added students are shown in the list.
How to remove a Student from a Class?
We can remove any student from the Google Classroom. For removing the student from Google Classroom, we required to follow the given steps.
Step 1: First, sign in to the Google Classroom with the help of the Google account.
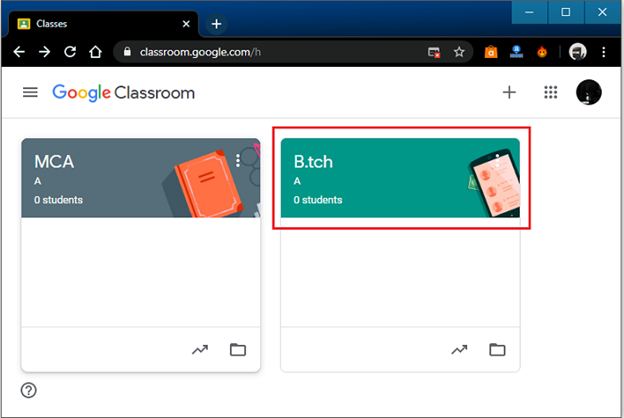
Step 2: After successfully logged in, open the classroom menu and select the classes option. We will get the following screen.

Step 3: Now, click on that class from which we want to remove the student.
Step 4: After selecting the class, click on the People tab at the top of the screen. It will look like the following snippet.
Step 5: Now, select the checkbox located next to the students. We will get the following screen.
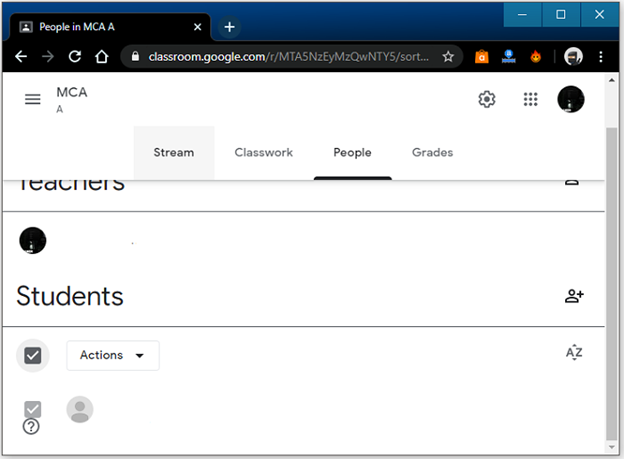
Step 6: Now, select the Action menu and then select the remove option. We get the following snippet.

Step 7: After selecting the remove option, we will get a confirmation dialog box. Now, click on the remove button again.
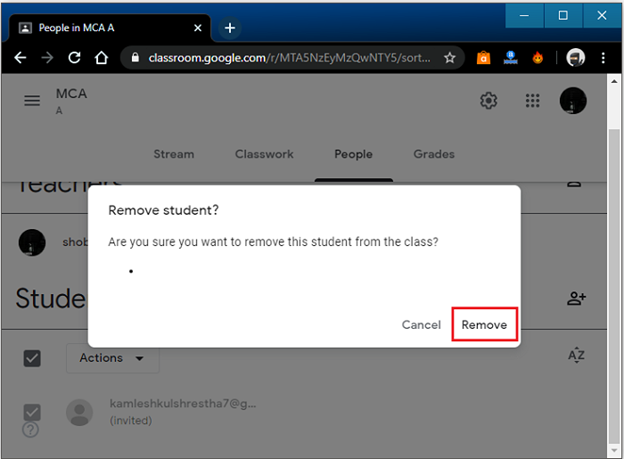
Step 8: After clicking on the remove button, the selected student is removed from the class.
How to Archive a Class?
We can easily hide or archive a class in the Google Classroom. If we archive a class, it will be archived for all those students and teachers who have joined it. When we required to use that class again, then we can restore it. For archiving a class, follow the below-given steps.
Step 1: First, sign in to the Google Classroom with the help of the Google account.
Step 2: After successfully signed in, open the classroom menu and select the classes option. We will get the following screen.
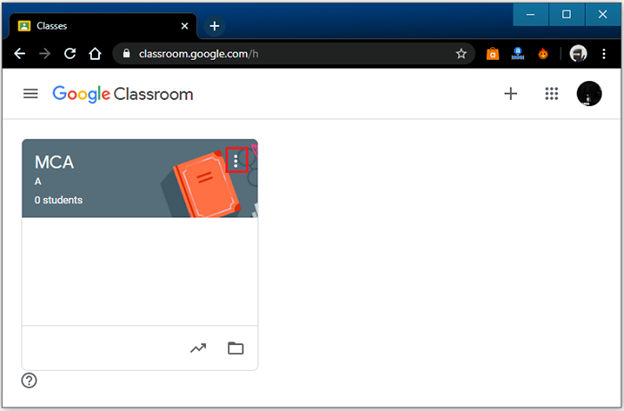
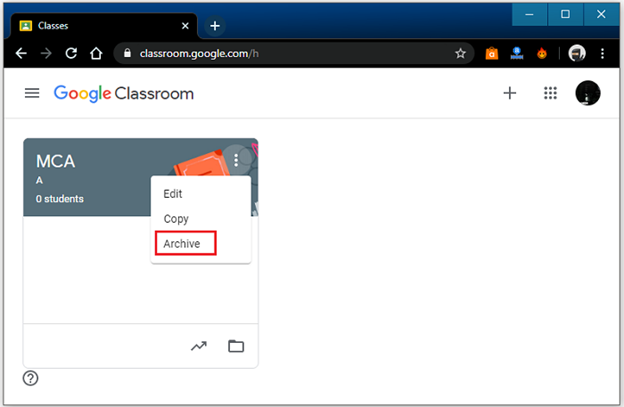
Step 3: Click on the more options button to archive a class. We will get the following snippet.
Step 4: Now, click on the Archive option shown in the drop-down list, and again, we required to click on the Archive in the confirmation box.
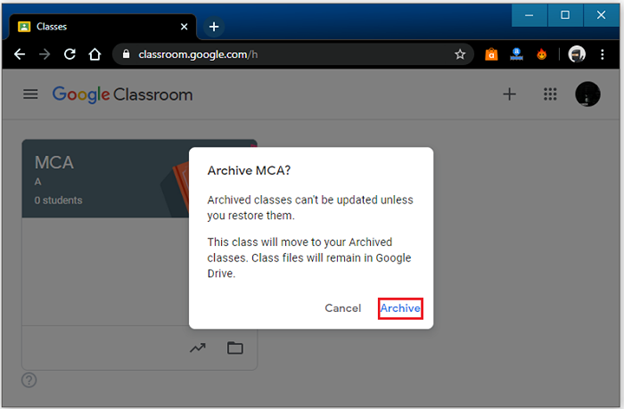
Step 5: After clicking on the Archive, the class is successfully archived. If we want to restore it, select the Archived Class option.
How to Delete a Class?
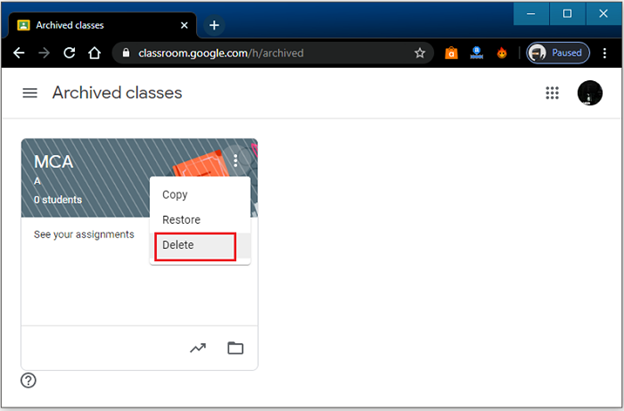
In the Google Classroom, we can delete a class easily. If we want to delete a class, the class must be archived because only those classes can be deleted, which are archived.
For deleting a class, we required to follow the given steps.
Step 1: First, sign in to the Google Classroom with the help of the Google account.
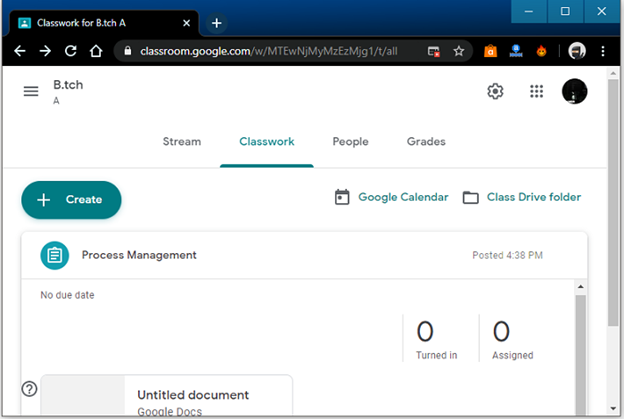
Step 2: After successfully logged in, open the classroom menu and select the classes option. We will get the following screen.

Step 3: Click on the more options button to delete a class. We will get the following snippet.

Step 4: Now, click on the Delete option shown in the drop-down list, and then again, click on the Delete in the confirmation box.
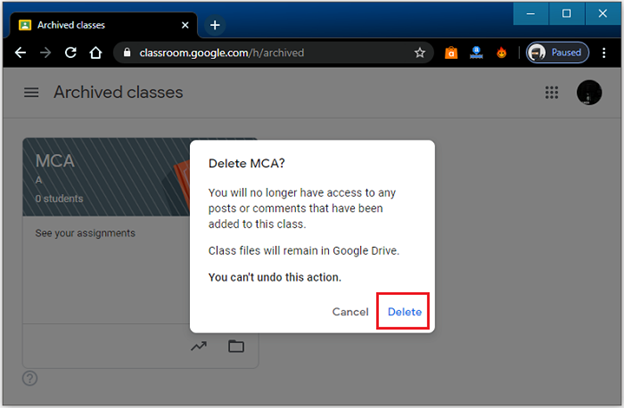
Step 5: After clicking on the Delete, the class is successfully Deleted.
How to Create an Assignment?
As a teacher, if we want to create an assignment for the students in Google Classroom, learn the following functions.
- Assignment for single or more class
- Assignment for Individual Student
- Assignment with attachments
- Assignment with a date and time
Here, we have some steps which help us to create an assignment.
Step 1: First, sign in to the Google Classroom with the help of the Google account.
Step 2: After successfully signed in, open the classroom menu and select the classes option. We will get the following screen.

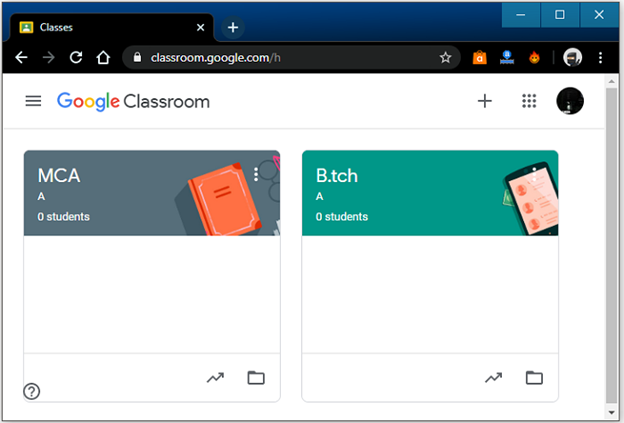
Step 3: Now, tap on the class in which we want to create an assignment. It looks like the below snippet.
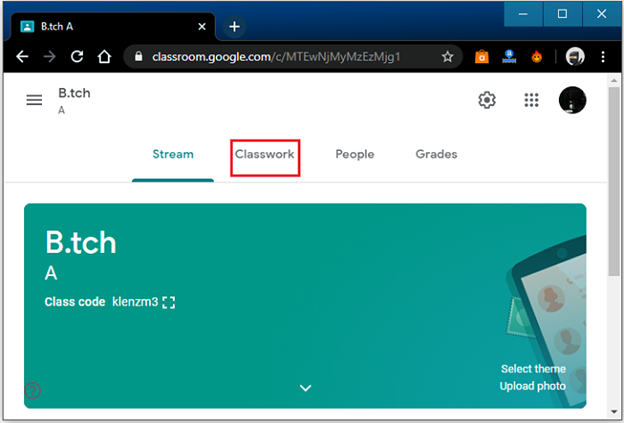
Step 4: After choosing the Class, click on the Classwork option (next to the Stream option), as shown in the below snippet.
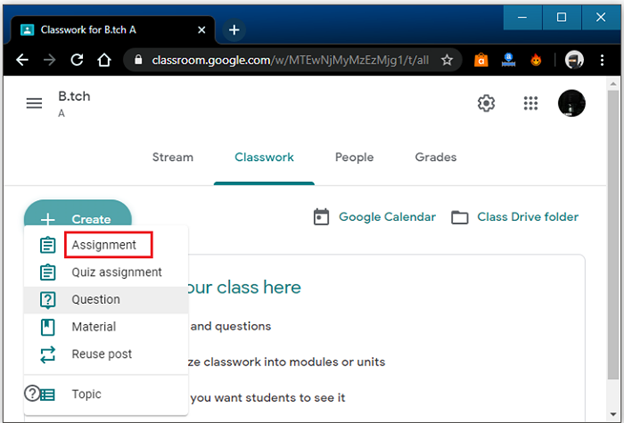
Step 5: After clicking on the Classwork option, click on the Create button, and then select the Assignment option in the drop-down button.
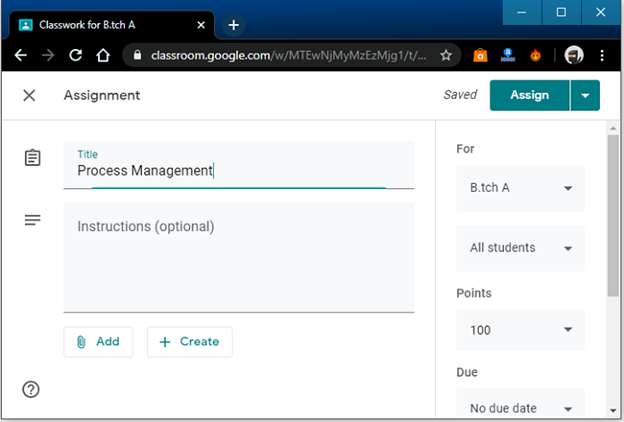
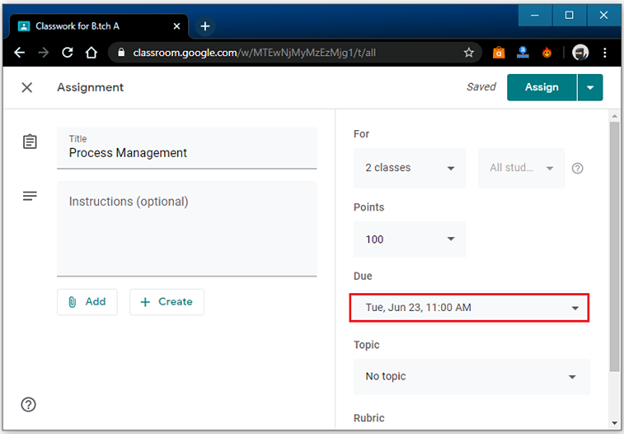
Step 6: After clicking, we got the following snippet. In the snippet, we required to enter the assignment Title. We can also enter the instructions about the assignment. It is optional to fill.
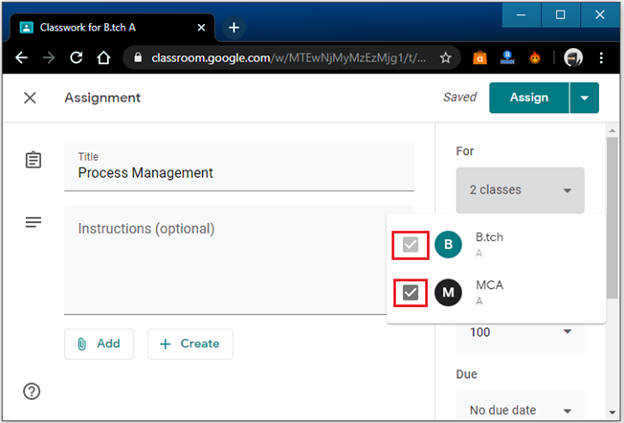
Step 7: We can post the assignment to more than one class. For posting the assignment to more than one class, we need to follow the given steps; otherwise, we will go to Step 8.
Step 7.1: Firstly, click on the down arrow ? button in For option, as shown in the below screen.
Step 7.2: Now, choose a single class or multiple classes by selecting the checkbox to post the assignment.
Step 8: If we want to post an assignment for the single student, follow the given steps; otherwise, we will go to Step 9.
Step 8.1: Firstly, click on the All Students ? button, as shown in the below screen.
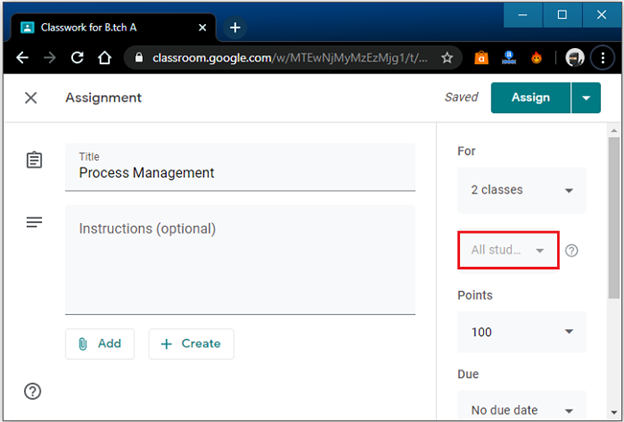
Step 8.2: Now, choose the single student for whom we want to post an assignment. We must deselect the previous All Student option.
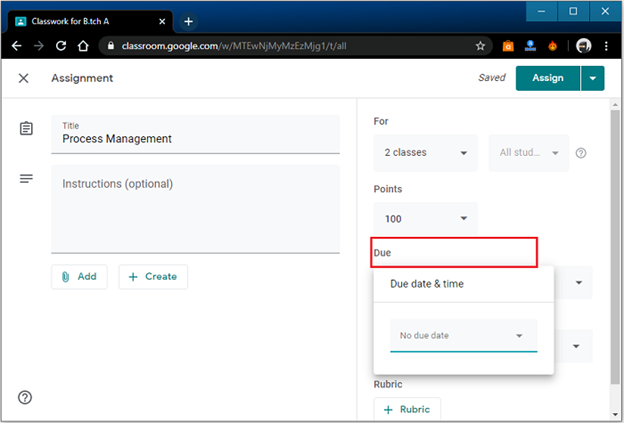
Step 9: We can also post an assignment with the due date and time. We need to follow the given steps; otherwise, we will go to Step 10.
Step 9.1: Firstly, click on the down arrow ? button in Due option, as shown in the below screen.
Step 9.2: Select the down arrow ? button next to the No due date. After it, choose the date on the calendar.
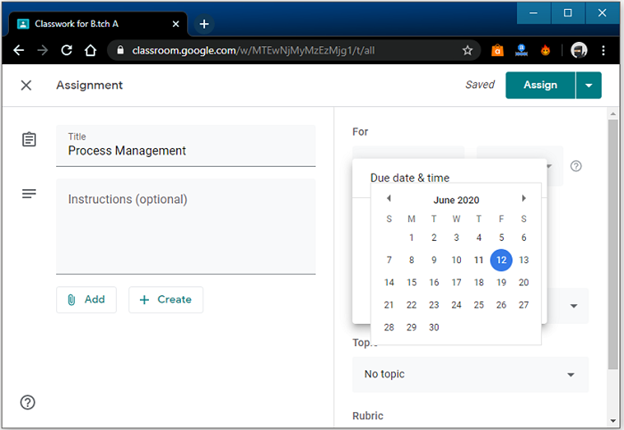
Step 9.3: We can also set a time for the assignment. For selecting the time, click on time.
Step 10: We can add a topic to the assignment. For adding the topic, follow the given steps; otherwise, go toStep 11. One assignment has only one topic.
Step 10.1: Firstly, click on the down arrow ? button in the Topic option, as shown in the below screen.
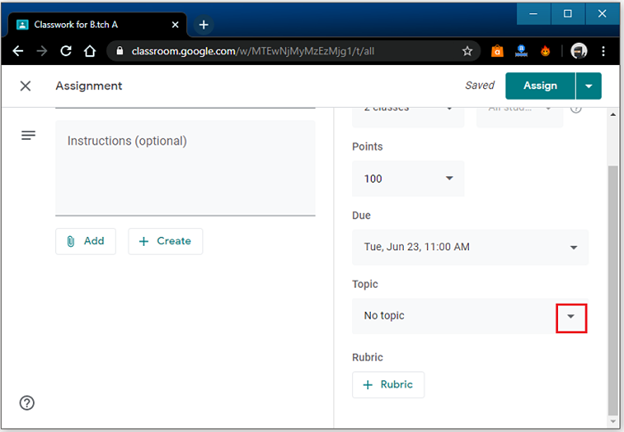
Step 10.2: Now, select the create Topic option and enter the name of the topic. After it, the topic is successfully added to the assignment.

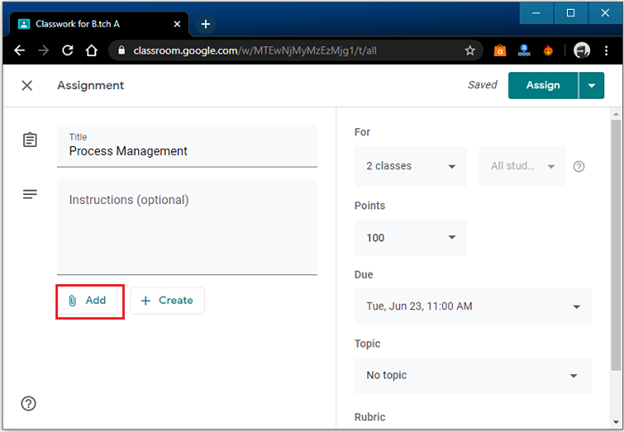
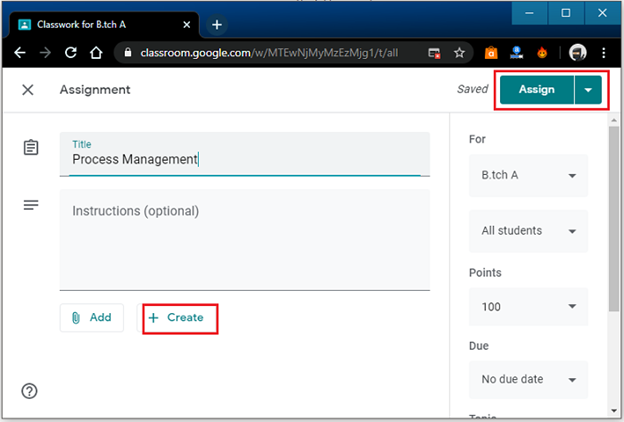
Step 11: In the assignment, we can also add the attachments. We can also attach the files from Google drive and the computer system, YouTube videos, and links. For adding the attachments, follow the given steps; otherwise, go to Step 12.
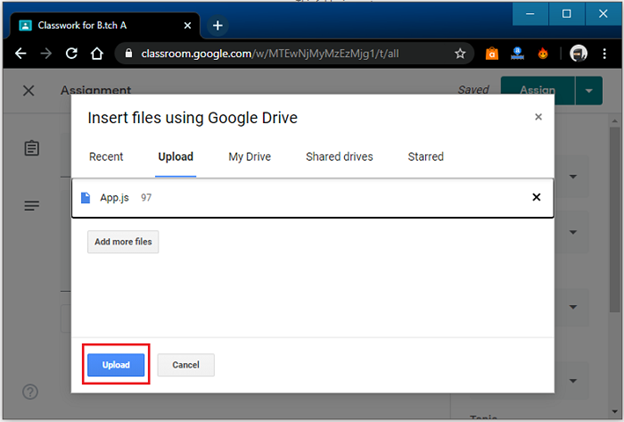
How to add a file from computer system?
We will follow the below steps to attach a file with an assignment from the computer system.
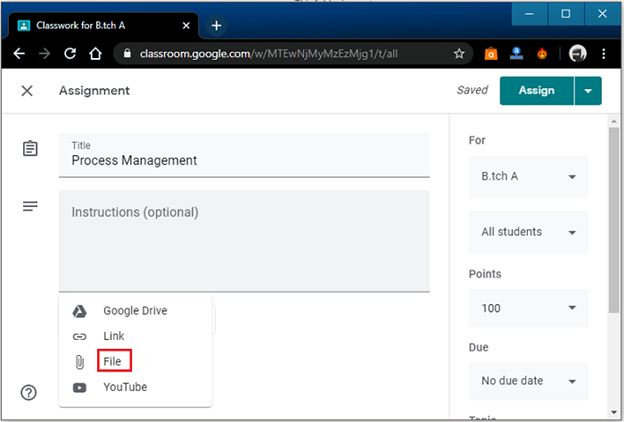
Step i: First, we will click on the add button and choose the file option in the drop-down list.
Step ii: After selecting the file, we will click on the Upload button. After clicking on the button, the file is successfully added to the assignment.
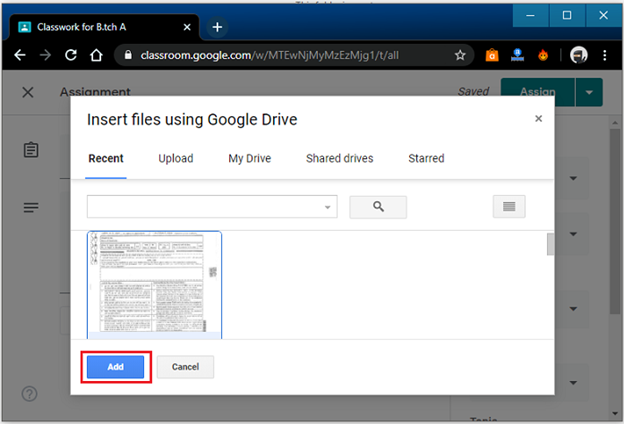
How to add a file from Google Drive?
We will follow the below steps to attach a file with an assignment from Google Drive.
Step i: First, we will click on the +add button and then choose the Google Drive option in the drop-down list.
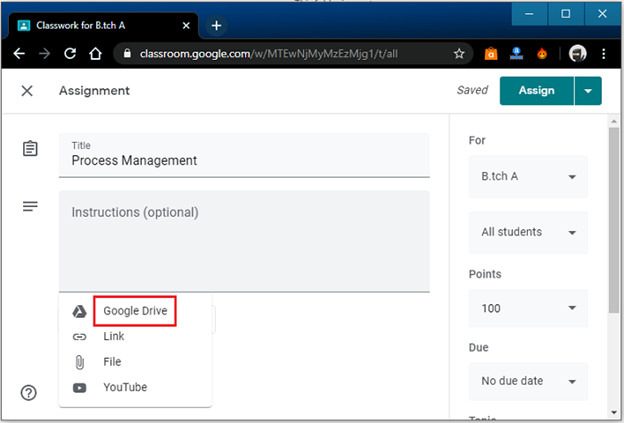
Step ii: After selecting the file from the Drive, we will click on the Add button. After clicking on the button, the file is successfully added to the assignment.
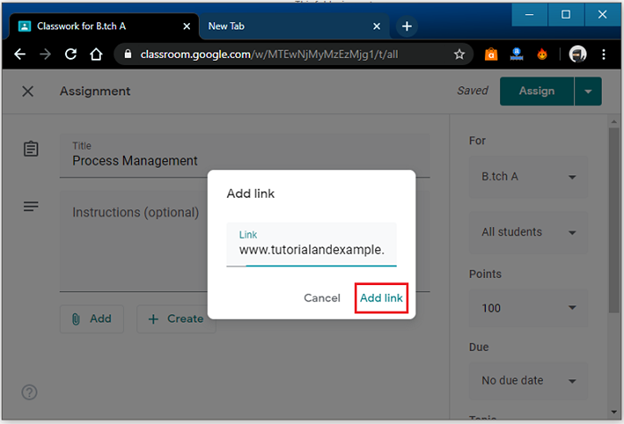
How to add a link?
We will follow the below steps to attach a Link with the assignment.
Step i: First, we will click on the +add button and then choose the Link option in the drop-down list.
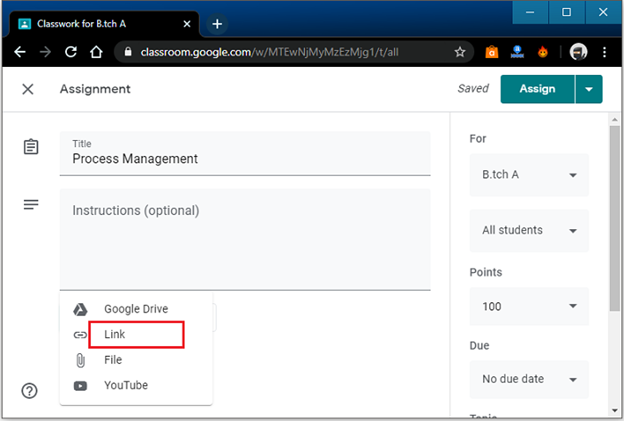
Step ii: After entering the Link, we will click on the Add link button. After clicking on the button, the Link is successfully added to the assignment.
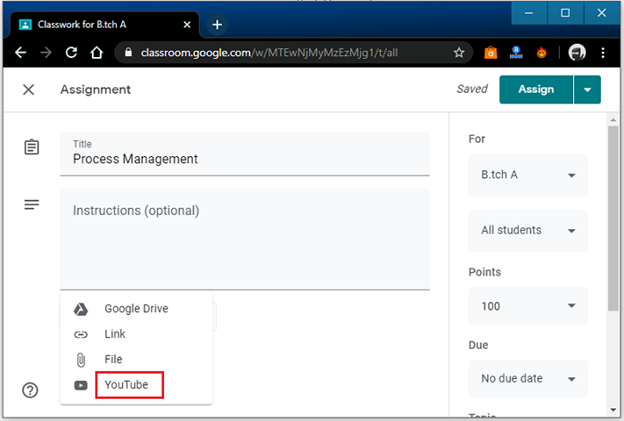
How to add a YouTube Video?
We will follow the below steps to attach a YouTube video with the assignment.
Step i: First, we will click on the +add button and then choose the Google Drive option in the drop-down list.
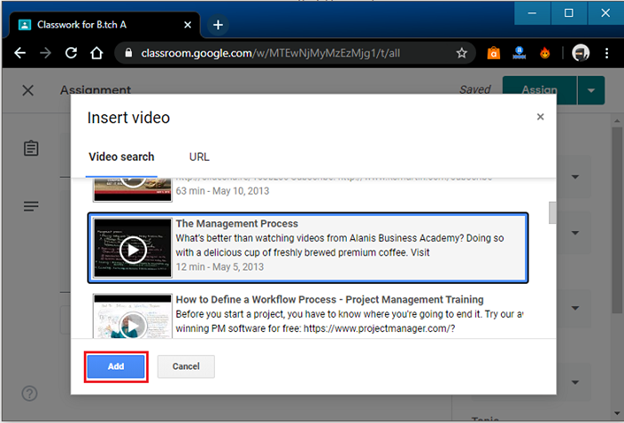
Step ii: Now, we will enter the video name in search panel or enter the URL, and then click on the search button.

Step iii: After searching, we will select the video which we want to attach, and then click on the add button.
Step 12: After it, we will click on the Create button and select the option from the drop-down list.When the assignment is created, we will click on the assign button at the top-right corner of the screen.
After completing all the steps, the assignment is successfully posted in Google Classroom. The selected students get the notification of assignment in their emails. We can also see the assignment in the Stream tab of Google Classroom.
How to Delete an Assignment?
As a teacher, if we want to delete an assignment from the Google Classroom, we need to follow the given steps. If we delete an assignment, then all the grades and comments are also deleted from the class.
Step 1: First, we will sign in to the Google Classroom with the help of the Google account.
Step 2: After successfully signed in, we will open the classroom menu and select the classes option. We will get the following screen.

Step 3: Now, we will click on the class from which we want to delete the assignment, as shown in the below snippet.
Step 4: After selecting the class, we will click on the Classwork tab, and then click on the more button as we got in the given snippet.
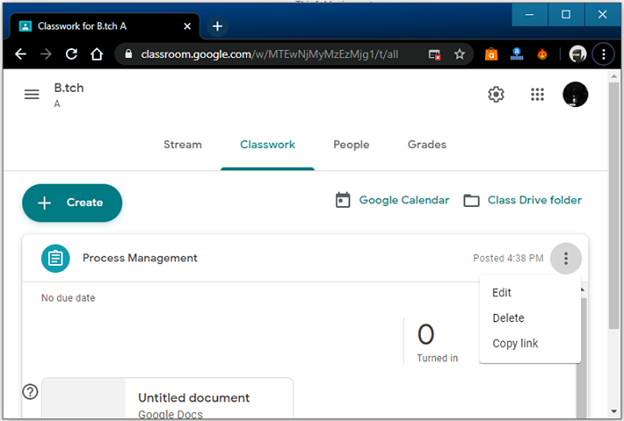
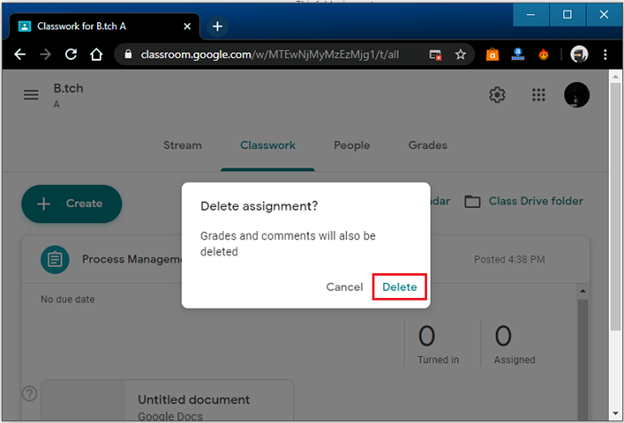
Step 5: We will click on the delete button from the drop-down list. It will look like the following snippet.
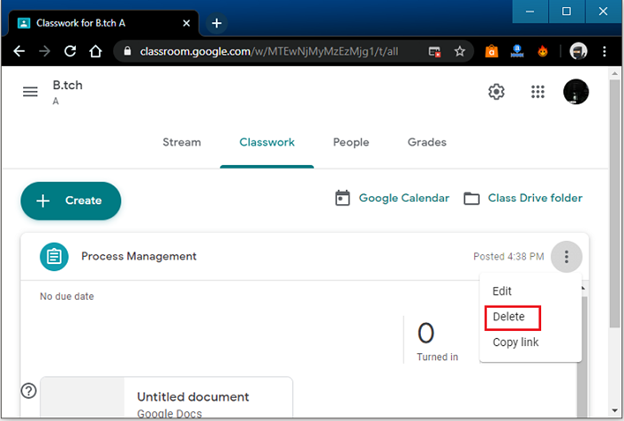
Step 6: Now, we will again click on the delete button in the confirmation dialog box. After it, the assignment is successfully deleted.
How to Post an Announcement?
As a teacher, if we want to post an announcement for the students in Google Classroom, then we have to learn the following functions.
- Post an announcement for single or more class
- Post an announcement for Individual Student
- Post an announcement with the attachments
Here, we have some steps which help us to post an announcement.
Step 1: First, we will sign in to the Google Classroom with the help of the Google account.
Step 2: After successfully signed in, we will open the classroom menu and select the classes option. We will get the following screen.
Step 3: We will select the class in which we want to post an announcement, as shown in the given snippet.
Step 4: After selecting the class, we will choose the Stream tab, and then click on Share something with your class.

Step 5: After it, we are required to write the announcement, and then click on the post button. It will look like the following snippet.

Step 6: After clicking on the post button the announcement is posted. We got the following snippet.

Benefits of Google Classroom
There are following advantages of Google Classroom as mentioned below:
- Google Classroom helps the teachers to set up their classes; they can also invite the students and other teachers to join that class.
- It is easy to set up and understandable for the teachers and students.
- The Google Classroom also helps the teachers to track the progress of their students.
- The teachers and the students can also access the other Google products by using Google Classroom.
- It allows the teachers and the students to interact with each other.
- Google Classroom is a paperless tool. It has also decreased the paperwork for teachers and students.
- Google Classroom is free to use. It only requires internet connectivity.
- All the work and data produced by the students and teachers are automatically saved in Google Cloud. They can also access their work at any time with the help of any device.
- Google Classroom is also accessible with the mobile phone when any announcement or assignment is posted in the class; students get the notification via email on their devices.
- The teachers can also ask the questions to the students by using Google Classroom.
Limitations of Google Classroom
There are some disadvantages of Google Classroom given below:
- Google Classroom is not associated with Google Hangouts. It creates a communication problem.
- Google Classroom doesn’t provide the facility of automated quizzes and assignments.
- It should not support automated updates.
- In many cases, the users face the editing problems in Google Classroom.
- It is also difficult for learner sharing because the learners cannot share their work with others unless they become the owner of assignments.