GraphQL: Installation of Apollo Server
Installation of Apollo Server
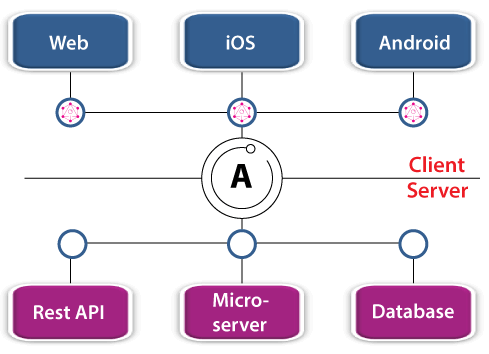
In the section, we have learnt why Apollo is such an important platform while implementing GraphQL in our application, and how powerful tool is its Apollo platform. Therefore, we always prefer to use Apollo while working with GraphQL server or client-side. We use the Apollo server setup to implement the GraphQL server in the database of many applications. And, for the client-side of GraphQL, we use client applications of Apollo-like Boost Apollo to implement GraphQL set up easily.
The GraphQL server is used to receive the request coming from multiple endpoints and direct them into a single endpoint to execute them. The GraphQL server is used to interpret the client request from the database. After interpreting and executing, GraphQL retrieves data from the user at the client-side of the application.
There are different types of Implementation available regarding setting up the GraphQL server in the JavaScript build application in different programming languages. Apollo server is one of such kinds of Implementation available for GraphQL server-side.
What is the Apollo Server?
- Apollo server is one of the implementations available for GraphQL server-side in the application.
- Apollo Server is an open-source and spec-compliant implementation for GraphQL that we can use with the application built on JavaScript.
- We can even specifically say that the Apollo server is particularly available for the node.js platform.
- The Apollo server is compatible with any client-side implementation of GraphQL. (But we will use Apollo client implementation in this tutorial)
Features of Apollo server implementation
Following are some highlighted features of Apollo server implementation in GraphQL:
- Apollo server provides an interactive environment for building projects and Applications.
- Apollo server provides a suitable ecosystem for production-ready applications.
- Apollo server is very helpful in building Self-documenting and production-ready GraphQL APIs.
- GraphQL APIs build with the implementation of the Apollo server are very powerful and efficient.
- The GraphQL APIs build through the implementation of the Apollo server can retrieve data from any kind of database source.
Frameworks in Apollo server
There are different kinds of Apollo server frameworks available, but in this section, as we have used Node.js, so we will only discuss the frameworks related to node.js
Following are the frameworks of node.js application, which can be supported by Apollo server:
- Help
- Restify
- Express
- Koa etc.
Usage of Apollo server
Apollo server has various benefits and usages when we implement it with the GraphQL server setup. Apollo servers can be helpful in performing many important and powerful functions in GraphQL. Following are the main usage of implementation of Apollo server in GraphQL server-side:
- Apollo server facilitates us to handle authentication while working with GraphQL APIs and check authentication in APIs.
- Apollo server provides us a way through that we can describe our data in the GraphQL server using a GraphQL schema.
- Additionally, the Apollo server provides us a very interactive framework for resolver functions present in GraphQL. (Resolvers functions are the functions which we use to fetch the data from the GraphQL server with a client query)
Getting started with Apollo server
Before getting started with the Apollo server, we should have pre-knowledge of the topic, which we are dealing with, i.e., GraphQL server and GraphQL.
For this, you can refer to our previous sections of this tutorial.
Apollo server implementation Prerequisites
Following are the prerequisites for the installation of the Apollo server:
- Before going ahead, you all should be comfortable with the command-line programs and JavaScript programming language.
- You all should have compatibility in using the Command prompt for installation.
- A recent version of node.js must be installed in your system. (You can go to nodejs.org for installing the latest version of node.js).
- GraphQL and express.js should be installed in your system.
Installation of Apollo Server
Let us discuss the installation part of the Apollo server in your system. We will install the latest version of the Apollo server for implementing GraphQL server in the node.js based applications.
Her in this section, we will cover the following topics:
- Installation of Apollo server
- Creation of GraphQL schema
We will learn the following things:
- Basic understanding of the GraphQL server principles with the Apollo server implementation.
- How we can define a GraphQL schema that will be storing values of data present in the database of our application.
- Run the Apollo server, which will allow us to retrieve data from the GraphQL schema using the Client query.
Steps for Installation of Apollo server:
We need to adhere to the following steps for installation of the Apollo server in the system:
Step 1: Create a new project file:
- In this step, we are going to create a new project file where we will create an example with an Installed apollo server in our system.
- Open the node.js command prompt of your system.
- Create a new directory file where node.js is installed for your project
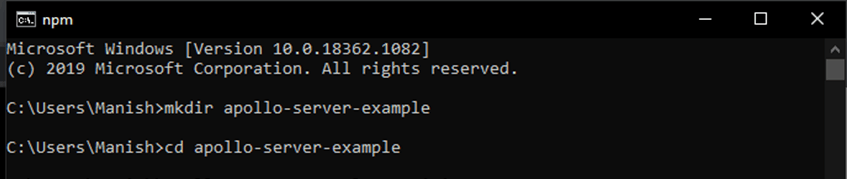
- Create a file with the name 'apollo-server-example' by writing the following command in the node.js command prompt:
'mkdir apollo-server-example'
- Now, the directory file is created in your system. Navigate the file using the following command:
'cd apollo-server-example'
Step 2: Create a Package.json file:
- Now, we will create a package.json file for the file directory 'apollo-server-example', which we just created.
- Create a package.json file in the apollo-server-example folder by writing the following command in the command prompt:
'npm init --yes'
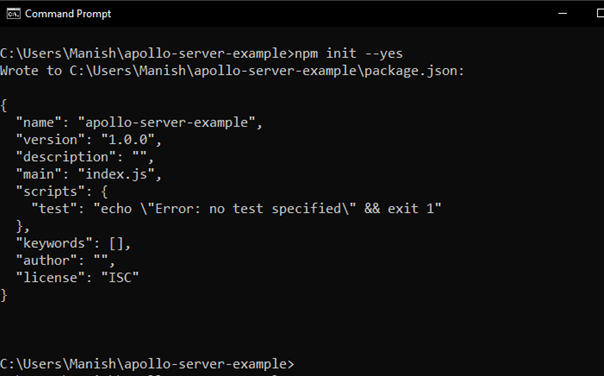
- Now, as we can see that our directory file 'apollo-server-example' contains a package.json file in it.
Step 3: Install all the dependencies:
When we want to install the Apollo server in our system or installing it, we have to understand that the Apollo server always requires a two-level dependency, and that too of top-level. Following are the two top-level dependencies required by Apollo server while installing it in our system:
- apollo-server: apollo-server is the core-library for the Apollo server, and it is very useful while implementing the Apollo server in GraphQL. Apollo-server facilitates us to define the shape of the data that we will store in the GraphQL server. It also facilitates us in how we will fetch data from the GraphQL server.
- graphql: The library graphql will be used to build GraphQL schema in our application of JavaScript. We will execute our client queries using GraphQL schema build through this GraphQL library.
Write and follow the following command to install the dependencies, as mentioned above:
- Write the following command inside the command prompt:
'npm install apollo-server-graphql'
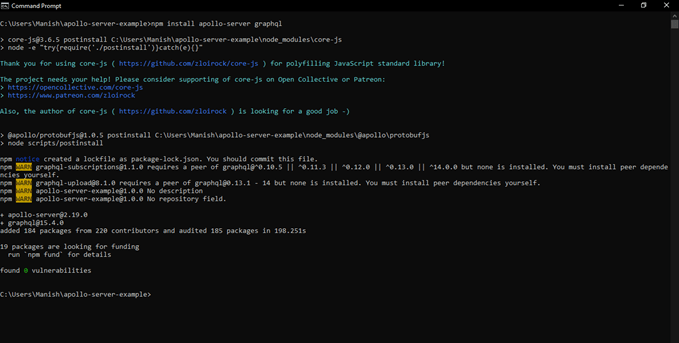
- Now, as you can see that all the required dependencies for the apollo server are installed in our project folder.
- We have installed the Apollo server to execute the queries from the server.
Run the Apollo server:
- Now, we will create an example to see the functionality of the apollo server. For this, we will create a GraphQL schema, a GraphQL resolver function and a datastore file of GraphQL.
- We will create all these files inside a server.js file through which we will execute the query and retrieve the data from the server.
- We will create an example for retrieving data of the name of the subject and teacher of the subject, and we will retrieve the name of the subject and teachers of the subject using the GraphQL query.
- We need to follow these below steps to create an example and run it on the server:
Step 1: Create an empty server.js file in the root directory of the project folder 'apollo-server-example.'
Step 2: Define a GraphQL schema:
- Whenever we work on GraphQL, we should always check that schema is properly defined or not because GraphQL schema is a place where data values are stored.
- For every GraphQL server and server file, including the apollo server, we always need to define a GraphQL schema inside it.
- The GraphQL schema inside the GraphQL server defines the structure of data present inside the server.
- Here in this example, as we have mentioned, we are creating an example for queried the name of subjects along with the name of the teacher of subjects.
- Open the server.js (which we create inside the project folder) inside a text editor like notepad, notepad++ etc., and write the following code inside the server.js file:
const { ApolloServer, gql } = require('apollo-server');
  const typeDefs = gql`
  type Coaching {
          Subject: String
          Name: String
     }
          type Query {
                  coaching: [Coaching]
         }
      `;
- Save the following code and save the file inside the project folder.
- Now, as we can see that we have defined the structure of the data, and in this, we will store the values inside the coaching type.
Step 3: Define the data set:
In the GraphQL schema we created above, we have defined the structure of the data that we are going to query. Now, we will define the data itself present inside the server.js file of the project folder.
- The Apollo server we have installed in our system can fetch the data queried by the client from any connected source of data or database.
- This source can be a connected database source, a storage device for a static object, a REST API from the different GraphQL servers connected to the Apollo server.
- Open the edited server.js file in a text editor and write the following code bottom of the server.js file:
const companies = [
  {
      Subject: 'JavaScript',       Teacher: 'John Steven’,
   },
   {
        Subject: 'Java',
        Teacher: 'Maria',
    },
    {
          Subject: 'Python',
          Teacher: 'Dr. Henery',
     },
     {
           Subject: 'C++',
           Teacher: 'Peter Kevin',
      },
   ];
- Save the server.js file with this code inside your project folder.
- Now, we have defined the data sets inside our server.js file and the Apollo server is able to fetch these data values when queried from any connected source of data or database.
Step 5: Define a Resolver:
const resolvers = {
  Query: {
    coaching: () => coaching,
  },
};
- Here we have defined our GraphQL resolver function, and the server will find the data set whenever the client will query about coaching.
Step 6: Create the instance for the Apollo server:
Now moving forward, defining an instance in the server is the last thing we will do before running the example.
- The information, i.e., dataset, schema or resolver we have defined in our server file, we need to provide information Apollo server about these files.
- We will initialize the apollo server in the project by providing all this information.
- Open the server.js file inside the text editor.
const server = new ApolloServer({ typeDefs, resolvers });
server.listen().then(({ url }) => {
  console.log(`Server ready at ${url}`);
}
);
- Write the following code inside the server.js file:
- Now save the server.js file inside the project folder.
- We are now able to initialize the Apollo server that we have Installed inside the project folder.
Server file: Now the server.js file stored inside the project folder will look like this after saving all the information in the file:
const { ApolloServer, gql } = require('apollo-server');
  const typeDefs = gql`
  type Coaching {
          Subject: String
          Name: String
     }
          type Query {
                  coaching: [Coaching]
  }
`;
const companies = [
{
      Subject: 'JavaScript',
      Teacher: 'John Steven’,
},
   {
        Subject: 'Java',
        Teacher: 'Maria',
},
  {
          Subject: 'Python',
          Teacher: 'Dr. Henery',
},
{
Subject: 'C++',
Teacher: 'Peter Kevin',
     },
   ];
const resolvers = {
  Query: {
    coaching: () => coaching,
  },
};
const server = new ApolloServer({ typeDefs, resolvers });
server.listen().then(({ url }) => {
  console.log(`Server ready at ${url}`);
}
);
This server file is ready to run in your system. We will now run a query from client-side GraphQL that is GraphiQL, and we will request from the server, and the server will fetch the query and return us the data that we have requested in our query.
Step 7: Run the Apollo server in the system:
Now, we have created a complete server file (server.js file inside the project folder) through which we will initialize the Apollo server and run the Apollo server inside our system.
- Now, the Apollo server is ready to start inside the system.
- Open the node.js command prompt present in your system.
- Write the following file inside the command prompt to locate the directory of the project folder:
'cd apollo-server-example'
- We have located the file directory of the project folder.
- Write the following command inside the command prompt to initialize the apollo server:
'node server.js.'
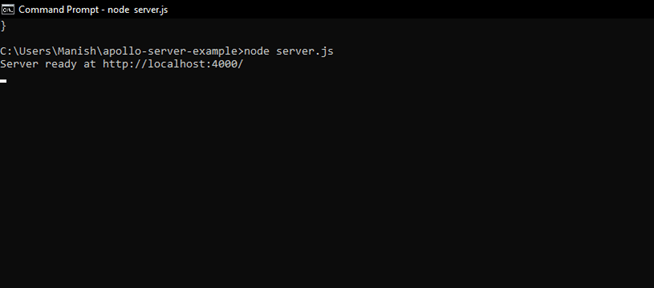
- In the above image, you can see that the server is initialized and running inside the system.
- We can write the query and fetch the data from the server after the server executes our query.
Writing the First GraphQL query:
Now, the Apollo server is initialized, and it is running inside the system. We will write the query inside the GraphQL client application, i.e., GraphiQL and fetch the data from the server after the server executes our query.
- For writing the GraphQL query, we are going to use a GraphQL client tool, which is called as GraphQL playground.
- We will write all the queries inside this GraphQL playground, and it is connected with our system's server.
- Open the web browser present in your system.
- Write the following URL search bar of the web browser to go to GraphQL playground tool:
'http://localhost:4000'
- When we run this URL in the browser, the following window will appear on web browser screen.
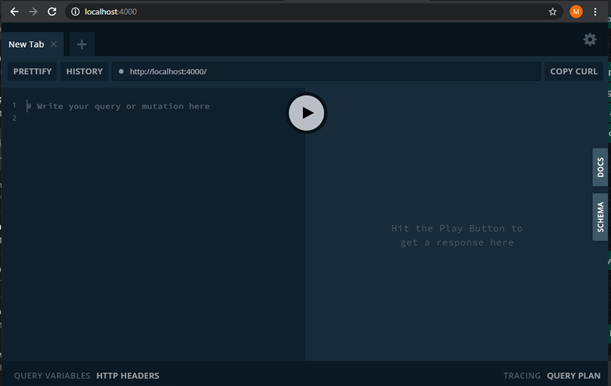
- As we can see in the above image, the GraphQL playground tool is running inside our web browser.
- We can write our GraphQL queries inside this GraphQL playground running in the browser.
Note: The Apollo server we installed in our system automatically hosts the GraphQL playground running on the localhost at our web browser.
- Write the following GraphQL inside the left side part of GraphQL playground window:
{
  coaching {
    Subject
     name
  }
}
- Hit the play button present inside the middle of the window, and you will get the following output:
{
  "data": {
companies :[
  {
      Subject: 'JavaScript',
      Teacher: 'John Steven’,
   {
        Subject: 'Java',
        Teacher: 'Maria',
    {
          Subject: 'Python',
          Teacher: 'Dr. Henery',
     {
           Subject: 'C++',
           Teacher: 'Peter Kevin',
         },
       }
      }
    }
];
Conclusion:
In the section, we have learned the following things:
- How to install the Apollo server, and it's all dependencies inside your system using command prompt.
- How to initialize and run the Apollo server inside your system.
- How to write the GraphQL query and fetch the required data from the Apollo server.