Selenium WebDriver- Checkbox handling
Selenium WebDriver- Checkbox handling
In this tutorial, we will be learning about handling the checkbox in selenium WebDriver.
Let us take one example to give you a better understanding of Checkbox handling, and we will create a sample test script which is as follows;
For our testing purpose, we are using the irctc website to perform Checkbox handling in selenium WebDriver.
In this test case, we will automate the following test scenarios:
| Steps | Action | Method Used | Input | Excepted Result |
| 1. | Open the Google Chrome Browser. | System.setProperty() | The Google Chrome browser must be opened. | |
| 2. | Navigate to the website. | get() | https://www.irctc.co.in/nget/train-search | The home page window must be displayed. |
| 3. | Identify the Journalist Concession checkbox and check that the checkbox is selected already or not. | isSelected() | A Journalist concession checkbox should be identified. | |
| 4. | Check whether the checkbox is clicked or not. | click() | The particular checkbox should be clicked. | |
| 5. | Check whether the checkbox is selected or not. | isSelected() | The particular checkbox should be selected. | |
| 6. | Closing the browser window. | close() | The browser window should be closed. |
Open the Eclipse IDE and the existing test suite new_test, which we have created in WebDriver Installation section of the WebDriver tutorial.
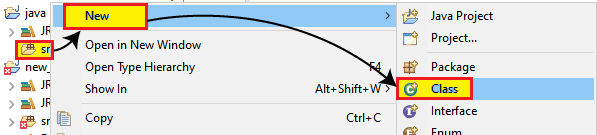
Then, right-click on the src folder and create a new Class File from New ? Class.
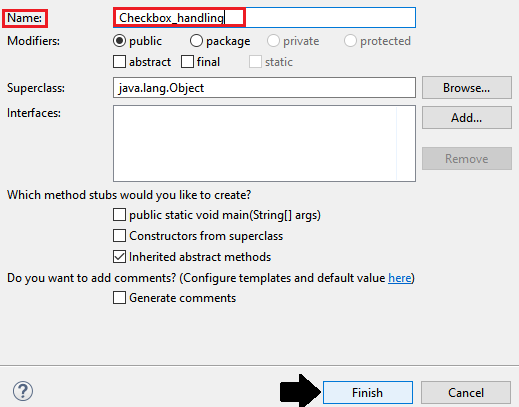
- Give the Class name as Checkbox_handling and click onthe Finish button.
Step1:
To launch the Google Chrome browser, we need to download the ChromeDriver.exe file and set the system property to the path of ChromeDriver.exe file.
Here is the code for setting the system property of the Google chrome Browser:
System.setProperty("webdriver.chrome.driver","C:\\Users\\JTP\\Downloads\\chromedriver_win32 (1)\\chromedriver.exe");
// create driver object for CHROME browser
WebDriver driver=new ChromeDriver();
Step2:
Now, we will get to the desired URL:
//navigate to the website.
 driver.get("https://www.irctc.co.in/nget/train-search");
Step3:
After that, we will move to our next step, where we are handling the checkbox, which is presented on the given website, and check whether the checkbox got selected or not using the isSelected() method.
Note: the isSelected() method is used to check whether the checkbox is already selected or not.
If it returns true, that means the checkbox got selected; otherwise, it returns false.
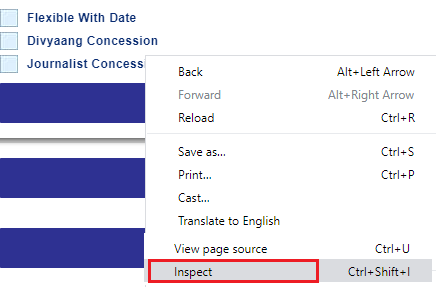
To identify the checkbox first, right-click on the journalist concession checkbox and select the Inspect element field which is as shown below,
The developer tool window will be launched, with all the specific codes used in the development of the particular checkbox.
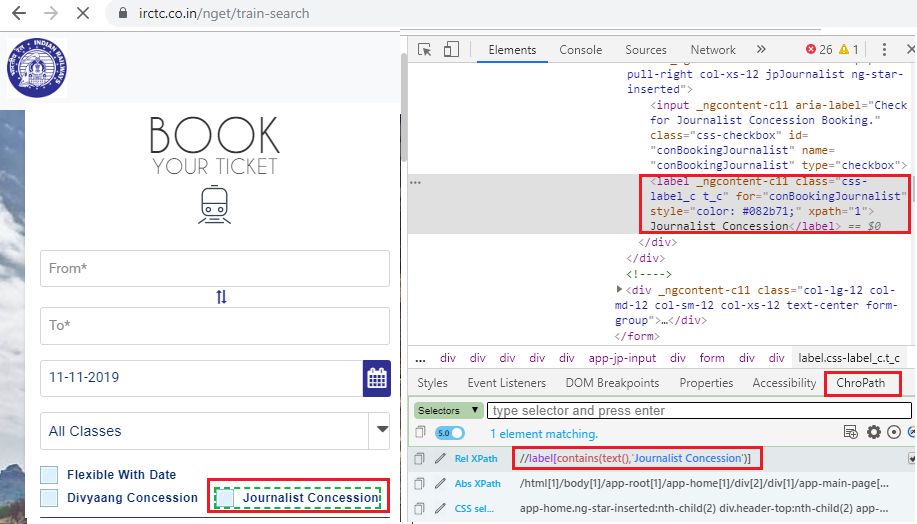
Here the sample code,
//identify the check box present on the web page
 System.out.println(driver.findElement(By.xpath("//label[contains(text(),'Journalist Concession')]")).isSelected());
Step4:
Now, we will check whether the checkbox is got clicked or not with the help of the click() method.
Note: the click() method is used to perform the left click operation on the link, checkbox, radio button.
Here the sample code,
//click on the checkbox
driver.findElement(By.xpath("//label[contains(text(),'Journalist Concession')]")).click();
System.out.println("check box is clicked");
Thread.sleep(2000);
Step5:
After that, we will check that the checkbox got selected or not
Here the sample code,
//check whether the checkbox is selected or not
 System.out.println(driver.findElement(By.xpath("//label[contains(text(),'Journalist Concession')]")).isSelected());
Step6:
Finally, we close the browser window.
 //close the browser
 driver.close();
After completing all the given steps, our final text script will look like this:
package testpackage;
 import java.util.concurrent.TimeUnit;
 import org.openqa.selenium.By;
 import org.openqa.selenium.WebDriver;
 import org.openqa.selenium.chrome.ChromeDriver;
 public class Checkbox_handling {
 public static void main(String[] args) throws InterruptedException{
 System.setProperty("webdriver.chrome.driver","C:\\Users\\JTP\\Downloads\\chromedriver_win32 (1)\\chromedriver.exe");
 // Create driver object for CHROME browser
 WebDriver driver=new ChromeDriver();
 //maximze the window size
 driver.manage().window().maximize();
 //manage the pageload time
 driver.manage().timeouts().pageLoadTimeout(10,TimeUnit.SECONDS);
 //delete all the cookies
 driver.manage().deleteAllCookies();
 //naviagte the the URL
 driver.get("https://www.irctc.co.in/nget/train-search");
 //identfiy the check box present on the web page
 System.out.println(driver.findElement(By.xpath("//label[contains(text(),'Journalist Concession')]")).isSelected());
 //click on the checkbox
 driver.findElement(By.xpath("//label[contains(text(),'Journalist Concession')]")).click();
 System.out.println("check box is clicked");
 Thread.sleep(2000);
 //check whether the checkbox is selected or not
 System.out.println(driver.findElement(By.xpath("//label[contains(text(),'Journalist Concession')]")).isSelected());
 //Closing browser
 driver.close();
 }
 }
- To run the test script in Eclipse, right-click on the window and then click Run as ? Java application and the test script will be launched in the chrome browser, and automate all the test scenarios.
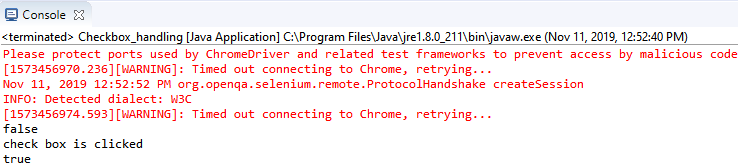
And print the result of all the commands in the eclipse console window which is as shown below,