WebDriver-Tag Name Locator
Selenium WebDriver-Tag Name Locator
The tag name locator is used along with the findElements() method to identify multiple similar elements in the UI.
It is used to locate the web element with the help of tag name like input tag, anchor tag, button tag, etc. on the web pages.
The syntax of the tag name locator is as below:
driver.findElement(By.tagName(“value of tag name”));
Let us see one sample test case in which we will try to identify the tag element using tag name locator to automate the following scenarios:
| Steps | Actions | Input | Expected Result |
| 1. | Open the Google Chrome browser. | The Google Chrome browser should be opened. | |
| 2. | Navigate to the Irctc application home page. | https://www.irctc.co.in/ | The irctc home page must be displayed. |
| 3. | Print the size and name of the text value. | The size and the name of the text value should be displayed. | |
| 4. | Close the Browser. | The Browser should be closed. |
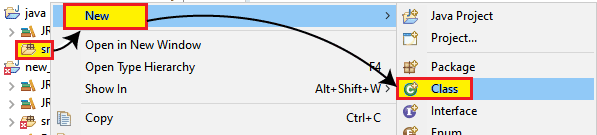
- After launching the Eclipse, we will open the existing test suite new_test, which we have created in earlier session of the WebDriver tutorial.
- And then, right-click on the src folder and create a new Class File from New ? Class.
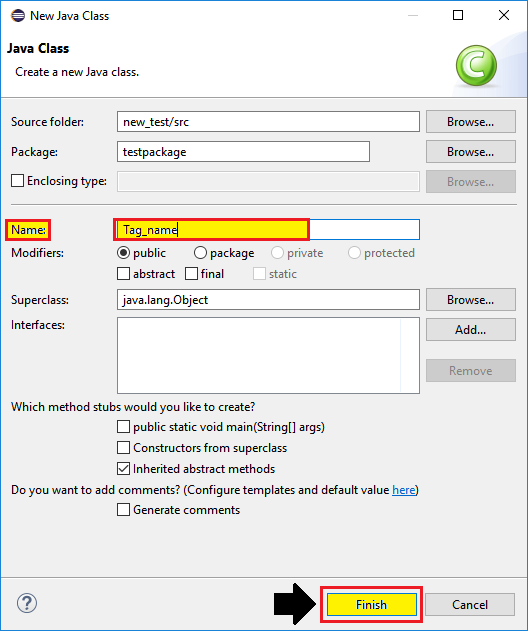
- And now, we will save the class name as Tag_name and click on the Finish button.
Now we will create our test case step by step to have an overview of how to use tag name locators to identify a web element.
Step1:
- To access the Google Chrome browser first, we need to download the Google Chrome driver and set the system property for Chrome driver.
- We have already discussed this in previous sessions of the Selenium WebDriver tutorial. And you can also refer given link "Working with Chrome browser” for a better understanding that how we can download it and set System property for Chrome driver.
// set the system property for chrome browser
System.setProperty("webdriver.chrome.driver","C:\\Users\\JTP\\Downloads\\chromedriver_win32\\chromedriver.exe");
//create the object for chrome driver
WebDriver driver = new ChromeDriver();
Step2:
After that, we will move to our second step, which navigates us to the given URL.
Here the sample code,
//navigate to the URL
driver.get("https://www.irctc.co.in/nget/train-search ");
Step3:
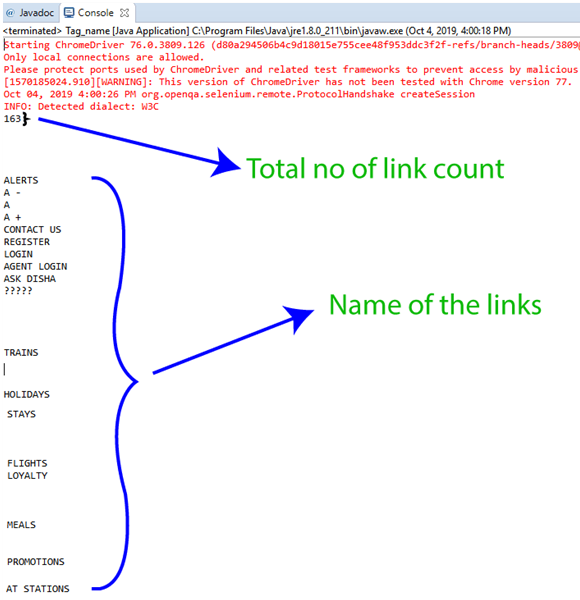
Now we are trying to locate web link count and name of the link using anchor tag by using the tag name locator.
//locating the number of links using anchor tag
List<WebElement> lst= driver.findElements(By.tagName("a"));
//print the link count
System.out.println(lst.size());
//display all the link names
 for(int i=0; i<lst.size();i++)
 {
String linkname=lst.get(i).getText();
// print the link name
System.out.println(linkname);
}
Step 4:
- In the last step of our sample test case, we will terminate the existing browser,
The sample code for closing the browser,
//Close the browser
 driver.close();
Our final test script will look like this:
package testpackage;
import java.util.List;
import org.openqa.selenium.By;
import org.openqa.selenium.WebDriver;
import org.openqa.selenium.WebElement;
import org.openqa.selenium.chrome.ChromeDriver;
public class Tag_name {
public static void main(String[] args) throws InterruptedException {
//set the system property
System.setProperty("webdriver.chrome.driver","C:\\Users\\JTP\\Downloads\\chromedriver_win32\\chromedriver.exe");
//creating the object for Chrome driver
WebDriver driver = new ChromeDriver();
driver.manage().window().maximize();
//Navigate to the home page irctc application
driver.get("https://www.irctc.co.in");
//locating the number of links
 List<WebElement> lst= driver.findElements(By.tagName("a"));
//print the link count
System.out.println(lst.size());
//display all the link names
for(int i=0; i<lst.size();i++)
{
 String linkname=lst.get(i).getText();
// print the link name
 System.out.println(linkname);
 }
//close the driver
driver.close();
}
}
- To run the test script in Eclipse, right-click on the code and then select Run as ? Java Application.
- After automating all the test scenarios, we can see the output of print commands in the Eclipse console window as shown in the below snapshot.