How to Outline Text in Photoshop
Outline Text in Photoshop
In Photoshop, we can outline the text to make it stand out. Even if you are a Photoshop novice or a learner, it's fast and simple to learn.
However, we need to be sure/clear. Being clear is the most important thing as you can create wonderful effects with just the right font mixture and various colors etc. Otherwise, the outlined text can look overdone.
Now let's get started and learn how to make your documents more attractive, beautiful, and eye-catching.
Following are the steps to add a line around the outside of text in photoshop:
STEP 1: CREATE A NEW DOCUMENT
the first step is to create a new blank Photoshop document. Navigate to the File-> select New menu and specify the image size. Now, Click on the 'OK' option. The new blank image will appear on the photoshop window.
STEP 2: SELECT THE TYPE TOOL
The second step is to select the type tool. Select it from the photoshop tool panel, or you can press on the letter 'T' on your keyboard. Select the color in which you want to write from the same toolbar. Write your text on the screen.
STEP 3: SELECT FONT FROM OPTION BAR
After selecting the type tool, the next step is to select the font as per your choice from the option bar, which is on the top of the photoshop window. You can pick up trendy fonts and make perfectly outlined fonts.
STEP 4: Click on your layer
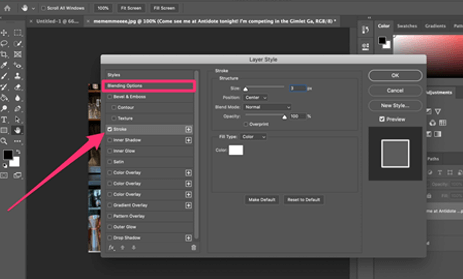
Once you have typed your text in the required font and color, visit the right side's layer palette. Now, double click your text on the layer. Put another way, click on the tiny "fx" button at the bottom of the Layer panel and pick the text you want to outline.
STEP 5: ADD YOUR STROKE
To add stroke to your text, click on the option "stroke" from the panel. You will find this option on the left side of the layer panel. There are several settings available under "stroke" to make your outline visibly pretty.
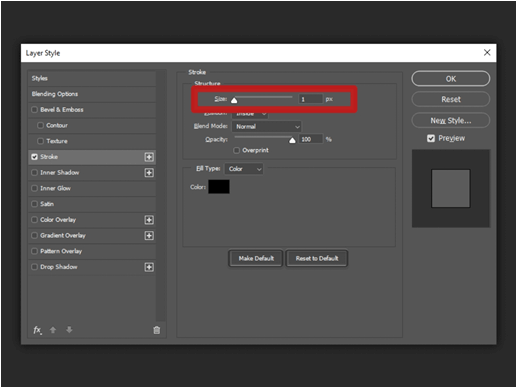
STEP 6: ADJUST THE SIZE OF YOUR OUTLINE
You will find the "size" slider on the top of the stroke panel. Adjust the size or width of your outline according to your needs. You can also manually add a number.
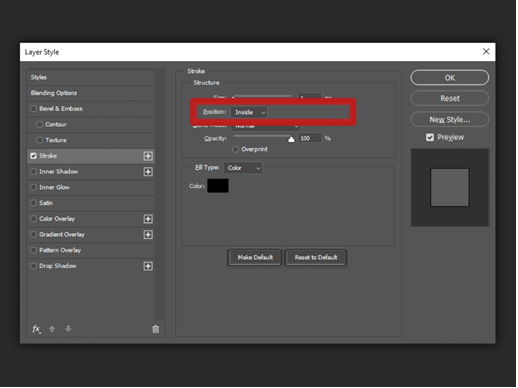
STEP 7: SELECT THE POSITION OF THE STROKE
The Position option is on the right below the "size" slider. There are three options: The "inside" position will outline the inner edge of the text. The "outside" position will outline the outer edge of the text. And the "center" position will outline 10 pixels inside and outside of the text. Choose your position by looking at the preview of your text.
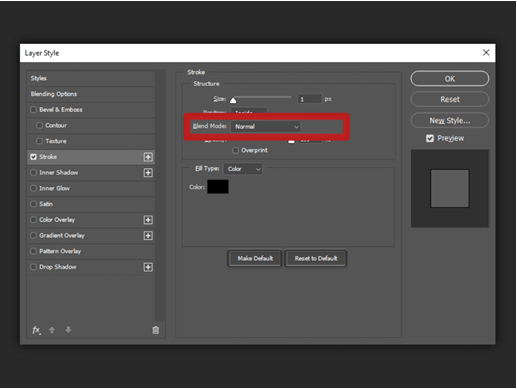
STEP 8: SELECT YOUR DESIRED BLEND MODE
Select the blend mode, which will help the colored stroke to interact with other colors under it. If your text is placed over a colored image, then this setting will be helpful.
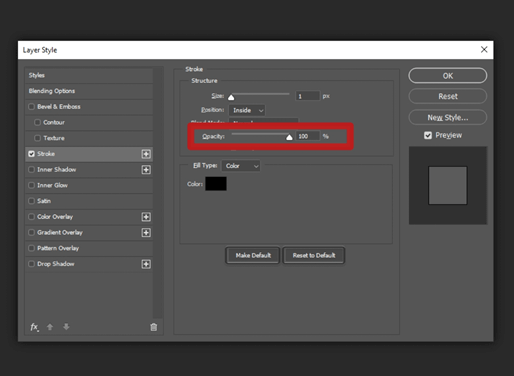
STEP 9: ADJUST THE OPACITY
The opacity decides the degree of transparency of the stroke. Move the opacity slider and set it as per your requirements. The higher the opacity, the darker will be the stroke. You can also set it manually in terms of percentage in the block on the right side of the slider.
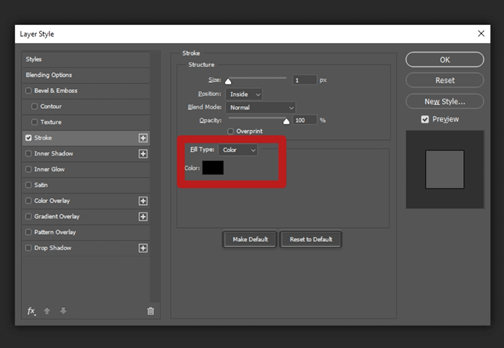
STEP 10: SELECT THE COLOR OF YOUR STROKE
You can select any color from the given options which will match with the text color. You can apply the features of solid colored lines, patterned borders, and colorful gradients in your stroke.
STEP 11: ADDING A SECOND STROKE (optional)
Now you are free to add a multiple layer effect on a single layer. Tap on the plus icon next to "stroke" in the Styles chart to do this. Select the stroke layer you want to add. Once you are satisfied with the effect, click on the "OK" button; it will add a second stroke effect to your text.
You can try various options on both stroke layers to give a unique look to your text.
STEP 12: PRESS OK TO FINISH
Once you are satisfied with the changes you made in your document, press the "OK" button to save it. Now you are finished with your outlined text. You are free to edit it if you want more changes.