How to Put a Text Behind an Object Using Photoshop CC?
Put a Text Behind an Object Using Photoshop CC
Photoshop CC has never failed to astound its users with amazing ways to edit pictures and make it more attractive. It has millions of effects to add to the images.
In this article, We will learn a way to put text behind an object using Photoshop CC.
Following are the steps to add text behind an object in Photoshop CC:
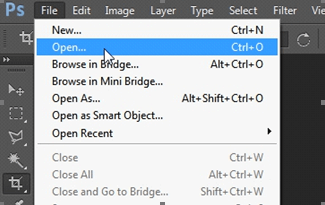
Step 1: Open an image
The picture you want to edit needs to be opened in Photoshop to start the process. Click on the "File" menu from the menu bar and navigate to "Open". Choose the image file you want to edit from the file location and then click on "Open" from the dialog box. Your chosen image will appear on the photoshop screen.

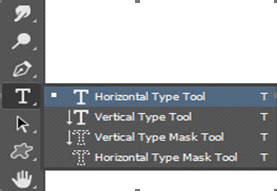
Step 2: Select the Type Tool
Go to the Photoshop toolbar in the left column on the photoshop screen. Choose the "Type" tool with the letter "T" from the toolbar.
Alternatively, you can also type the letter "T" on your keyboard.
Select "Horizontal Type Tool" as shown below.
Step 3: Style your text
Set the font of your text according to your requirements. The font can be changed using the "Options Bar" in the upper photoshop screen. You can also apply any character style to your text. Go to "Windows" and select "character". A dialog box will appear, which will help you choose a character style.

Step 4: Type your text and resize it
Type your text over the image after selecting the font. Click and drag the text box inside or outside to contract or enlarge the text according to your needs. Move your text into the desired position over the image. For example, consider the below image:

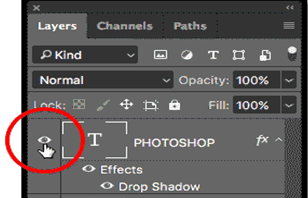
Step 5: Disable the Text Layer
Go to the Layer Palette at the right column of the Photoshop screen. You will see an eye icon on your text layer. Click on it to disable it, as shown below.
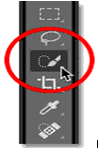
Step 6: Select the Main Subject of your Image
You can do this using the "Quick Selection Tool" with the symbol shown below.
To select your main subject, you can either click and drag over the main subject of your image or simply click on the "Select Subject" from the "Quick Selection" options bar. The "Select Subject" button will automatically detect the main subject of your image. However, it may be incorrect sometimes. So, it would be best if you fixed it accurately after it has made the selection.

Step 7: Refine your selection
You will find the "Select and Mask" button on the right side of the "Select subject" button in the options bar. Click on this button. This will refine your selection.

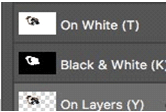
Step 8: Change the View Mode
In the Refine Edge dialog box, click on view mode. Change the view mode to "white" so that your selection becomes more clear.
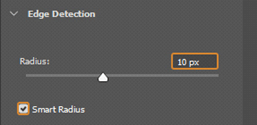
Set the opacity to 100%. In the Edge detection option, enable a smart radius and then increase the radius.
Now, Go to the Global refinement option, drag the "smooth" slider to the right, add contrast to your image, and adjust the other settings accordingly.
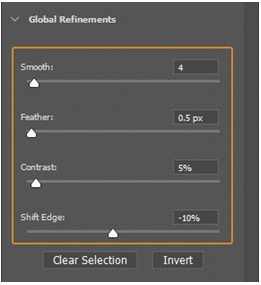
After the refining is complete, click OK.
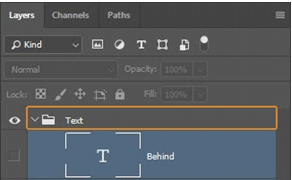
Step 9: Create a group in the Layer Panel
To create a new group, go to the Layer Panel and click on the New Group icon. You can rename the category by double-clicking it. Then, click and drag a layer of text into the group.
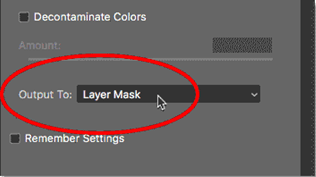
Step 10: Apply and Refine the Layer Mask
Go to the Output settings area and change the "Output to" option to Layer Mask. Click on OK, and we will see our text appearing behind the image.

Hence, we are done with adding the text behind an object using Photoshop CC.