React Forms
React Forms
Forms are the important part of any web application. It allows the interaction of the user with the app as well as the gathering of the information from the users. Forms can perform various tasks that depend on the nature of the requirement of your business and logic, such as user authentication, adding user, searching, filtering, booking, etc. A form can include text fields, buttons, check boxes, radio buttons, etc.
Creating forms
React provides you a Stateful and reactive approach to create a form. In React, the controlled components usually implemented the forms.
The form has mainly two types that are as follows:
- Uncontrolled component.
- Controlled component.
Uncontrolled component
Uncontrolled components are similar to the traditional HTML form inputs. The DOM is itself responsible for handling the form data. Here, the elements of HTML maintain their state, which will update when the value of input changes. For writing an uncontrolled component, you have to use a ref to get form values from the DOM. In other words, it is not important to write an event handler for updating of every state.
Example:
import React, { Component } from 'react';
 class App extends React.Component {
  constructor(props) {
  super(props);
  this.updateSubmit = this.updateSubmit.bind(this);
  this.input = React.createRef();
  }
  updateSubmit(event) {
  alert('Data submitted successfully.');
  event.preventDefault();
  }
  render() {
  return (
);
}
}
export default App;
Output:

Once the submit button gets clicked, you will get the following output:

Controlled component
In the controlled component, the input of the form element is handled by the component rather than the DOM. Controlled components have the functions that govern the data, which passes to them on every onChange event. Here, the changeable (mutable) state is kept inside the state property and updated only with the setState() method.
Like an onChange event, the controlled component also takes its current value by props and notifies the changes by the callbacks.
Controlled components consist of the functions that govern the data, which passes into them on every onChange event. After that, this data will save into state and updated with the setState() method. It makes better control of the component over the elements and data of the forms.
Example:
import React, { Component } from 'react';
class App extends React.Component {
constructor(props) {
super(props);
this.state = {value: ''};
this.handleChange = this.handleChange.bind(this);
this.handleSubmit = this.handleSubmit.bind(this);
}
handleChange(event) {
);
}
}
export default App;
Output:

Once the submit button gets clicked, you will get the following output:

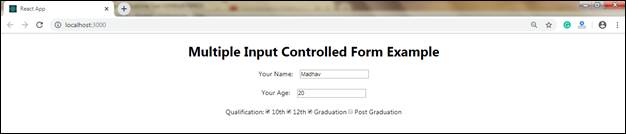
Multiple Input Fields
You can handle more than one input field value by adding a name attribute to each element.
If you want to access the fields in the event handler, use the syntax event.target.name and event.target.value.
Example:
import React, { Component } from 'react';
class App extends React.Component {
constructor(props) {
super(props);
this.state = {
quali1: true,
quali2: true,
quali3: true,
quali4: false,
name: 'Madhav' ,
age:20
};
this.handleInputChange = this.handleInputChange.bind(this);
}
handleInputChange(event) {
const target = event.target;
const value = target.type === 'checkbox' ? target.checked : target.value;
const name = target.name;
const age = target.age;
this.setState({
[name]: value,
[age]: value
});
}
render() {
return (
Output:
Conditional Rendering
If you do not wish to display the element before the input provided by the user, you can add if statement.
In the following example, we are creating an empty variable that is stated as the top. We are also adding if statement for inserting the data to the top variable if the user provides any input.
Example:
import React, { Component } from 'react';
class App extends React.Component {
constructor(props) {
super(props);
this.state = { name: '' };
}
myChangeHandler = (event) => {
this.setState({name: event.target.value});
}
render() {
let top = '';
if (this.state.name) {
top = Hello Mr. {this.state.name}
;
} else {
top = '';
}
return (
);
}
}
export default App;
Output:
Before any input given by the user, you will see the following output.

When input provided by the user, you will see the following output.