Defect or Bug Life Cycle in Software Testing
In this tutorial, we will study the Defect Life Cycle or Bug Life Cycle in software testing. As the name suggests, it is a life cycle of a defect found while performing the testing activities. It consists of various life cycle stages a bug goes through in its complete life. Before moving forward, let us briefly understand what a defect is.
What is a Defect?
In software testing, a defect is a difference between the client's requirement and the developed software. In simple terms, a defect is an error/flaw in the system which results in incorrect and unexpected outputs. During the designing and developing phase of the application, programmers accidentally or unknowingly create some defects by code overlapping, missed, or ignored code snippets, etc. These mistakes and faults will result in defects which further lead to the failure of the application. A defect is also acknowledged as a bug, problem, issue, or incident in various organizations.
Defects or bugs are found when testers validate the application or software after the completion of the development phase. To find all possible bugs in the system, testers perform testing activities to deliver a defect-free product. While performing testing activities, the identification of bugs can be made in two ways.
- When the actual and expected outputs of a system are different, therefore, the system deviates from its original function
- when the testing output is different from the user's expectations or business requirements.
Let us discuss the Defect Life Cycle in detail for a better understanding of the defect stages.
Defect Life Cycle
A defect undergoes a set of stages in its entire life which starts when a new defect is found and ends when the defect is closed, known as the Defect Life Cycle. All defects should follow the life cycle stages. Defects are opened and closed by the testers while testing the application. A defect is only closed when it gets resolved, and the developer ensures that this won't get reproduced. It is also acknowledged as Bug Life Cycle.
The objective of the bug life cycle is to systematically maintain the defect fixing process and easily update, coordinate, and communicate the status of defects to the respective POC (Point of contact). The process of defect life cycle differs from one organization to another or project to project depending on the software development model used, software testing techniques used, timelines, organizational policies, etc. Various defect management tools are used for keeping track of the defects, like Bugzilla, Jira, etc.
The defect life cycle involves several resources to whom a defect is assigned for fixing, testing, etc. Below is the list of resources involved in the cycle: -
- Tester – The task of testers is to identify bugs in the developed software or application. Once the bug is fixed, testers also retest the bug to ensure it is working properly.
- Developer –The task of developers is to fix or resolve the bugs and issues present in the software that are logged by the testers.
- Test Lead – The task of the test lead is to verify the defect logged by testers and assign it to the development team for a fix.
- Developer Lead – The task of the developer lead is to assign the defect to the respective developer when testers are unaware that the developer who created the module has a bug.
Before moving forward, let’s understand what a defect status is.
Defect Status – It is the current or present state of the defect from which it is currently experiencing. It helps a tester communicate the current state of the defect to the respective assignee. It also helps testers and developers easily keep track of the defects logged.
A defect goes through multiple stages in its lifetime. The most important stages of the defect life cycle are mentioned below: -
- New
- Assigned
- Open
- In-progress
- Fixed
- Pending Retest
- Retest
- Verified
- Closed
New State – The first state of a defect in the defect life cycle is “New”. Whenever a new bug is found or logged by a tester, a status is assigned to the defect as “New”. Once the defect is logged, bug fixing activities are done by the developers.
Assigned State – It is the second state of the defect life cycle. When the defect of the "New" state is approved and verified by the QA lead or manager, it will be handed over to the development team for a fix. After assigning the defect to the developer, the status of that defect will be changed to “Assigned”. The bug priority is also assigned at the time of defect allocation to a developer.
Open State – It is the third state of the defect life cycle. In this state, the development team or developer start analyzing the bug and its root cause and performs the defect fixing tasks. While exploring the defect, if they found it inappropriate, then the status of the defect will be changed to Duplicate, Rejected, Deferred, or Not a Bug based on the conditions and reasons.
We will discuss the above states separately in detail.
In-Progress State – A defect enters in "In-Progress" state when the developer starts working on fixing the defect. The defect status will be marked as “In-Progress” till the defect is fixed or resolved. Once the defect is fixed by the team, the defect is moved to the next state.
Fixed State – It comes after the “Open” state in the defect life cycle. In this state, the defect gets fixed, and the defect status is updated as “Fixed” by the developers. The development team makes the appropriate changes in the code to fix the bug.
Pending Retest State – Once the defect is fixed, it will be ready for a retest. In this state, the defect is assigned back to the testing team for a retest. So, the defect is in the tester's bucket for a retest, and until they start retesting, the status of the defect will remain as “Pending Retest”.
Retest State – In this state, testers start with retesting the previously failed test cases and defects for which developers have modified the code to fix it. Retesting is done to ensure that the defect is fixed and working as expected. While retesting the defect, the status will be updated as "Retest".
Verified State – Once the retesting is completed with no present issues, the defect status will be modified as "Verified" because testers have verified that the defect got fixed and test cases are working as per the expectations. If issues are identified, the status will be updated as "Reopen".
Closed State – This is the last stage of the defect life cycle. Once the defect is retested and verified by the testers, it no longer exists. Then, the defect will be closed, and the status will be marked as "Closed".
Some more stages of the defect life cycle are mentioned below: -
- Duplicate
- Rejected or Invalid
- Deferred
- Not a Bug
- Reopened
- Non-Reproducible
- It cannot be Fixed
Duplicate State – A defect enters the "Duplicate" state when a developer feels the bug is repeated or the logic and concept of the bug are the same as of previous one. Hence, they mark the status as "Duplicate".
Rejected or Invalid State – A defect enters a "Rejected" or "Invalid" state when a developer thinks that it is not a valid or genuine defect. In some cases, developers don't understand the actual requirements or misunderstand their requirements. Therefore, they mark the defect status as "Rejected" or "Invalid".
Deferred State – A defect enters in “Deferred” state when it is not urgent to fix the defect. Based on the priority and urgency, the development team works on fixing the defect. If they feel that it's not urgent to fix and it won’t affect the release of the product, then it can be fixed in future releases or updates. Hence, developers mark the status as "Deferred".
Not a Bug State – A defect enters the "Not a Bug" state when the developer feels it doesn't have an impact on the functionality and behaviour of the system. In such cases, developers mark the status as "Not a Bug", and sometimes it may be considered as “Rejected”.
Reopened State – A defect enters the "Reopened" state when testers find the bug is not completely resolved, or some new issue is generated from it. While retesting the defect, if the tester identifies any current issue, they will assign it back to the developer and mark the status as “Reopen”.
Non-Reproducible State – A defect enters the "Non-Reproducible" state when the developer feels it won’t get reproduced due to data mismatch, platform mismatch, server mismatch (both testing and development servers), build mismatch, improper defect report, etc. Sometimes, developers are not able to find the same bug in their working environment due to the points mentioned above. Hence, they mark the defect status as “Non-Reproducible”.
Cannot be Fixed State – A defect enters the "Cannot be Fixed" state when the development team is unable to fix the defect due to some specific reasons like the root cause of the defect, lack of technical support, lack of skills, defect fixing cost, etc. In such cases, they mark the defect status as “Cannot be Fixed”. Usually, all the bugs with the "Cannot be Fixed" status are minor bugs.
Detailed workflow of Defect Life Cycle
Let us understand the workflow of the defect life cycle in detail with the help of a diagram.
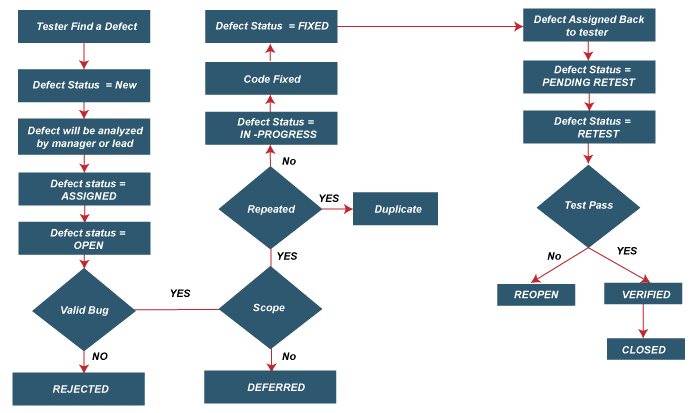
- Identifying a defect is the entry criteria for the defect life cycle. When a tester finds any issue or fault in the system that deviates from its expected output, they may raise or log a bug for it.
- While logging the defect in the defect management tool, the current defect status will be updated as "New" as a new defect is logged by the testers.
- The project manager or QA lead will check and approve the newly raised defect. After analyzing the defect, the manager or lead will mark the defect status as “Assigned” and move the defect to the development team.
- Once the bug is assigned to the respective developer for a fix, the defect status will be marked as "Open" as it is open for the fixing procedure.
- The developer will examine the defect and decides whether the defect is valid or not. If it is a valid defect, it will be moved to the next step. Else, the defect status will be marked as "Invalid", "Rejected", or "Not a Bug", and developers will reject the defect.
- After knowing that it is a valid defect, the next step is to verify its scope of it. The scope will cover the priority, severity, urgency and functionality of the defect. If the defect is in scope, it will be moved to the next step. Else, developers will mark the defect status as "Deferred" and fix it in the next release.
- The next step is to check the redundancy of the defect, whether it is a duplicate or not. If the developer finds it duplicate, the defect status will be marked as "Duplicate" and need not fix.
- After all the mandatory checks for a valid bug, the developer starts the procedure of fixing the defect. While the developer is working on a defect fix, the status will be marked as "In-Progress" till the defect gets fixed.
- After fixing the defect, the developer marked the defect status as "Fixed" and assigned it back to the tester or test lead.
- Once the defect is fixed and assigned back to the tester, defect status will be marked as “Pending Request” till the time retesting is not started.
- The next step is to retest the defect to ensure whether it is resolved or not. While retesting the defect, the status is marked as “Retest”. If the defect is resolved, then the tester is good to close the defect. Else if any issue persists, the defect is again moved to the developer for a fix, and the status will be marked as “Reopened”.
- After moving the defect back to the dev (developer), the developer starts working on fixing it. The same defect life cycle will be followed here from steps 8 to 11 according to the defect state and condition.
- Once the defect is fixed and retested by the tester, the testers will verify that the defect is resolved and it is working as expected. After verifying, the defect status will be marked as “Verified”.
- At last, testers close the defect when all the previous checks are passed, and the status will be marked as “Closed”.
Once the defect is fixed and closed, a Defect Report or Bug Report is generated for that defect.
What is Defect or Bug Report?
In software testing, a defect or bug report is a detailed document which contains all the information about the defect raised or logged by the tester. It is used to keep track of the bug with all the details, which include the date on which the bug was found, description, found by whom (assignee), name of the developer (assigned to whom), defect id, priority, severity, defect status, etc. The main purpose of maintaining a bug report is for the understanding of the developer and product team, and it helps in defining the issue clearly so that the developers can quickly understand and fix the issue. It also helps in identifying duplicate or similar bugs in future and taking the appropriate action against them. Defect reports must be created alternatively and correctly as it is the most important document for developers.
A defect report is usually generated by the testing or Quality Assurance team. The customers or end-users also generate a defect report as they have curious about using each feature or module of the software. Therefore, they usually find more bugs and share the report with the customer support team for reference.
Attributes/ Fields of Defect Report
A defect report consists of many fields or attributes which vary from organization to organization. Some of the important attributes that should be included in the reports are mentioned below: -
- Defect Id – It is a unique identification id that is assigned to each bug while reporting. The system automatically assigns an identification number to each bug.
- Description of the Defect – It is a brief description of the defect, including the issue, snapshots, expected result, and the module having the bug. It should contain the correct information and should be easy to understand.
- Release or Build Number – The release or builds version number of the product under test. It should be specific to the build where the bug was found.
- Problem Title – It is a brief one-line description of the defect, which creates a defect title.
- Open Date – It is the date when the defect is reported or logged in the system.
- Close Date – It is the date when the defect is closed in the system by a tester.
- Detailed Steps or Steps to Replicate – It is a piece of detailed information or steps of the error attached with screenshots and documents for developers' reference so that they can replicate the issue in their environment and fix it.
- Reported or Defected By – The details (name & id) of the person (Tester) who reported the bug in the system.
- Assigned To or Fixed By – The details (name & id) of the person (Developer) to whom the bug is assigned by the tester.
- Defect Status – The current state or status of the defect, such as Open. In-Progress, Fixed, Closed, etc.
- Summary – It is the defect summary with clear and concise information.
- Priority – It is the defect’s priority which is associated with the defect fixing urgency. Based on the urgency, the defect’s priority could be low, medium, or high.
- Severity – It is the defect’s severity which is related to the impact of the defect on the application or software. Based on the impact and criticality, the defect severity is marked as critical, high, low, or medium.
- Defect Type – It specifies the type or category of the reported defect, such as Functionality issue, GUI issue, Documentation issue, Coding issue, Connectivity issue, Database issue, Performance issue, Stress issue, etc.
- Actual Result – It specifies the actual output (when the bug is generated) received while testing the module.
- Expected Result – It specifies the expected output defined as per the requirements and specifications.
Need for defect reports
A defect report plays an important role in software testing as it helps in keeping track of all the defects reported for a particular module in a documented format. It contains all the details of a defect starting from the reported data, reported by, to closed date, fixed by. All the actions and information associated with a bug are combined and stored in the defect report.
One defect report is created for one defect. Suppose there are multiple defects in a project. In that case, multiple defect reports will be created for the respective defects and should include all the above defect report elements to be an effective defect report.
Some of the reasons why defect reports are important are mentioned below: -
- For testers – When the tester assigns a bug to the developer and the developer cannot understand the root cause or needs more information on the bug. In such cases, the tester can provide them with the defect report for better understanding and give a walkthrough of the report. Similarly, when other testers or test lead wants some information on a particular bug, the tester working on that bug can provide the defect report of the bug. It is also helpful for the tester when a new bug is found, and they can compare the problem with the earlier bugs and quickly report it to the developers so that the failure can be avoided.
- For developers – It helps in understanding the issue and impact of the defect on the application. With the help of the reports, developers can deeply analyze and reproduce the same bug in their environment and can effectively work on the fix of the defect.
- For clients or customers – With the help of defects reports, the project manager or lead can provide the details of the defects to the clients when required or in case the client asks for the same. They can examine the issues and progress in the testing process along with the defect management process.
- For other testers – If the tester working on a particular defect is not available, other testers can also handle the defect by studying the defect reports. In future, if a similar kind of bug is found, then other testers should be able to handle that defect by analyzing the defect reports.
Advantages of using Defect Life Cycle
Some of the advantages of following a defect life cycle are mentioned below: -
- It helps the team to meet the quality standard of a product with zero open defects.
- With the help of a defect life cycle, the team can deliver better services with a high client or customer satisfaction.
- It also helps in the early detection of the bug so that failures can be avoided in later stages.
- It reduces the cost of bug fixing and removes the cost of failure as defects are identified in the early phase.
- It is useful for maintaining better communication and connectivity within the team and with the product and client's team. Efficient teamwork and understanding are required during bug reporting and fixing.
Disadvantages of using Defect Life Cycle
Some of the disadvantages of following a defect life cycle are mentioned below: -
- The major issue when the following defect life cycle is that the development environment is very dynamic, and all the defects are reported and tracked in the real-time environment. Therefore, when development is in progress, or some modifications are done by the developers, it will also affect the testing environment. Hence, there is no control over the test environment, and more bugs will be generated in such cases.
- The other issue is variations or dissimilarities of the bug life cycle. This will result in a high workload as the team needs to keep track of the issues more efficiently, and no discrepancies are allowed.
- Sometimes, developers cannot reproduce the bug in the development environment due to various reasons such as data mismatch, server mismatch, platform mismatch, etc.
- In some cases, defects cannot be logged or reported in the system as it is not related to the requirements mentioned in the BRD (Business Requirements Document), FRD (Functional Requirements Document), or design documents. It could be a data issue which is not exactly impacting the functionality, but it is an issue that should be reported.
- One of the minor issues is while reporting a bug, testers, as well as developers, might feel the difficulty in deciding the defect severity.