Manual Testing Types
In this tutorial, we will discuss the types of manual testing in detail. As discussed in the previous tutorials, there are three types of manual testing in the software testing world. Before moving forward, let us just recall what manual testing is.
What is manual testing?
Manual testing is one of the types of software testing. It is the most important and oldest testing technique, which is used to test the software and application manually with the help of testers. Testing activities like test case generation, test execution, and defect reporting are performed manually to produce a 100% defect-free software or application.
Types of manual testing
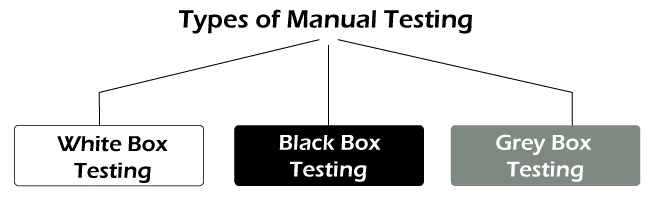
Manual testing is further categorized into three different categories, which are mentioned below:
- White-box testing
- Black box testing
- Grey box testing
Let us thoroughly discuss all three types of manual testing.
White Box testing
A type of manual testing that keeps track of the testing of source code and internal structure of the system is acknowledged as White box testing. In white box testing, the whole testing process is focused on the infrastructure of the software, including design, code, structure, and integration with other systems to evaluate and enhance the design and security of the software. This testing approach also tests the workflow of all input data against the output for all test cases.
White box testing allows us to have visibility of the source code of the application. Thus, it is also termed as Glass box testing, Clear box testing, Transparent Box testing, and Open box testing. It is performed by developers or testers knowing a programming language, as white box testing requires a good knowledge of programming languages. Therefore, it is generally performed by the developers. Each line of code is tested by the developers to discover all the hidden loopholes in it.
How is white box testing performed?
Following are the steps used to perform white box testing:
- Understanding the code and test case preparation – In this step, the tester or developer study and understand the source code as it tests the internal infrastructure of the application. A highly knowledgeable programmer is required to do white box testing to discover the errors and should be aware of secure programming methods. Also, it requires knowledge of development tools to understand the functioning of the code and application. Test cases are drafted according to the source code by categorizing them into three categories (statement, decision, condition).
- Test execution and report creation – Once the test cases are prepared, test execution occurs. Execution will find out the hidden bugs, loopholes, and incorrect code. After completing test execution, a test report is created, which contains detailed information on the entire testing process.
Need for White box testing
White box testing plays an important role in the testing process. Its main objective is to analyze the application's workflow through testing techniques.
- It examines and corrects each statement and function in the code. Tests each line of code to find errors.
- It is used to test the source code for security loopholes.
- It also validates the incorrect or broken structures in the code.
- It helps in validating the workflow of input data in contrast to the output of the code.
- It can be performed at three levels of software testing, which are Unit testing, Integration testing, and System testing levels.
Testing techniques of White box testing
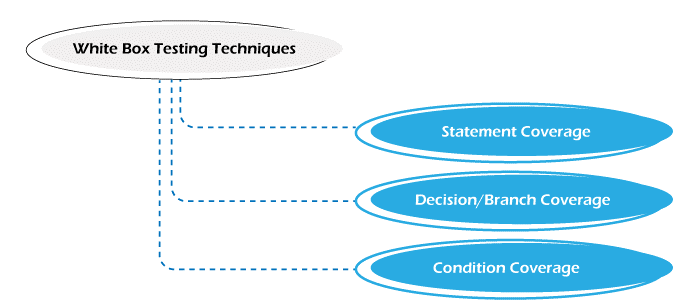
To perform white box testing, we must follow certain code coverage techniques, which are mentioned below:
- Statement Coverage
- Decision/ Branch Coverage
- Condition Coverage
Let us discuss each technique in detail.
Statement Coverage – It ensures that all statements of the code must be covered and tested once to detect faults and errors in the code. In other words, it is used to validate each line of the program at least once with minimal tests. It allows us to discover untouched codes or statements, missing statements, and unwanted snippets from earlier versions. It is considered as the weakest form of code coverage.
Also, it measures the percentage of statements executed by the given formula.
Statement coverage = (No. of statements/ Total no. of statements) *100
For e.g.,
public void sum (int x, int y) {
int result = x + y;
if (result >0) {
System.out.println("Positive result" + " = " + result); }
else {
System.out.println("No result"); }
}
In the above example, for testing all the statements, we need at least 2 test cases. Let’s assume
TC 1: x=2, y=3
The first Test case (TC1) will cover the first four statements and the last line, approximately 70% of statement coverage.
TC 2: x=-1, y=0
Similarly, the second test case (TC2) will cover the first three statements and directly jumps to the else part covering all statements till the end, which is approx. 70%. And the remaining statements are executed in this test case.
After executing both cases, the percentage of statement coverage is 100%. Hence, to cover all the statements, we must provide variable input values according to the requirement.
Decision Coverage or Branch Coverage – It ensures that all possible code branches should be tested at least once. In other words, it allows us to execute all decision statements (branches) of the code with minimal tests. Statements consisting of IF, IF-ELSE, CASE, and DO-WHILE statements will result in a decision statement or branch. Generally, the outcome of all the decision statements is a Boolean value (either true or false). To test the functional flow and logic behind each branch, we used to perform branch coverage testing. It also validates the output against the input of each branch.
It is found that decision coverage is better and stronger than Statement coverage. If we achieve 100% branch coverage of the code, it will automatically result in 100% statement coverage. Also, it measures the percentage of how many branches are executed/covered by the given formula.
Branch/ Decision coverage = (No. of decision outcomes executed/ total no. of decision outcomes) * 100
For e.g.,
public void add (int a, int b) {
int result = a + b;
if (result >0) {                                                                                                      //Decision statement 1
System.out.println("Positive result" + " = " + result); }
else if (result ==0) {                                                                                            //Decision statement 2
System.out.println("Result equal to 0"); }
else{                                                                                                                      //Decision statement 3
System.out.println("Negative"); }
}
Flowchart for the above code:
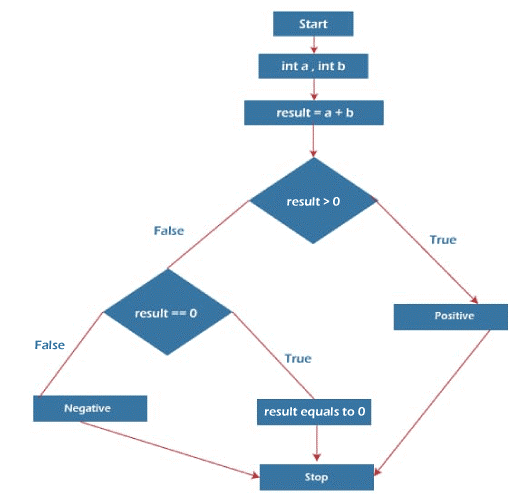
In the above example, we have three branches to cover, so we need at least 3 test cases.
TC1: a= 1, b= 5
Here, both the variables are positive, so it will cover decision statement 1, approximately 33% of coverage.
TC2: a= 0, b= 0
Here, both the variables are 0, so it will cover decision statement 2, approximately 33% of coverage.
TC3: a= -2, b= -5
Here also, both the variables are negative, so it will cover decision statement 3, which is approximately 33% of coverage.
After adding all three coverage outcomes, the result will be 100% decision coverage.
Condition Coverage – It ensures that every logical condition of the code must provide its all-possible outcomes. In other words, it is used to validate the expressions with logical operands that are present in conditional statements like Boolean operations (AND, OR). It is also known as Expression Coverage or Predicate Coverage. It validates the result of each condition for both true and false outcomes. Achieving 100% condition coverage will not result in 100% decision coverage.
To measure the condition coverage of a program, we use the below formula:
Condition coverage = (No. of operands executed/ Total no. of operands) * 100
For e.g.,
if ((a>b) && (b<c))
In the above example, we can have four possible combinations of outcomes. For better understanding and view, we have organized all the conditions with their respective outcomes in a tabular format, as mentioned below:
| Values | a > b (Cond. 1) | b < c (Cond. 2) |
| a = 2, b = 1, c = 5 | True | True |
| a = 1, b = 3, c = 2 | False | False |
| a = 5, b = 2, c = 1 | True | False |
| a = 0, b = 2, c = 2 | False | True |
Hence, after adding all four coverage outcomes, the result will be 100% condition coverage.
Black Box Testing
A type of manual testing that keeps track of the behavior and functionality of the software and ensures it should work as per the pre-defined requirements is known as Black box testing. In black box testing, there is no visibility of the internal structure and source code of the application. Testing is performed based on the specifications defined by the clients or users. Therefore, it is also acknowledged as Specification-based testing.
It is usually performed by the testers because no programming knowledge is required to perform black box testing. The main aim of black box testing is to validate the functional and non-functional requirements and working of the application under test by providing a set of valid and invalid inputs and observing the outcome against it. It is done to evaluate the system's responsiveness under multiple conditions. Black box testing is also termed as Close box testing or Behavioral testing.
How is black box testing performed?
Following are the steps used to perform black box testing:
- Understanding the requirements and specifications – In this step, testers analyze the requirements and specifications defined by the clients to understand exactly what is expected from the software.
- Test preparation and test case creation – In this step, test preparation activities are performed. Once the requirement analysis is completed, testers start preparing the test cases as per the specifications. Both positive and negative test scenarios, as well as test cases, are drafted to validate the working of the entire system with various testing techniques. After drafting the test cases, testers also define the expected outputs.
- Test execution and test reports – Once the test cases are prepared, test execution occurs. Execution will discover the loopholes and bugs in the system. Testers compare the actual result with the expected result to check whether the software is working as expected or not. If they find any defects, they will be assigned to developers for fixing and retested after the fix. After completing test execution, a test report is created, which contains detailed information on the entire testing process.
Need for Black box testing
Like white box testing, black box testing also plays a crucial role in the testing process. Its main objective is to examine and test the functionality and behavior of the application. Some of the important points on why black box testing is required are mentioned below: -
- Black box testing consists of both functional and non-functional testing. Hence, we can test the entire system using black box testing.
- It is a vital manual testing type for performing integration testing, system testing, regression testing, acceptance testing, performance testing, etc.
- It is also helpful for the users or customers to easily perform acceptance testing.
Testing techniques of Black box testing
For performing black box testing, we have the below testing techniques: -
- Equivalence Class Partitioning
- Boundary Value Analysis
- Decision Table
- State Transitioning
- Use Case Testing
- Cause-Effective Graph/ Graph-Based Technique

Let us discuss each technique in detail.
Equivalence Class Partitioning – It is a technique that allows testers to create equal partitions of input values based on which test execution takes place. In other words, a technique used to reduce the count of test cases by dividing the input data into equivalent groups or partitions. It creates a segregated group of both valid and invalid input data. Testers select one or two values from each partition to perform the testing because all other values that belong to the same group will have the same behavior. It is the most widely used black box technique for preparing test cases. Generally, it is used for performing exhaustive testing to reduce the redundancy of input data.
Let’s understand equivalence partitioning with the help of an example: -
Scenario: Assume the above test field that accepts numeric values ranging from 0 to 50. In this case, we have partitions as mentioned below:
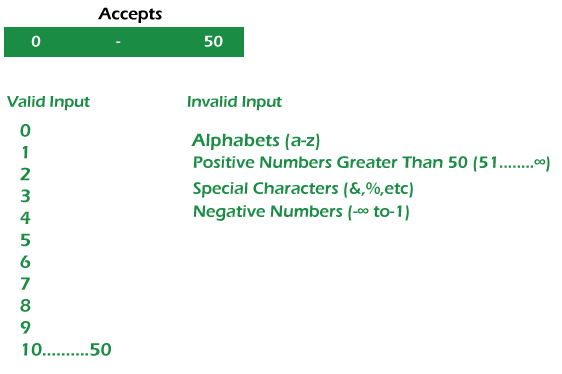
- Valid input data – Valid input data can be from 0 to 50, such as 1, 2, 3, 4, and till 50.
- Invalid input data – Invalid input data can be a variety of inputs, such as negative integers, positive integers greater than 50, alphabets, and special symbols.
From both groups, we will select a minimum of two input values for performing the equivalence class partitioning technique.
Boundary Value Analysis – It is a technique that allows us to test the boundary values of a particular range. It is the most useful and important testing technique, which is also useful in the equivalence class partitioning technique. Testers use this technique to validate a certain input data range as boundary value analysis is more concerned with validating the edge values of the data range. It is also useful in reducing the count of test cases by validating the limits to examine the changes in software's behavior. Generally, three values are selected around the limits (upper and lower) for performing boundary value analysis which are the boundary, inside the boundary, and outside the boundary.
Let’s understand boundary value analysis with the help of an example: -
Scenario: Assume the above text field accepts a numeric input value from 1 to 100. So, we will select the below boundary values for testing:
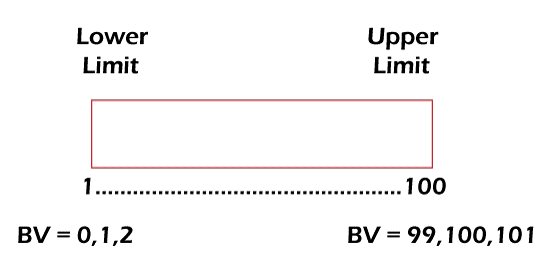
From Lower limit: 0 (Boundary -1), 1 (Boundary), 2 (Boundary + 1)
From Upper limit: 99 (Boundary - 1), 100 (Boundary), 101 (Boundary + 1)
By testing all six boundary values, we have ensured that this scenario is working as per the requirements.
Decision Table – It is a testing technique used to test certain cases that require a combination of inputs to test the business requirements specified by the clients. In other words, a technique that captures the combination of all possible inputs and their respective outputs in an organized manner. The decision table technique is used in such cases where keeping track of input combinations is a complex task or scenario having a relationship between two or more inputs. It is also referred to as the Cause-Effect table. This technique is very similar to the Graph-based technique.
Let's understand the Decision table technique with the help of an example: -
Scenario: Suppose we have a login page that contains two fields, i.e., email id and password. For a successful login, we must enter valid login credentials (both email id and password). Otherwise, it will throw an error "Incorrect Login Credentials."
To test the above scenario, we must need combinations of input data to check the functionality. Here, we will prepare a decision table for all possible inputs and their respective outputs.
| Email Id (Cond. 1) | Password (Cond. 2) | Outcome |
| Valid | Valid | Successful Login |
| Invalid | Invalid | Incorrect Login Credentials |
| Valid | Invalid | Incorrect Login Credentials |
| Invalid | Valid | Incorrect Login Credentials |
State Transitioning – It is a technique used to test the system's behavior by providing all permutations and combinations of the input data to identify breakpoints in the system. It validates the outcomes of the system when a system changes its state. The primary purpose of the state transition technique is to test the system's behavioral changes from one state to another. Input data, output, and states are the key elements for performing state transitioning. The tester observes the output and behavioral changes in the system by giving input data. It is more effective in easy and simple testing projects as we can easily keep track of the state transitioning of the system.
Let's understand the State transitioning technique with the help of an example: -
Scenario: Suppose we have a login page that contains two fields, i.e., Mobile number and OTP. When the login is successful, it will redirect to the dashboard of the user. Otherwise, it will remain on the same login page and displays an error "Incorrect Number" or "Incorrect OTP." After three attempts, the account will be blocked.
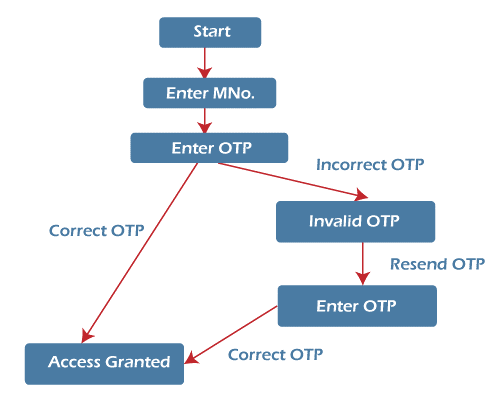
The above diagram shows how the states of a system change from the login page à Dashboard or Account blocked page. Like a decision table, we can create a table for tracking the outcome for both positive and negative conditions.
Use Case testing – It is a technique that is used to test the entire system by drafting test cases required for the end-to-end testing process. It is a very helpful functional testing technique that identifies all the test scenarios and cases which will be used for validating the whole system. The main aim of use case testing is to discover all possible methods by which an end-user interacts with the system.
A Use Case records communication or interactions between the actor (user) and the system. Use cases are prepared by the developers based on the events or transactions specified in the customer requirement specification (CRS) document and sends the use case for client review. After completing the review, the testing team starts the preparation of test planning and creating test cases.
Let's understand the Use Case technique with the help of an example: -
Scenario: Suppose we are placing an order on an e-commerce website. While placing the order, we have the below fields on a page.
Name, mobile no., address, amount to be paid.
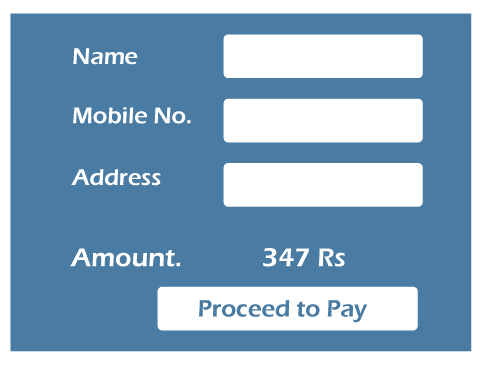
All the above fields are events or actions performed by the user, and these interactions between a user and system are captured through the use case testing technique.
Cause-Effective graph or Graph-based technique – It is a technique that uses a graphical representation for both inputs and outputs of the system. As the name suggests, cause- effective graph is being prepared that represents the relationship between the input (Cause) and output (Effect) of the system. The main purpose of a cause-effective graph is to understand the system's functional behavior by analyzing the flow between input and output. It also helps in reducing the count of test cases by achieving maximum coverage with the minimum possible number of test cases. This technique is useful in reducing the time and cost of the test execution.
Let's understand the Cause-effective graph technique with the help of a diagram: -
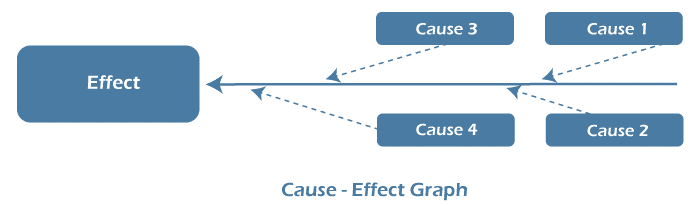
The cause-effective graph is mainly used for identifying the root cause of the problem or effect and analyzing the existing problems in the system.
Grey Box testing
A type of manual testing, a blend of both white box and black box testing, are acknowledged as Grey box or Gray box testing. In grey box testing, testers have partial knowledge and visibility of the system’s internal infrastructure. The primary purpose of grey box testing is to examine and enhance the system’s quality by performing activities that cover both white box and black box testing techniques. It includes the visibility of internal source code and algorithms as well as the system’s requirements in terms of functional and non-functional requirements.
Due to the partial visibility of the internal structure, grey box testing is also known as a semi-transparent box. Testers perform grey box testing based on their limited knowledge of internal code and the architecture of the system.
How is Grey box testing performed?
Following are the steps used to perform grey box testing:
- Input selection – This is the initial step for performing grey box testing. In this step, inputs are recognized and selected based on white box and black box testing inputs.
- Output identification – In this step, expected outputs are identified against the selected inputs.
- Paths selection – In this step, all crucial paths are recognized for performing the testing process.
- Sub-function identification – In this step, sub-functions are selected for executing the deep-level testing activities.
- Input selection for sub-functions – In this step, inputs are selected for sub-functions.
- Output identification for sub-functions – In this step, expected outputs are identified against the selected inputs for sub-functions.
- Test case execution – In this step, test cases are executed for the defined sub-functions.
- Verification of test execution – In this step, test execution is verified to check the correctness of the actual result.
Need for Grey box testing
Grey box testing is an essential part of the manual testing process as it has the ability to test the software’s presentation layer as well as the internal architecture. Some of the important reasons why grey box testing is needed are mentioned below:
- The essential reason for using grey box testing is that it is a blend of white box and black box testing.
- To enhance the software’s quality, it covers the inputs of both developers and testers for testing.
- Testing is performed from the user’s perspective instead of testers or designers.
- It takes less time to perform testing activities.
- It provides an ample amount of time to developers for defect fixing.
- Test cases designed for grey box testing include almost all aspects such as GUI testing, Database testing, Operational system testing, and Security related testing.
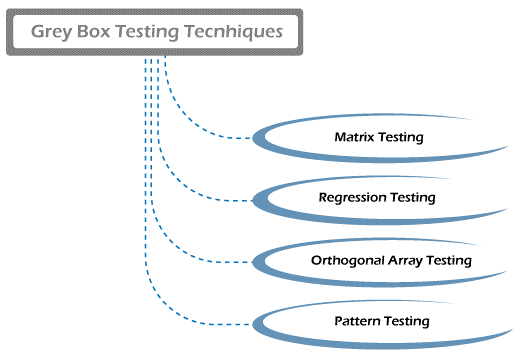
Testing techniques of Grey box testing
To perform grey box testing, we have the below testing techniques:
- Matrix Testing
- Regression Testing
- Orthogonal Array Testing
- Pattern Testing
Matrix Testing – It is a technique used to examine all the program variables. In other words, a technique that defines and examines all the used variables which exist in a software program is known as Matrix testing.
Generally, developers identify all possible technical and business risks linked with the used variables of the programs. After identifying risks, matrix testing is performed on each variable to remove the risk associated with it. It also helps in discovering the unused variables of the program as it reduces the readability of the programs.
Regression Testing – It is a technique that ensures that any modifications are done or defect fixes will not affect the existing functionalities of the system. It validates the previously passed test cases of the older version to ensure that it should not affect any functionality in the latest version. It also verifies that the modifications shouldn't develop any new faults or defects in the system. Regression testing is done with the help of some testing strategies like retesting, retesting tricky or risky use cases, etc.
Orthogonal Array Testing (OAT) – It is a technique used for maximum code coverage with minimal test cases. The OAT testing data comprises permutations and combinations of a few input values. The main purpose of using OAT is to test complex and large functionalities of the applications to identify defects.
Pattern Testing – It is a technique used on such applications which follows the historical data for development. In other words, it is applicable to systems that use the same patterns from older projects for developing software. It follows the pattern of identifying defects that were used in previous projects.