Java AWT
Java AWT
Java programming is used to develop different types of applications like window-based applications, web applications, Enterprise applications, or mobile applications. For creating standalone applications, Java AWT API is used. AWT allows programmers to create Graphical User Interface (GUI) for a window-based application.
Java Abstract Window Toolkit (AWT) is an Application Program Interface (API). The components used in Java AWT are platform-dependent. It uses recourses of the operating system that means the view of these components is changed according to the operating system.
Features of AWT
- AWT has a set of native user interface components.
- It provides various classes for graphical representation of components like font, shape, color.
- It provides a robust event-handling model.
- It has Layout managers which is helpful for changing window size or screen resolution.
- It provides a large range of libraries that can be used for designing graphics for gaming applications or educational applications.
- It has data transfer classes through which cut and paste operation can be performed using the local clipboard.
AWT User Interface Aspects
The AWT UI is designed using the following aspects:
- Elements of UI: These are the elements that are visible to the user and using those elements the user can communicate with the application. AWT provides a wide range of UI elements.
- Layouts: Layouts are useful for managing the different UI elements on the screen and provide a well-organized look to the application.
- Behavior: It explains how the UI elements act on triggering events performed by the user.
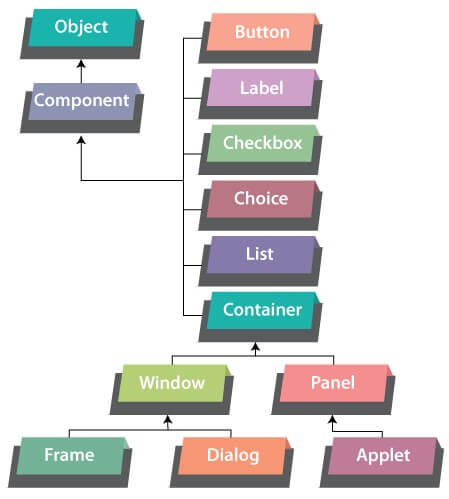
AWT Hierarchy
- Component
In the AWT class hierarchy, the Component class is derived from the Object class. Component class is an abstract class. It is the superclass of all the GUI element classes like Container, Button, Label, Checkbox, Choice, and List. Therefore, Component class is responsible for an overall graphical interface.
- Container
A Container in AWT is a component, which holds all the other components used for building the interface. We can insert another container inside the main container.
There are four types of container available in AWT:
- Window:A window is a rectangular box shaped area displayed on the screen. It is an instance of Window class. It does not have any menu bar, toolbar, or border. It should always be placed inside another window, frame, or dialog.
- Frame:A Frame is a subclass of Window. It has a border, menu bar, title bar. The size of the frame can also be changed. It can hold all other AWT components like buttons, checkboxes, etc. Frames are the most widely used type of AWT container.
- Dialog:Dialog is a subclass of Window. It contains a border and title bar. To create a dialog object, an instance of the associated Frame class is always needed.
- Panel: A Panel is a subclass of Container. The Panel does not have any border, title bar, or menu bar. It is a generic container that holds other GUI components. An instance of Panel class is necessary in order to insert the components.
- Button:
The Button class allows the developer to create a button with an appropriate label on it. It also provides a way to define functionality after clicking the button.
- List
A List class is used to display a list of required items. Using a list, the user can select one or multiple items in it.
- Checkbox
A Checkbox can be used when an application wants the user to choose from either true or false.
- Label
A Label provides descriptive text information on the application window. It is placed inside a container.
- Choice
A Choice class is used to display a drop-down menu. The selected choice can be seen on the head.
Advantages of GUI over CLI
- GUI provides interactive graphical elements to perform required actions while in CLI the command needs to be in text format only.
- GUI offers an easy yet efficient way of communication for the user. But in CLI, it is a difficult task to remember all the commands.
- GUI gives a facility for multitasking. On the other hand, multitasking is not possible in CLI.
- It is easier for a new user to interact with the application using GUI but it is difficult in CLI.
- GUI makes the application more entertaining and user friendly on the contrary CLI does not.
AWT Classes
The various AWT classes have their own constructors and methods. Some of these constructors and methods of AWT classes are explained below.
- Window:
The Window class is the area where other graphical components are placed. It do not consists of a border and menu bar.
Constructors of the Window class
| Constructor | Description |
| Window(Frame parentframe) | Creates a new Window inside the specified Frame. |
| Window(Window parentwindow) | Creates a new Window inside the specified Window. |
| Window(Window parentwindow, GraphicsConfigurationgc) | Creates a new Window inside the specified Window with a GraphicsConfiguration of the display device. |
Methods of the Window class
| Method | Description |
| voidpaint(Graphics g) | Paints the window. |
| void setIconImage(Image ig) | Uses the image in argument as the icon of the window. |
| void setSize(int width, int height) | Sets the size of window with values of height and width arguments. |
| void setBounds(int x, int y, int width, int height) | Used to set the height and width of the window using initial points x and y. |
| Window getOwner() | Returns the parent frame or window of the current window. |
- Frame
The Frame is a subclass of Window. It has a border, title bar, and menu bar. Frame class has its default layout as BorderLayout.
Constructors of the Frame Class
| Constructor | Description |
| Frame() | Creates a new Frame object. |
| Frame(GraphicsConfigurationgc) | Creates a new Frame with a GraphicsConfiguration of the display device. |
| Frame(String name) | Creates a new frame with a name passed as a title of the frame. |
Methods of the FrameClass
| Method | Description |
| booleanisResizable() | Checks whether the frame is resizable. Returns True or False accordingly. |
| MenuBargetMenuBar() | Returns the menu bar of the Frame. |
| void setMenuBar(MenuBar m) | Sets the menu bar of the Frame to another specified Frame. |
| void setState(int s) | Sets the state of the Frame. |
| void setTitle(String t) | Changes the title of the Frame with the new title specified. |
- Panel
A Panel is a subclass of Container. The Panel does not have any border, title bar, or menu bar. It has FlowLayout as its default layout.
Constructors of Panel Class
| Constructor | Description |
| Panel() | Constructs a new Panel using FlowLayout. |
| Panel(LayoutManagerlm) | Constructs a new Panel with the mentioned layout. |
Methods of Panel Class
| Method | Description |
| void addNotify() | Makes the Panel visible on the device. |
| AccessibleContextgetAccessibleContext() | Returns the AccessibleContext connected to the Panel. |
- Dialog
Dialog is a subclass of Window. It contains a border and title bar.
Constructors of the Dialog Class
| Constructor | Description |
| Dialog(Dialog Parent) | Creates a new dialog with the connected parent dialog and without any title. |
| Dialog(Dialog Parent, String s) | Creates a new dialog with the connected parent dialog and with the mentioned title. |
| Dialog(Frame Parent) | Creates a new dialog with assigned Frame as a parent and without any title. |
| Dialog(Frame Parent, String s) | Creates a new dialog with assigned Frame as a parent and with the mentioned title. |
Methods of the Dialog Class
| Method | Description |
| String getTitle() | Returns the assigned title of the Dialog. |
| Boolean isResizable() | Checks whether the dialog is resizable. Returns True or False accordingly. |
| void setTitle(String s) | Changes the title of the dialog with the new specified title. |
| void setVisible(boolean b) | Hides or displays the dialog according to the argument value passed. |
Programs for AWT Classes
The following programs demonstrate the implementation of AWT classes with their methods and constructors using Java programming.
SampleFrame.java
 import java.awt.*;
public class SampleFrame extends Frame
{
SampleFrame()
    {
        /* Declare a button */
        Button b1=new Button("Button!!");
        /* Position the button on screen */
b1.setBounds(50,50,50,50);
        /* Add button on the frame */
        add(b1);
        /* Set width and height of the frame*/
setSize(500,300);
        /* Set title of the Frame */
setTitle("This is my First AWT example");
        /* Set the layout for the Frame */
setLayout(new FlowLayout());
       /* Display the frame on screen */
setVisible(true);
    }
    /* Driver Code */
    public static void main(String args[])
    {
SampleFramefr = new SampleFrame();
    }
}
Output:
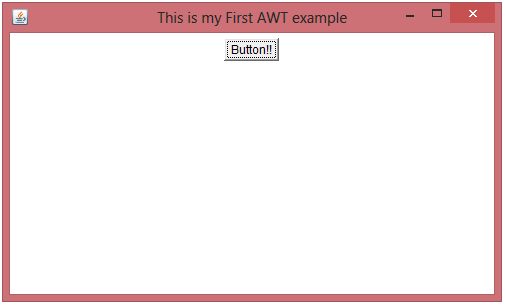
In the above code snippet, AWT Frame is created.
- Class SampleFrame inherits the Frame class in order to construct a new empty frame.
- A button b1 is created using the Button class. The size of the button and window is adjusted.
- The button is placed on the frame using the add() method. And the title of the Frame is set using the setTitle() method.
- Finally the Frame is displayed on the screen using the setVisible() method.
SamplePanel.java
 import java.awt.*;
/* Parent Frame */
class SampleJavaPanel extends Frame
{
    /* Create instances of Panel class */
    Panel p1,p2,p3 ;
    /* Create instances of Label class */
Label  lb1,lb2,lb3;
SampleJavaPanel()
    {
setLayout(new FlowLayout());
        /* Panel 1: Adds a label and button on Panel 1 */
        p1 = new Panel();
        lb1 = new Label("Panel 1 Red");
        p1.add(lb1);
        Button bt1 = new Button("Button 1");
        p1.add(bt1);
        p1.setBackground(Color.red);
        add(p1);
        /* Panel 2 Adds a label and button on Panel 2 */
        p2=new Panel();
        lb2 = new Label("Panel 2 Blue");
        p2.add(lb2);
        Button bt2 = new Button("Button 2");
        p2.add(bt2);
        p2.setBackground(Color.blue);
        add(p2);
    }
}
public class SamplePanel
{
    /* Driver Code */
    public static void main(String[] args)
    {
        /* Creates an instance of SampleJavaPanel. */
SampleJavaPanelpanelframe = new SampleJavaPanel();
        /* Sets the title of the Frame. */
panelframe.setTitle("Java AWT Panels Example");
        /* Sets the size of the Frame. */
panelframe.setSize(500,300);
        /* Displays the Frame containing Panel on Screen. */
panelframe.setVisible(true);
    }
}
Output:
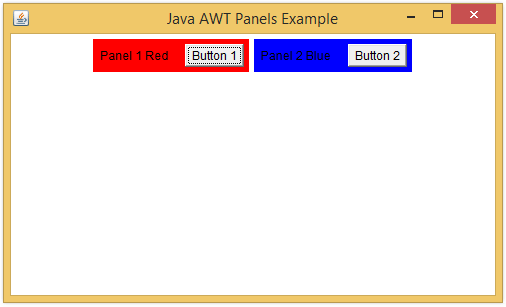
In the above code snippet, the class SamplePanel constructs a Frame with panelframe as an instance name. And the constructor SampleJavaPanel() of class SampleJavaPanelconstructs two panels’ p1 and p2 with labels lb1 and lb2, buttons b1 and b2 on it, respectively.
SampleDialog.java
 import java.awt.*;
import java.awt.event.*;
public class SampleDialog
{
    /* Driver Code */
    public static void main(String[] args)
    {
        /* Creates a Frame. */
        Frame frame = new Frame("Java AWT Dialog Example");
frame.setLayout(new FlowLayout());
frame.setSize(400, 400);
frame.setBackground(Color.white);
frame.setVisible(true);
        /* Creates a dialog inside the Frame. */
        Dialog d1 = new Dialog(null, true);
        d1.setLayout(new FlowLayout());
        d1.setTitle("Java Dialog");
        d1.setSize(400, 200);
        d1.setBackground(Color.gray);
        /* Creates a Button displayed on the Dialog. */
        Button bt1 = new Button("Button!!");
        bt1.setSize(20,10);
        d1.add(bt1);
        d1.setVisible(true);
    }
}
Output:
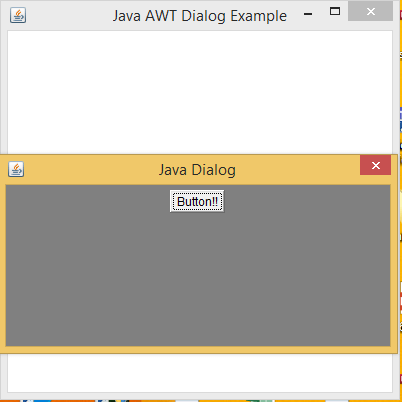
Here, the class SampleDialog constructs a Frame with frame as an instance name. Using the methods of Frame class properties like frame layout, frame size, background color and frame visibility are set. Dialog d1 is created and its properties are set using methods given in Dialog class. Buttonbt1 is added on the dialog. And lastly, visibility of d1 is set to True so that the dialog box is visible.
SampleButton.java
 import java.awt.*;
public class SampleButton
{
          /* Creates object of Frame and Button. */
          Frame f;
          Button bt1, bt2, bt3;
          SampleButton()
          {
                   f = new Frame("Java AWT Button Example");
                   /* Create Buttons bt1, bt2, bt3. */
                   bt1= new Button();
                   bt2= new Button("Click here");
                   bt3= new Button();
                   /* Sets text on the Button. */
                   bt3.setLabel("Button3");
                   /* Add Buttons on the Frame. */
                   f.add(bt1);
                   f.add(bt2);
                   f.add(bt3);
                   /* Set properties of the Frame. */
                   f.setLayout(new FlowLayout());
                   f.setSize(260,220);
                   f.setVisible(true);
          }
          /* Driver Code */
          public static void main(String[] ar)
          {
                   SampleButtonsb = new SampleButton();
          }
}
Output:
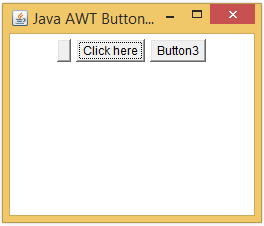
In the above code snippet, the class SampleButton constructs a Frame with f as an instance name. And the constructor SampleButton() of class SampleButtoncreates three Buttons bt1, bt2, and bt3.
SampleList.java
 import java.awt.*;
public class SampleList
{
          /* Creates object of Frame, List, Label and String array. */
          Frame f;
          List list;
          Label lb1;
          String[] country;
          SampleList()
          {
                   f = new Frame("Java AWT List Example");
                   /* Creates a list with 6 items. */
                   list= new List(6);
                   lb1 = new Label("Select your country from the list: ");
                   /* Adding items in the list. */
                   list.add("India");
                   list.add("Australia");
                   list.add("America");
                   list.add("Russia");
                   list.add("France");
                   list.add("China");
                   /* Add label and list on the Frame. */
                   f.add(lb1);
                   f.add(list);
                   /* Set properties of the Frame. */
                   f.setLayout(new FlowLayout());
                   f.setSize(260,220);
                   f.setVisible(true);
          }
          /* Driver Code */
          public static void main(String[] ar)
          {
                   SampleListsl = new SampleList();
          }
}
Output:
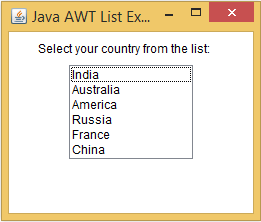
In the above code snippet, the class SampleList constructs a Frame with f as an instance name. And the constructor SampleList() of class SampleListcreates a list with 6 items in the list. The list and Label lb1 is added to the Frame f.
SampleCheckbox.java
 import java.awt.*;
public class SampleCheckbox
{
          /* Creates object of Frame and Checkbox. */
          Frame f;
          Checkbox cb1, cb2, cb3;
          SampleCheckbox()
          {
                   f= new Frame("Java AWT Checkbox Example");
                   /* Creates a no message Checkbox. */
                   cb1 = new Checkbox();
                   /* Creates a pre-selected Checkbox with a message. */
                   cb2 = new Checkbox("Yes",true);
                   /* Creates an unselected Checkbox with a message. */
                   cb3 = new Checkbox("No");
                   /* Add Checkboxes on the Frame. */
                   f.add(cb1);
                   f.add(cb2);
                   f.add(cb3);
                   /* Set properties of the Frame. */
                   f.setLayout(new GridLayout());
                   f.setSize(260,220);
                   f.setVisible(true);
          }
          /* Driver Code */
          public static void main(String[] ar)
          {
                   SampleCheckboxsc = new SampleCheckbox();
          }
}
Output:
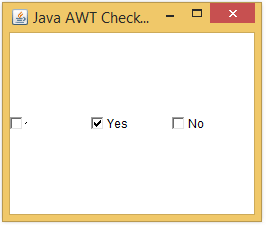
In the above code snippet, the class SampleCheckbox constructs a Frame with f as an instance name. And the constructor SampleCheckbox() of class SampleCheckboxcreates three Checkboxes cb1with no message,cb2 with a message, checked value and cb3 with a message and unchecked value.
SampleLable.java
 import java.awt.*;
public class SampleLabel
{
   /* Creates object of Frame and Label. */
   Frame f;
   Label lb1, lb2, lb3, lb4;
   SampleLabel()
   {
          f = new Frame("Java AWT Label Example");
          lb1 = new Label("Hi!");
          lb2 = new Label("Good Morning!!");
          lb3 = new Label("Have a great day, Take care!");
          lb4 = new Label("Thanks");
          /* Setting text on the Labels. */
          lb4.setText("Thank you and Hello!");
          /* Add Labels on the Frame. */
          f.add(lb1);
          f.add(lb2);
          f.add(lb3);
          f.add(lb4);
          /* Set properties of the Frame. */
          f.setLayout(new FlowLayout());
          f.setSize(260,220);
          f.setVisible(true);
   }
   /* Driver Code */
   public static void main(String[] ar)
   {
          SampleLabelsl = new SampleLabel();
   }
}
Output:
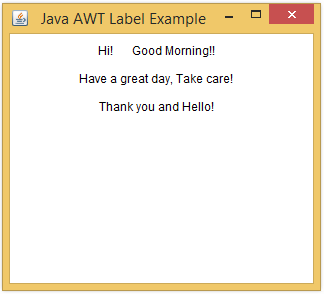
In the above code snippet, the class SampleBLabelconstructs a Frame with f as an instance name. And the constructor SampleLabel() of class SampleLabelcreates for Labels lb1,lb2, lb3, and lb4. The Labels are added on the Frame f.
SampleChoice.java
 import java.awt.*;
public class SampleChoice
{
   /* Creates object of Frame, Choice, Label and Button. */
   Frame f;
   Choice ch;
   Label lb1;
   Button bt1;
   SampleChoice()
   {
          f = new Frame("Java AWT Choice Example");
          ch = new Choice();
          lb1 = new Label("Select your country from the Menu: ");
          /* Adding items in the list. */
          ch.add("India");
          ch.add("Australia");
          ch.add("America");
          ch.add("Russia");
          ch.add("France");
          ch.add("China");
          bt1= new Button("Submit");
          /* Add label and choice menu on the Frame. */
          f.add(lb1);
          f.add(ch);
          f.add(bt1);
          /* Set properties of the Frame. */
          f.setLayout(new FlowLayout());
          f.setSize(260,220);
          f.setVisible(true);
   }
   /* Driver Code */
   public static void main(String[] ar)
   {
          SampleChoicesl = new SampleChoice();
   }
}
Output:
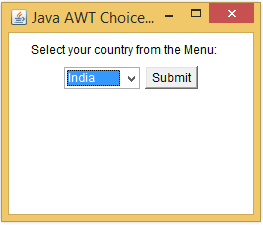
In the above code snippet, the class SampleChoice constructs a Frame with f as an instance name. And the constructor SampleChoice() of class SampleChoicecreates a Choice ch. Total 6 Items are added to the choice list. And the choice ch is added to Frame f.
This article explains the basic concept of Java AWT classes with their constructors and methods. We have also discussed how to implement AWT classes using the methods available in java.awt package.