Java Swing
Java Swing is the extension of Abstract Windows Toolkit (AWT). Any component designed in Swing will appear the same on any platform.
Problems/Disadvantage of Abstract Windows Toolkit (AWT):
- As we know that AWT is internally dependent on C language code and C language is a Platform dependent so in Java, it is not desirable.
- Any component developed in AWT, its look and feel changes depending on the platform. For example, if you write code for a push button in AWT, when you run that code in Windows it will display windows type of push button whereas same code executed in UNIX operating system, then it will display UNIX type of push button. So we can’t be sure how a particular screen will look on a particular operating system because its appearance changes from system to system.
- Component developed in AWT is very heavy-weight, so it consumes more system resources such as more Memory space, more processor time, etc.
Solution of above (AWT) problems:
To fix the problems of AWT, JavaSoft people redeveloped complete AWT package without internally taking the help of native methods. So all AWT classes extended to form new classes and new class library is created, further this library is called as Java Foundation Classes (JFC). Java Foundation Classes created five main library package which is very popular in GUI designing.- Javax.swing
- Javax.accessibility
- Javax.swing.plaf
- Java.awt.dnd
- Java.aet.geon
Advantage of JFC Library for GUI designing:
- JFC library classes create a light-weight component, so it consumes less resources (memory, processors) and executes much faster than AWT component.
- Any Component created by using JFC library classes appears the same on every platform.
- JFC is an extension of AWT, so all the methods that we used in AWT are also applicable in JFC.
Let’s Explore “ Javax.swing ” :
Its most commonly used JFC library for the graphical user interface (GUI) designing in Java programming. It provides classes to create components such as push button, checkbox, menu list, radio button, etc. Swing Follow Model – View – Controller (MVC) architecture: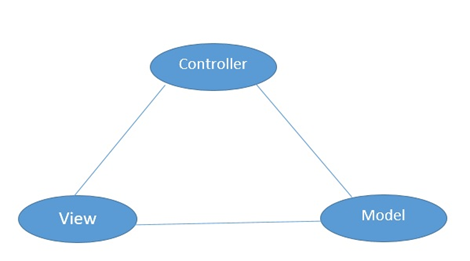
Model: It represents the data of any swing component.
View: It represents the visual appearance of any swing component based on the data model.
Controller: It is the mediator between the model and view. Whenever a user interacts with the swing component, first of all, the controller will understand this and modify the model data accordingly.
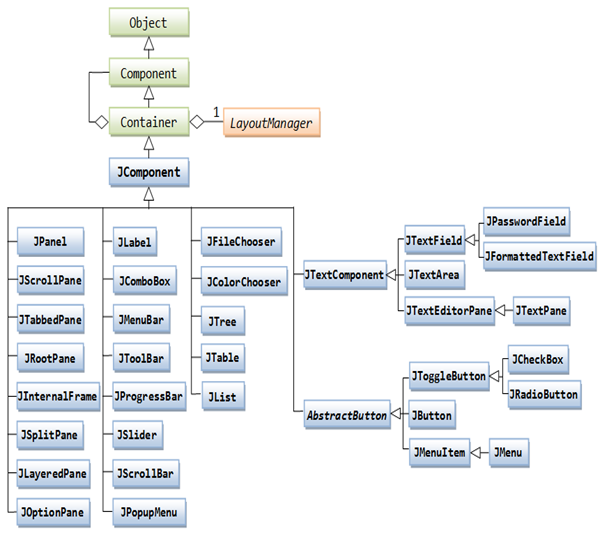
Important Classes of “Swing Package”
In Javax.swing package there are lots of important classes. These swing classes are derived from the java.awt package.
How to Create a Frame in swing?
A frame represents a window with the free area which has a Title bar and border. In that free area, we can display any Text, or any component can be displayed. To create a frame we have a JFrame class in swing package.- Create Frame without Title
JFrame frame= new JFrame();
- Create a frame with Title
JFrame frame= new JFrame(“ Frame Title ”);
- Create a frame with Title and Frame Size
JFrame frame= new JFrame(“ Frame Title ”);
frame.setSize(x,y);
Note: in place of x and y, put some value in pixel. Such as :
frame.setSize(200,400);
Java Program to create a frame of 200x200 px size :
import javax.swing.*;
class SimpleFrame{
public static void main(String args[]){
// Frame Name
String framename = "Simple Frame";
//Create Frame with Title
JFrame frame= new JFrame(framename);
//set Size of this new frame
frame.setSize(200, 200);
// Now Display the Frame
frame.setVisible(true);
}
}
Output : 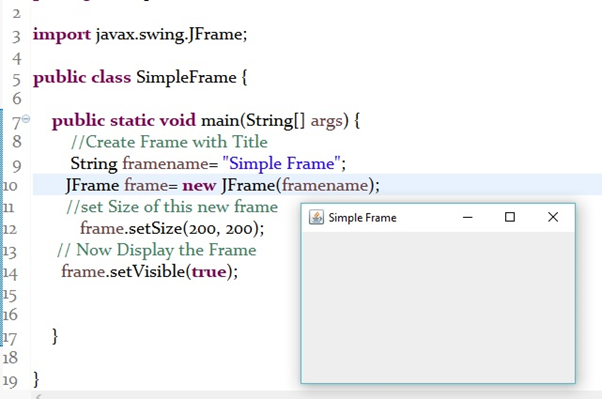
Note:
- To Close a Swing frame, we need to take help of methods of JFrame Class.
- getDefaultCloseOperation(parameter) => it’s method of JFrame Class.
- JFrame.EXIT_ON_CLOSE => it closes the frame/application upon clicking on Close button.
import javax.swing.JFrame;
public class CloseFrame extends JFrame {
          public static void main(String[] args) {
                    //Create Frame
                   CloseFrame cframe=new CloseFrame();
                   //set Frame Name
                   cframe.setTitle("Close Frame");
                   //Set Frame Size
                   cframe.setSize(200,300);
      // Close the application upon clicking Close Button
      cframe.setDefaultCloseOperation(JFrame.EXIT_ON_CLOSE);
          }
}
Output: 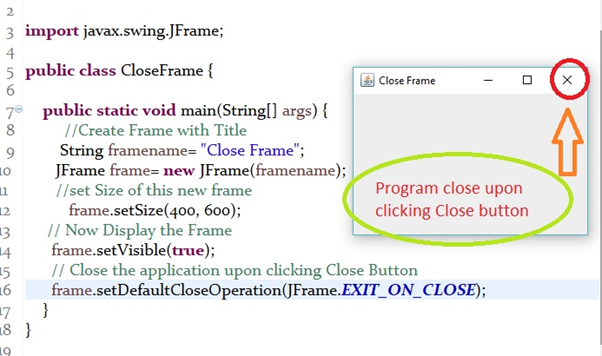
How to Set the Background color of any frame:
To set the background color in frame, we have to set the background color in the Content pane. Content pane is the free area of any frame. Program:import java.awt.Color;
import java.awt.Container;
import javax.swing.JFrame;
public class SetBackgroundColor extends JFrame {
public static void main(String[] args) {
//Create a Frame
SetBackgroundColor setbg=new SetBackgroundColor();
//Create Content pane, it's a container
Container container=setbg.getContentPane();
//Set Background Color
container.setBackground(Color.CYAN);
//set the size of frame
setbg.setSize(200,300);
//display the frame
setbg.setVisible(true);
//Close application upon clicking Exit button
setbg.setDefaultCloseOperation(JFrame.EXIT_ON_CLOSE);
}
}
Output: 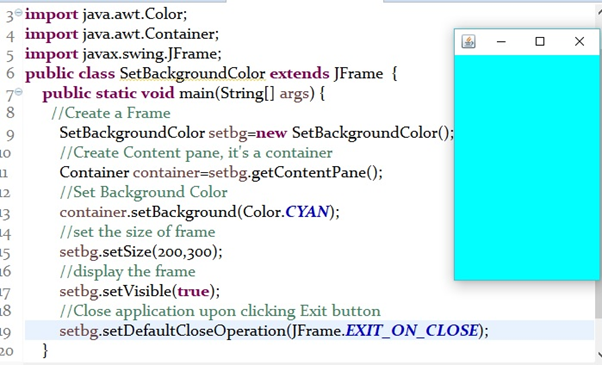
How To Display Text in Swing Frame/Application?
Text can be displayed by using the label. We can use the JLabel class to create label.
JLabel label=new JLabel(“Any Text”);Program:
import java.awt.Color;
import java.awt.Container;
import java.awt.FlowLayout;
import java.awt.Font;
import javax.swing.JFrame;
import javax.swing.JLabel;
public class TextOnFrame extends JFrame {
          public static void main(String[] args) {
                   JLabel label; //Variable
                   TextOnFrame tframe=new TextOnFrame();
                   tframe.setTitle("Text on Frame");
                   tframe.setSize(200,300);
                   Container container=tframe.getContentPane();
                   container.setLayout(new FlowLayout());
                   container.setBackground(Color.YELLOW);
                   //Creating Label with any Text
                   label=new JLabel("Welcome to Swing...");
                   //Set Font for label
                   label.setFont(new Font("Helvetica",Font.BOLD,24));
                   //set color for label
                   label.setForeground(Color.RED);
                   //add the label to Content pane
                   container.add(label);
                   tframe.setVisible(true);
                   tframe.setDefaultCloseOperation(JFrame.EXIT_ON_CLOSE);
          }
}
Output: 
Creating components like Check Box, Radio Button, Text Field, and Text Area:
Check Box: with the help of the JCheckBox class, we can create Check Boxes.- Check box without any label or image
JCheckBox bx=new JCheckBox();
- Check box with a label
JCheckBox bx=new JCheckBox(“label”);
- Check box with an image
JCheckBox bx=new JCheckBox(ImageIcon image);Image will be loaded from ImageIcon object
- Check box with label and Image
JCheckBox bx=new JCheckBox(“label”, ImageIcon image);Text Field: Text field can be created with the help of JTextField Class. Text field can accommodate only one line of text.
- Text Field without any text
JTextField textfield=new JTextField();
- Text Field with some text displaying within it
JTextField textfield=new JTextField(“Some Text ”);
- Text Field with a width of 35 character
JTextField textfield=new JTextField(35);
- Text Field with text and width of 35 character
JTextField textfield=new JTextField(“Some Text ”,35);Radio Button: Radio Button can be created with the help of JRadioButton Class.
- Radio Button without any label or image
JRadioButton radio=new JRadioButton ();
- Radio Button with label
JRadioButton radio=new JRadioButton (“label”);
- Radio Button with image
JRadioButton radio=new JRadioButton (ImageIcon image);Image will be loaded from ImageIcon object
- Radio Button with label and Image
JRadioButton radio=new JRadioButton (“Label”, ImageIcon image);Text Area: Text Area can display multiple lines of text. With the help of the JTextArea class, we can create a text area.
- Text Area without any text in it.
JTextArea text=new JTextArea();
- Text Area with Some Text in it.
JTextArea text=new JTextArea(“ Some Text”);
- Text Area with 10 rows and 30 characters on each row
JTextArea text=new JTextArea(10,30);
- Text Area with some text, 10 rows and 30 characters on each row
JTextArea text=new JTextArea(“Some Text”, 10,30);
Write a Program to Implement “Radio Button, Check Box and Text Area”:
Program:import java.awt.Container;
import java.awt.FlowLayout;
import java.awt.event.ActionEvent;
import java.awt.event.ActionListener;
import javax.swing.ButtonGroup;
import javax.swing.JCheckBox;
import javax.swing.JFrame;
import javax.swing.JRadioButton;
import javax.swing.JTextArea;
public class RadioCheckboxTextAreaDemo extends JFrame implements ActionListener {
JCheckBox cbox1, cbox2;
JRadioButton rbutton1, rbutton2;
JTextArea tarea;
ButtonGroup bg;
String message="";
//Constructor
public RadioCheckboxTextAreaDemo() {
//create container pane
Container container=getContentPane();
//set Layout
container.setLayout(new FlowLayout());
//create text row in that 15 row and each row has 30 character
tarea=new JTextArea(15,30);
//Create two checkbox with label and status
cbox1=new JCheckBox("Spring", true);
cbox2=new JCheckBox("Hiberate");
//create two radio button with label and status
rbutton1=new JRadioButton("Boy Batch",true);
rbutton2 =new JRadioButton("Girl Batch");
//Create Button group
bg=new ButtonGroup();
bg.add(rbutton1);
bg.add(rbutton2);
//add these all check box, radio button, text area in to the container
container.add(cbox1);
container.add(cbox2);
container.add(rbutton1);
container.add(rbutton2);
container.add(tarea);
//Now add the action listener on radio button and checkbox
cbox1.addActionListener(this);
cbox2.addActionListener(this);
rbutton1.addActionListener(this);
rbutton2.addActionListener(this);
//Close the Frame or application upon Close button clicking
setDefaultCloseOperation(JFrame.EXIT_ON_CLOSE);
}
@Override
public void actionPerformed(ActionEvent e) {
//Check which component is selected by user
if(cbox1.getModel().isSelected()){
message +="\n Spring";
}
if(cbox2.getModel().isSelected()){
message +="\n Hibernate";
}
if(rbutton1.getModel().isSelected()){
message +="\n Boy Batch";
}else {
message +="\n Girl Batch";
}
//set the selected message in text area
tarea.setText(message);
//clear the message with empty string
message="";
}
public static void main(String[] args) {
///create frame
RadioCheckboxTextAreaDemo frame=new RadioCheckboxTextAreaDemo();
frame.setTitle("Checkbox and Radio button demo");
frame.setSize(500,400);
frame.setVisible(true);
}
}
Output: 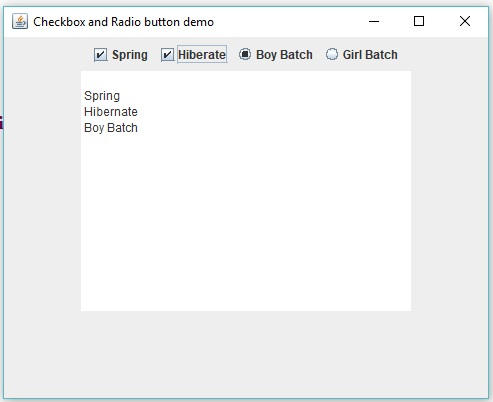
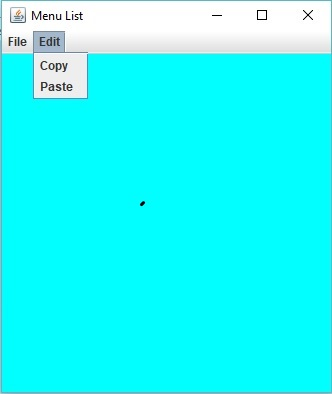
How To Create Menu in Swing frame/Application:
Menu is collection of similar types of group of items. With the help of JMenu class, we can create a menu in Swing frame/application.- We can create menu Bar by this:
JMenuBar menubar=new JMenuBar();
- We can create separate menus to attach them on Menu bar:
JMenu menulist=new JMenu(“File”);Now attach this file to menu bar:
menubar.add(menulist);
- With JMenuItem Class, we can create group of menu items.
JMenuItem save=new JMenuItem(“Save”);Now add it to menulist:
Menulist.add(save);Program: Creating a Sample Menu List.
package pkg1;
import java.awt.BorderLayout;
import java.awt.Color;
import java.awt.Container;
import java.awt.event.ActionEvent;
import java.awt.event.ActionListener;
import javax.swing.JCheckBoxMenuItem;
import javax.swing.JFrame;
import javax.swing.JMenu;
import javax.swing.JMenuBar;
import javax.swing.JMenuItem;
public class SwingMenuModule extends JFrame implements ActionListener {
           JMenuBar jmbar;
           JMenu file,edit,font;
           JMenuItem op,sa,cl,cp,pt,f1,f2;
             public SwingMenuModule() {
                   //create container
                      Container container=getContentPane();
                      container.setLayout(new BorderLayout());
                      container.setBackground(Color.CYAN);
                      //Create a Menu bar
                      jmbar=new JMenuBar();
                      //add member to container
                      container.add("North", jmbar);
                      //create the File and Edit menu and attach them to menu bar
                      file=new JMenu("File");
                      edit=new JMenu("Edit");
                      jmbar.add(file);
                      jmbar.add(edit);
                      //Create Menu Items
                      op=new JMenuItem("Open");
                      sa=new JMenuItem("Save");
                      cp=new JMenuItem("Copy");
                      pt=new JMenuItem("Paste");
                      cl=new JMenuItem("Close");
                      //add Open, Save, Close to file Menu and Copy, Paste to edit menu
                      file.add(op);
                      file.add(sa);
                      file.add(cl);
                      edit.add(cp);
                      edit.add(pt);
                      //add  separator (horizontal line) to File menu
                       file.addSeparator();
                      //Create Font SubMenu and add it to file menu
                        font=new JMenu("Font");
                        file.add(font);
                        //Create submenu items
                        f1=new JMenuItem("Arial");
                        f2=new JMenuItem("Times New Roman");
                        //Add item to submenu
                        font.add(f1);
                        font.add(f2);
                        //Attach action listener to all menu items
                        op.addActionListener(this);
                        sa.addActionListener(this);
                        cl.addActionListener(this);
                        cp.addActionListener(this);
                        pt.addActionListener(this);
                        f1.addActionListener(this);
                        f2.addActionListener(this);
                        //Close Application upon Close Button Click
                       setDefaultCloseOperation(JFrame.EXIT_ON_CLOSE);
          }
             //it will execute when menu item is clicked.
                   @Override
                   public void actionPerformed(ActionEvent e) {
                             if(op.isArmed()){
                                      System.out.println("Open is Selected");
                             }
                             if(sa.isArmed()){
                                      System.out.println("save is Selected");
                             }
                             if(cl.isArmed()){
                                      System.out.println("Close is selected");
                             }
                             if(pt.isArmed()){
                                      System.out.println("Paste is selected");
                             }
                             if(f1.isArmed()){
                                      System.out.println("Arial Font is selected");
                             }
                             if(f2.isArmed()){
                                      System.out.println("Times New Roman is selected");
                             }
                   }
          public static void main(String[] args) {
                    //Create the frame
               SwingMenuModule menu=new SwingMenuModule();
               menu.setTitle("Menu List");
               menu.setSize(500,400);
               menu.setVisible(true);
          }
}
Output: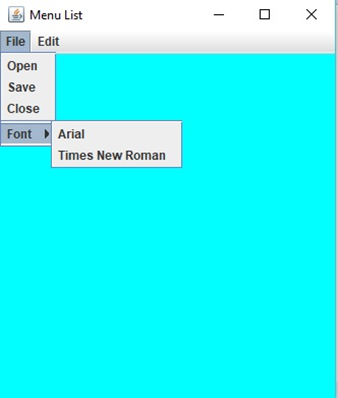
How to Create Progress Bar in Swing ?
Progress Bar is visual representation of any task completion. It represent that how much any particular or a group of task has been completed. With the help of JProgressBar class, we can create Progress Bar.- By default horizontal progress bar will create:
JProgressBar progress=new JProgressBar();
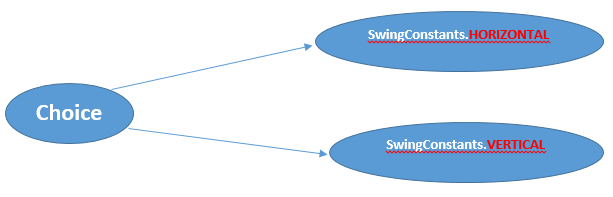
- But you can create Horizontal and Vertical Progress Bar
new JProgressBar(Choice)
Program:
package com.pramodsoft;
import java.awt.Color;
import java.awt.Container;
import java.awt.FlowLayout;
import java.awt.event.ActionEvent;
import java.awt.event.ActionListener;
import javax.swing.JButton;
import javax.swing.JFrame;
import javax.swing.JProgressBar;
public class Progressbar extends JFrame  implements ActionListener {
            JButton b;
            JProgressBar pbar;
            public Progressbar() {
                     Container container=getContentPane();
                     container.setLayout(new FlowLayout());
                     container.setBackground(Color.cyan);
                     //Create a button
                     b=new JButton("Click Again...");
                     //Create Progress bar
                     pbar=new JProgressBar();
                     //set foreground colour
                     pbar.setForeground(Color.green);
                     //display the percentage starting
                     pbar.setStringPainted(true);
                     // add progress bar and button to container
                     container.add(b);
                     container.add(pbar);
                     //add action listener to progress bar
                     b.addActionListener(this);
          }
                            @Override
                   public void actionPerformed(ActionEvent e) {
                             //on every button click.. Progress bar will increase 10%
                             pbar.setValue(pbar.getValue()+10);
                   }
          public static void main(String[] args) {
                   Progressbar progress=new Progressbar();
                    progress.setTitle("Progress Bar");
                    progress.setSize(400,500);
                    progress.setVisible(true);
                    progress.setDefaultCloseOperation(JFrame.EXIT_ON_CLOSE);
          }
}
Output: 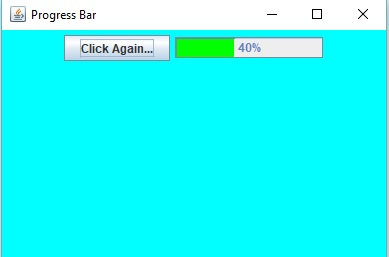
Note: Swing is a big topic, so in 1000 words we can’t explain every feature. It’s a 1900 word Article.