Spring MVC Form Text Field
We have previously discussed the Spring MVC form tags. The form tag library provides a variety of form tags that are used to build web applications. One of them is a <form:input> tag used to generate text field.
<form:input> - It represents an HTML input tag used to develop text fields using bound values.
The following code snippet shows how to use the <form:input> tag:
 <form:input path = "…" >
 </form:input>
Let’s briefly understand the concept of <form:input> tag with the help of an example.
Example of MVC Form Text Field
Here, we are going to create an example of a form text field using <form:input> tag.
Following are the steps to create an example of a form text field:
- Create a request page
In this step, we are going to create a request page named index.jsp.
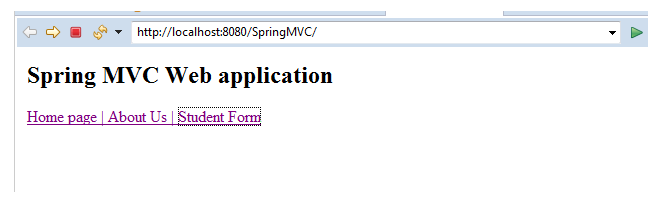
index.jsp
 <html>
 <body>
 <h2> Spring MVC Web application </h2>
 <a href = "home_page">Home page | </a>
 <a href = "about_us"> About Us | </a>
 <a href = "student_form"> Student Form</a>
 </body>
 </html>
- Create the Model class
In this step, we are going to create the Model class named Student.java, which stores the field values.
Student.java
 public class Student {
             private String fname;
             private String lname;
             public Student() {
             }
             public String getFname() {
                         return fname;
             }
             public void setFname(String fname) {
                         this.fname = fname;
             }
             public String getLname() {
                         return lname;
             }
             public void setLname(String lname) {
                         this.lname = lname;
             }
  }
- Create the Controller
In this step, we are going to create a Controller class named StudentController.java, which returns the JSP pages.
StudentController.java
 import org.springframework.stereotype.Controller;
 import org.springframework.ui.Model;
 import org.springframework.web.bind.annotation.ModelAttribute;
 import org.springframework.web.bind.annotation.RequestMapping;
 import org.springframework.web.bind.annotation.RequestParam;
 @Controller
 public class StudentController {
             @RequestMapping("/student_form")
             public String showStudentForm( Model m) {
                         Student student = new Student();
                         m.addAttribute("student", student);
                         return "studentform" ;
             }
             @RequestMapping("/studentregis")
             public String showStudentData(@ModelAttribute("student") Student student) {
                         System.out.println("student:" + student.getFname() +" "+ student.getLname());
                         return "student-data" ;
             }
 }
- Add the entry of Controller in web.xml
In this step, we are going to add the entry of the Controller inside the web.xml file.
web.xml
 <?xml version = "1.0" encoding = "UTF-8"?>
 <web-app xmlns:xsi = "http://www.w3.org/2001/XMLSchema-instance"
             xmlns = "http://xmlns.jcp.org/xml/ns/javaee"
             xsi:schemaLocation = "http://xmlns.jcp.org/xml/ns/javaee http://xmlns.jcp.org/xml/ns/javaee/web-app_3_1.xsd"
             id = "WebApp_ID" version = "3.1">
             <display-name>spring-mvc-demo</display-name>
             <absolute-ordering />
             <!-- Spring MVC Configs -->
             <!-- Step 1: Configure Spring MVC Dispatcher Servlet -->
             <servlet>
                         <servlet-name>dispatcher</servlet-name>
                         <servlet-class>org.springframework.web.servlet.DispatcherServlet</servlet-class>
                         <init-param>
                                     <param-name>contextConfigLocation</param-name>
                                     <param-value>/WEB-INF/spring-servlet.xml</param-value>
                         </init-param>
                         <load-on-startup>1</load-on-startup>
             </servlet>
             <!-- Step 2: Set up URL mapping for Spring MVC Dispatcher Servlet -->
             <servlet-mapping>
                         <servlet-name>dispatcher</servlet-name>
                         <url-pattern>/</url-pattern>
             </servlet-mapping>
 </web-app>
- Define the Model in another XML file
In this step, we are going to define the Model class in another XML file (spring-servlet.xml).
spring-servlet.xml
 <?xml version = "1.0" encoding = "UTF-8"?>
 <beans xmlns = "http://www.springframework.org/schema/beans"
             xmlns:xsi = "http://www.w3.org/2001/XMLSchema-instance"
             xmlns:context = "http://www.springframework.org/schema/context"
             xmlns:mvc = "http://www.springframework.org/schema/mvc"
             xsi:schemaLocation = "  http://www.springframework.org/schema/beans
 http://www.springframework.org/schema/beans/spring-beans.xsd
 http://www.springframework.org/schema/context
 http://www.springframework.org/schema/context/spring-context.xsd
 http://www.springframework.org/schema/mvc
 http://www.springframework.org/schema/mvc/spring-mvc.xsd">
             <!-- Step 3: Add support for component scanning -->
             <context:component-scan base-package = "com.app.SpringMVC5" />
             <!-- Step 4: Add support for conversion, formatting and validation support -->
             <mvc:annotation-driven/>
             <!-- Step 5: Define Spring MVC view resolver -->
             <bean
                         class="org.springframework.web.servlet.view.InternalResourceViewResolver">
                         <property name = "prefix" value = "/WEB-INF/view/" />
                         <property name = "suffix" value = ".jsp" />
             </bean>
 </beans>
- Create all the view pages
In this step, we are going to create all the view pages (JSP pages) required in the application.
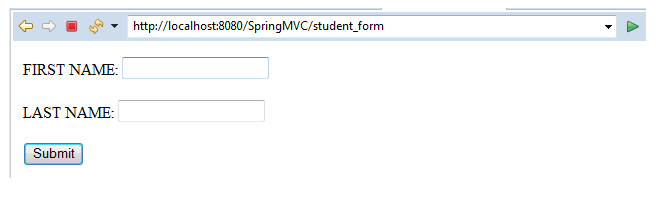
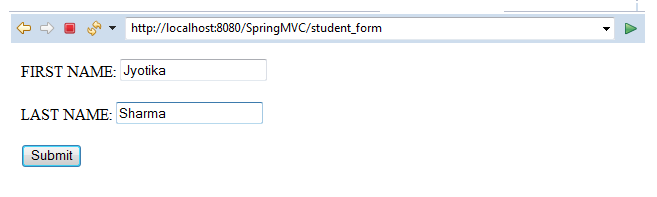
studentform.jsp
 <%@ taglib prefix = "form" uri = "http://www.springframework.org/tags/form" %>
 <html>
 <head>
 <title>Student Registration Form</title>
 </head>
 <body>
 <form:form action = "studentregis" modelAttribute = "student" >
 FIRST NAME: <form:input path = "fname" />
 <br></br>
 LAST NAME: <form:input path = "lname" />
 <br></br>
 <input type = "submit" value = "Submit"/>
 </form:form>
 </body>
</html>
student-data.jsp
 <%@ page language = "java" contentType = "text/html; charset = ISO-8859-1"
     pageEncoding = "ISO-8859-1"%>
 <!DOCTYPE html>
 <html>
 <head>
 <meta charset = "ISO-8859-1">
 <title>Student Registration Data</title>
 </head>
 <body>
 The student name is ${student.fname} ${student.lname}
 </body>
 </html>
Output