Spring MVC – @RequestParam
We have already discussed an example of Spring MVC in our previous tutorials. Here, we are going to discuss the @RequestParam annotation. In the last case, we had created a bean class for defining the parameters. But in the following example, we are going to use the @RequestParam annotation for automatic binding of the method parameter with the form data.
@RequestParam – It is used to bind the form data values with the parameters available in the Controller class methods. In other words, it indicates that a method parameter can be mapped with a web request parameter. It is used in the Controller class method.
Example of Spring MVC using @RequestParam
Here, we are going to create an example of Spring MVC using the @RequestParam annotation.
Following are the steps to create an example using @RequestParam:
- Create a request page
In this step, we are going to create a request page named index.jsp.
index.jsp
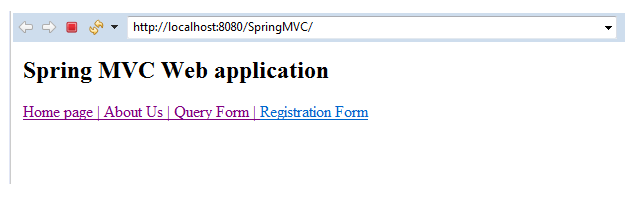
 <html>
 <body>
 <h2> Spring MVC Web application </h2>
 <a href = "home_page"> Home page | </a>
 <a href = "about_us"> About Us | </a>
 <a href = "general-form"> Query Form | </a>
 <a href= "register-form" > Registration Form </a>
 </body>
 </html>
- Create the Controller class
In this step, we are going to create a Controller class named MainController.java, which returns the JSP view pages.
MainController.java
import javax.servlet.http.HttpServletRequest;
import org.springframework.stereotype.Controller;
import org.springframework.ui.Model;
import org.springframework.web.bind.annotation.RequestMapping;
import org.springframework.web.bind.annotation.RequestParam;
@Controller
public class MainController {
@RequestMapping("/register-form")
public String showRegiterForm() {
return "registerform" ;
}
@RequestMapping("/regis-form")
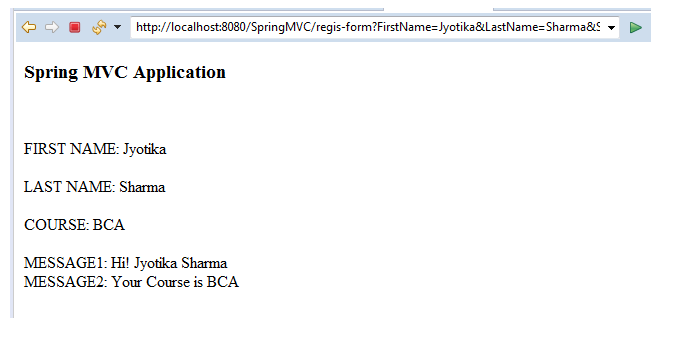
public String showRegisterFormData(@RequestParam("FirstName") String fname,
@RequestParam("LastName") String lname,
@RequestParam("StudentCourse") String course,
Model m) {
String result = "Hi! " + fname+" "+ lname ;
String result2 = "Your Course is " + course ;
m.addAttribute("message", result);
m.addAttribute("message2" ,result2);
return "regisformdata" ;
}
}
In the above class (MainController), we have used @RequestParam annotation instead of using bean class. It is used for retrieving the form data and mapping it with the parameters available in the method.
Here, we have three parameters available in the form FirstName, LastName, and StudentCourse.
- Add the entry of Controller in web.xml
In this step, we are going to add the entry of the Controller into web.xml.
web.xml
 <?xml version = "1.0" encoding = "UTF-8"?>
 <web-app xmlns:xsi = "http://www.w3.org/2001/XMLSchema-instance"
             xmlns = "http://xmlns.jcp.org/xml/ns/javaee"
             xsi:schemaLocation = "http://xmlns.jcp.org/xml/ns/javaee http://xmlns.jcp.org/xml/ns/javaee/web-app_3_1.xsd"
             id = "WebApp_ID" version = "3.1">
             <display-name>spring-mvc-demo</display-name>
             <absolute-ordering />
             <!-- Spring MVC Configs -->
             <!-- Step 1: Configure Spring MVC Dispatcher Servlet -->
             <servlet>
                         <servlet-name>dispatcher</servlet-name>
                         <servlet-class>org.springframework.web.servlet.DispatcherServlet</servlet-class>
                         <init-param>
                                     <param-name>contextConfigLocation</param-name>
                                     <param-value>/WEB-INF/spring-servlet.xml</param-value>
                         </init-param>
                         <load-on-startup>1</load-on-startup>
             </servlet>
             <!-- Step 2: Set up URL mapping for Spring MVC Dispatcher Servlet -->
             <servlet-mapping>
                         <servlet-name>dispatcher</servlet-name>
                         <url-pattern>/</url-pattern>
             </servlet-mapping>
 </web-app>
- Create another XML file for component scanning
In this step, we are going to create an XML file named spring-servlet.xml, which is used for component scanning.
spring-servlet.xml
 <?xml version = "1.0" encoding = "UTF-8"?>
 <beans xmlns = "http://www.springframework.org/schema/beans"
             xmlns:xsi = "http://www.w3.org/2001/XMLSchema-instance"
             xmlns:context = "http://www.springframework.org/schema/context"
             xmlns:mvc = "http://www.springframework.org/schema/mvc"
             xsi:schemaLocation = "  http://www.springframework.org/schema/beans
 http://www.springframework.org/schema/beans/spring-beans.xsd
 http://www.springframework.org/schema/context
 http://www.springframework.org/schema/context/spring-context.xsd
 http://www.springframework.org/schema/mvc
 http://www.springframework.org/schema/mvc/spring-mvc.xsd">
             <!-- Step 3: Add support for component scanning -->
             <context:component-scan base-package = " com.app.SpringMVC4" />
             <!-- Step 4: Add support for conversion, formatting and validation support -->
             <mvc:annotation-driven/>
             <!-- Step 5: Define Spring MVC view resolver -->
             <bean
                         class="org.springframework.web.servlet.view.InternalResourceViewResolver">
                         <property name = "prefix" value = "/WEB-INF/view/" />
                         <property name = "suffix" value = ".jsp" />
             </bean>
 </beans>
- Create all View pages
In this step, we are going to create all the view pages (JSP pages) required in the application.
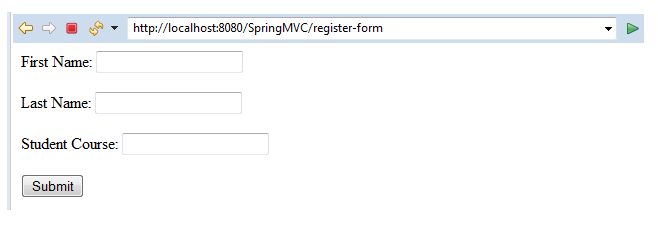
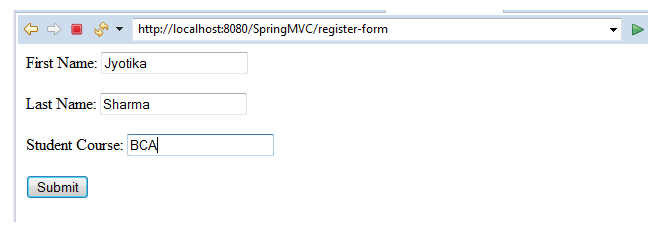
registerform.jsp
 <%@ page language = "java" contentType = "text/html; charset=ISO-8859-1"
     pageEncoding = "ISO-8859-1"%>
 <!DOCTYPE html>
 <html>
 <head>
 <meta charset = "ISO-8859-1">
 </head>
 <body>
 <form action = "regis-form" method="get" >
 First Name: <input type = "text" name = "FirstName" />
  <br></br>
 Last Name: <input type = "text" name = "LastName" />
  <br></br>
 Student Course: <input type = "text" name = "StudentCourse" />
 <br></br>
 <input type = "submit" value  = "Submit"/>
 </form>
 </body>
 </html>
regisformdata.jsp
 <%@ page language = "java" contentType = "text/html; charset=ISO-8859-1"
     pageEncoding = "ISO-8859-1"%>
 <!DOCTYPE html>
 <html>
 <head>
 <meta charset = "ISO-8859-1">
 <title>Insert title here</title>
 </head>
 <body>
 <h3>Spring MVC Application</h3>
 <br></br>
 FIRST NAME: ${param.FirstName}
 <br></br>
 LAST NAME: ${param.LastName}
 <br></br>
 COURSE: ${param.StudentCourse}
 <br></br>
 MESSAGE1: ${message}
 </br>
 MESSAGE2: ${message2}
 </body>
 </html>
Output