Spring Boot Actuator
It is a subproject of Spring Boot Framework. It contains many additional characteristics, with the help of which you can monitor and control the Spring Boot application. It includes the actuator endpoint (where the resource is located). The HTTP and JMX endpoints can manage and control Spring Boot applications. You should use the Spring Boot actuator if your application wants production-ready features.
Spring Boot Actuator Features
Spring-Boot-Actuator has three main features:
- Endpoint
- Metric
- Audit
Endpoint: Actuator endpoints enable application monitoring and operation. Spring Boot gives an enormous number of built-in endpoints. You can also create your endpoint. You can enable or disable each endpoint individually. Most applications choose HTTP and map the endpoint's ID to the URL with the / actuator prefix.
For example, the / info endpoint displays the information of your application. Actuator, by default, mapped it to actuator/info by default.
Metrics: The Spring Boot Actuator provides dimensional metrics through integration with a micrometre. The micrometre is built into Spring Boot. It is an instrumentation library that supports Spring application metric delivery. It provides a vendor-neutral interface for long task timers with timers, gauges, counters, distribution overviews, and dimension data models.
Audit: Spring Boot gives a malleable audit framework that exposes events to the AuditEventRepository. It also publishes authentication events automatically when you run spring security.
Enabling Spring Boot Actuator
We can introduce the dependency spring-boot-starter-actuator to permit the actuator in the pom.xml file.
<dependency>
    <groupId>org.springframework.boot</groupId>
    <artifactId>spring-boot-starter-actuator</artifactId>
    <version>2.2.2.RELEASE</version>
</dependency>
Spring Boot Actuator Endpoints
Actuator endpoints enable to monitoring and operating Spring-Boot applications. Spring Boot has several built-in endpoints, and you can also add custom endpoints to your Spring Boot application.
To describe the commonly used endpoints refer to the table mentioned below.
| Id | Usage | Default |
| actuator | Gives you the hypermedia-based discovery pages for other endpoints. Spring HATEOAS must be included in the class path. | True |
| auditevents | Publish information about audit events for the current application. | True |
| autoconfig | It allows you to exhibit all auto-configuration candidates and an auto-configuration report showing you the reason for applying or not. | True |
| beans | Utilized for presenting the whole list of all Spring Beans available in your application. | True |
| configprops | Utilized to exhibit a sorted list of all @ConfigurationProperties. | True |
| dump | Utilized to show a thread dump. | True |
| env | Used to expose the properties of Spring's Configurable Environment. | True |
| flyway | Used to view all Flyway database migrations applied. | True |
| health | Used to display application health information. | False |
| info | Used to display application information. | False |
| loggers | Used to view and modify the logger configuration of an application. | True |
| liquibase | Used to view all Liquibase database migrations applied. | True |
| metrics | Used to display metric information for the current application. | True |
| mappings | Utilized to present a sorted list of all @RequestMapping paths. | True |
| shutdown | Used to enable a successful shutdown of the application. | True |
| trace | Used to display trace information. | True |
Some of the following additional endpoints are utilized when discussing Spring MVC.
| Id | Description | Default |
| docs | It exhibits a document containing sample requests and reactions for actor endpoints. | False |
| heapdump | GZip is utilized to give back a compressed hprof heap dump file. | True |
| jolokia | Used to serve JMX Beans over HTTP (if Jolokia is in the classpath). | True |
| logfile | Used to return the contents of the log file. | True |
| prometheus | Used to provide metrics in a scrapable format on the Prometheus server. Requires reliance on micrometer-registration-Prometheus. | True |
Spring Boot actuator properties
Spring Boot has a feature that allows protection for every actuator endpoint. For that, this uses form-based authentication that gives a user ID as a user and a password that is randomly generated. You can also customize the basic authentication security of the endpoint so that the actuator can access the local endpoint. It must override configuration with the management.security.roles property. For example:
management.security.enabled=true
management.security.roles=ADMIN
security.basic.enabled=true
security.user.name=admin
security.user.passowrd=admin
Spring Boot Actuator Example
Now, we will understand the concept of an actuator by giving an example.
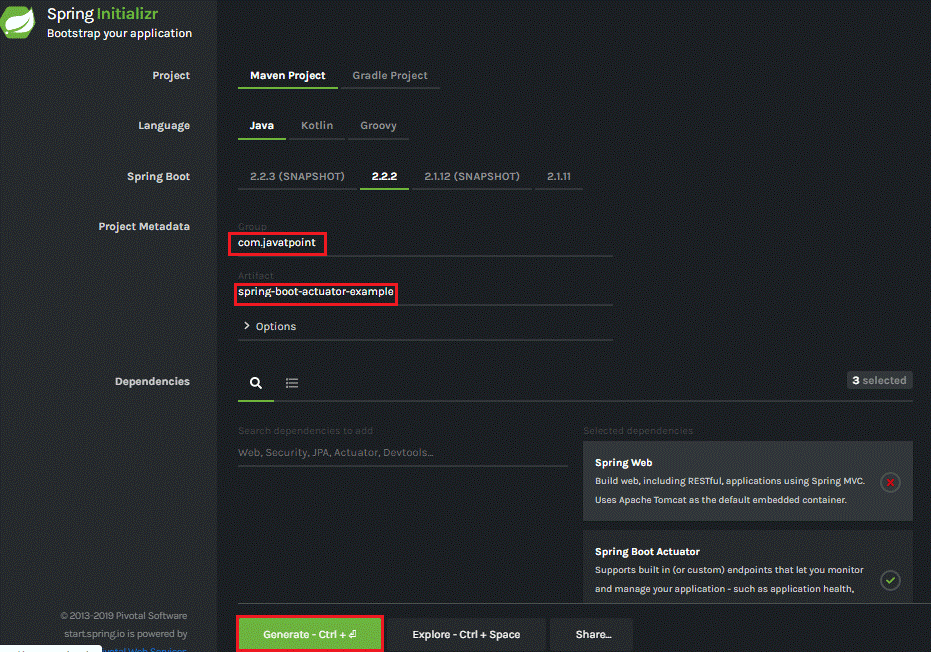
Step 1: First, we have to open Spring Initializr https://start.spring.io/ and create a Maven project.
Step 2: Specify the Group name. Deployed com.tutorialandexample.
Step 3: Provide the Artifact ID. Provided an example of Spring-boot-actuator.
Step 4: Add the mentioned dependencies: Spring Web, Spring Boot Starter Actuator, and Spring Data RestHAL browsers.
Step 5: Press the Generate button. When you click the Generate button, all the specifications related to your project will be packaged in a jar file and downloaded to your local system.
Step 6: Once done with the above steps, you must export jar files and paste them into the STS workspace.
Step 7: Import the project folder.
File -> Import -> Existing Maven Project -> Browse -> Select Folder spring-boot-actuator-example -> Finish
Import might take a long time. When you import the project, the project directory appears in the Package Explorer pane.
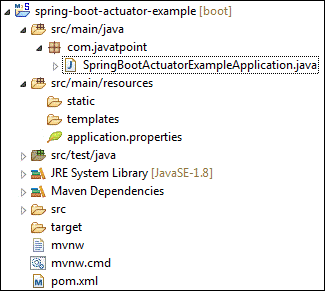
Step 8: You need to create a controller class. I have created a controller class called DemoRestController.
DemoRestController.java
package com.tutorialandexample;
//import statements
import org.springframework.web.bind.annotation.GetMapping;
import org.springframework.web.bind.annotation.RestController;
@RestController
public class Example
{
@GetMapping("/demo")
public String demo()
{
return "This is Spring Boot Tutorial!!";
}
}
Step 9: In this step, open the application.properties file and add the following statement to disable the actuator safety feature.
application.properties
management.security.enabled=false
Step 10: Run the SpringBootActuatorExampleApplication.java file.
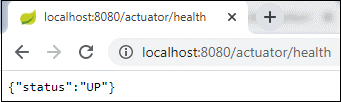
Step 11: Just open your browser and go to the URL http: //localhost: 8080/ actuator. It returns you to the following page:
{"_links":{"self":{"href":"http://localhost:8080/actuator","templated":false},"health":{"href":"http://localhost:8080/actuator/health","templated":false},"health-path":{"href":"http://localhost:8080/actuator/health/{*path}","templated":true},"info":{"href":"http://localhost:8080/actuator/info","templated":false}}}
You must note down that the application runs on port 8080 by default. When the actor starts, you'll see a list of all the endpoints exposed over HTTP.
Let's call the health endpoint by accessing the URL HTTP: //localhost: 8080/actuator/ health. It specifies the status of UP. It means that the application is error-free and runs uninterrupted.
Likewise, you can call other endpoints that help you monitor and manage your Spring Boot application.