Spring Boot JPA
Overview of Spring Boot JPA
What do you mean by JPA?
The JAVA Persistence API can be defined as the group of classes and methods used for persisting huge data sets to a database offered by Oracle Corporation.
Use
It is used to save the hassle of writing code for relational object management; programmers follow the framework named "JPA Provider". It helps to provide direct interaction with database instances. At this point, JPA will take over the required framework.
Chronology
The business logic layer is merged with the previous versions of the EJB-defined persistence layer with the assistance of the javax.ejb.EntityBean interface.
When EJB 3.0 was introduced, the persistence layer was separated and designated as:
- JPA 1.0 (Java Persistence API). The API specification was published on May 11, 2006, with the JAVA EE 5 specification using JSR220.
- JPA 2.0 was released on December 10, 2009, with the JAVA EE 6 specification as part of the Java Community Process JSR 317.
- JPA 2.1 was released with the JAVA EE 7 specification on April 22, 2013, using JSR338.
JPA Vendors
As we have seen, JPA is an open-source API, and various enterprise vendors such as Oracle, Redhat, and Eclipse are making new products available by adding JPA persistence flavors. Some of them are mentioned below:
- Hibernate
- Eclipselink
- Toplink, and more.
Example
In this example, we will use the spring-boot-starter-data-JPA dependency to connect to the H2 database.
Step 1: First, navigate to Spring Initializr with the help of given link,
https://start.spring.io/.
Step 2: Specify the group name. Deployed com. javatpoint.
Step 3: Enter the Artifact ID as mentioned: spring-boot-jpa-example.
Step 4: Following Dependencies has to be added: Spring Web, Spring Data JPA, and H2 databases.
Step 5: After that press on the Generate button. Click the Generate button, and the project will be packaged in a jar file and downloaded to your local system.

Step 6: Now, you must withdraw the jar file by the action Extract and put it into the STS workspace.
Step 7: The folder for the above project needs to be imported into STS.
File -> Import -> Existing Maven Project -> Browse -> Select Folder spring-boot-jpa-example -> Finish
Import takes a long time.
Step 8: Creation of a package named com.javatpoint.controller under the src>main>java folder.
Step 9: Creation of a controller class named Example under the com.javatpoint.controller package.
ControllerDemo.java
package com.javatpoint.controller;
//import @Controller
//import @RequestMapping
@Controller
public class Example
{
@RequestMapping("/")
public String mainPage()
{
return "mainPage.jsp";
}
}
Step 10: After the above steps, we need to make another package named com.javatpoint.model in the src > main > java folder.
Step 11: Creation of another class named Emp in the com.javatpoint.model package.
Emp.java
package com.javatpoint.model;
import javax.persistence.Entity;
import javax.persistence.Id;
import javax.persistence.Table;
@Entity
@Table(name="Empdata")
public class Emp
{
@Id
private int id;
private String empname;
public int getPass()
{
return pass;
}
public void setPass(int id)
{
this.pass = pass;
}
public String getEmpname()
{
return empname;
}
public void setEmpname(String username)
{
this.empname = empname;
}
@Override
public String toString()
{
return "User [id=" + id + ", uname=" + username + "]";
}
}
Once we are done with the above steps, we need to Configure the H2 database.
Step 12: You need to open the file named application.properties and start configuring the mentioned: port, enable the H2 console, data source, and URL.
application.properties
server.port=8085
spring.h2.console.enabled=true
spring.datasource.plateform=h2
spring.datasource.url=jdbc:h2:mem:javatpoint
Step 13: Now, creating a SQL file under the folder src > main > resources.
Give the file name as data.sql and provide the below data into it.
data.sql
insert into empdata values(001,'Rama');
insert into empdata values(002,'Jacky');
insert into empdata values(003,'Tessa');
insert into empdata values(004,'Shiva');
insert into empdata values(005,'Rohan');
Step 14: After that we have to make another folder named abc_app in the src folder.
Step 15: Creation of a JSP file with the name returned by ControllerDemo. ControllerDemo.java returned user.JSP.
user.jsp
<!DOCTYPE html>
<html>
<head>
<meta charset="ISO-8859-1">
<title>Insert title here</title>
</head>
<body>
<form action="addUser">
ID :<br />
<input type="text" name="t1"><br />
User name :<br />
<input type="text" name="t2"><br />
<input type="submit" value="Add">
</form>
</body>
</html>
Step 16: Run the SpringBootJpaExampleApplication.java file. In the console, you can see that the application is running successfully on port 8085.

Step 17: Navigate to browser and search the URL HTTP: // localhost: 8085 / h2console /. The driver class, the JDBC URL configured in the file named application.properties will be showing the default user name sa.
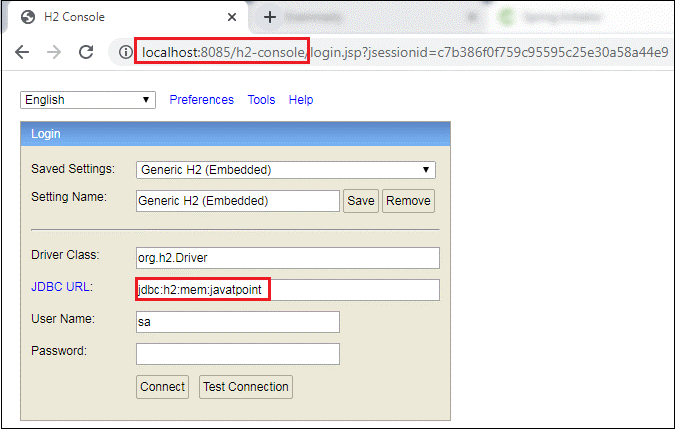
To test the connection you need to click on the Test Connection button. For the successful connection, it will give a test success message.
Step 18: Now, click the Connect button. It shows the structure of the user data table defined in User.java.
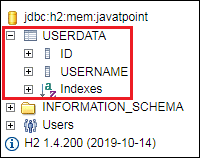
Step 19: Run the following query to verify the data you entered in the data.sql file.
SELECT * FROM USERDATA;