
Lifecycle of React Native Components
We are familiar with the word “lifecycle”. In human life, the lifecycle has three phases -
- birth
- life
- death
In react native its component lifecycle is almost the same as the human lifecycle. The life cycle of the react-native component starts when it is created. We can manipulate and monitor components during their life cycle.
Life cycles of react-native components :
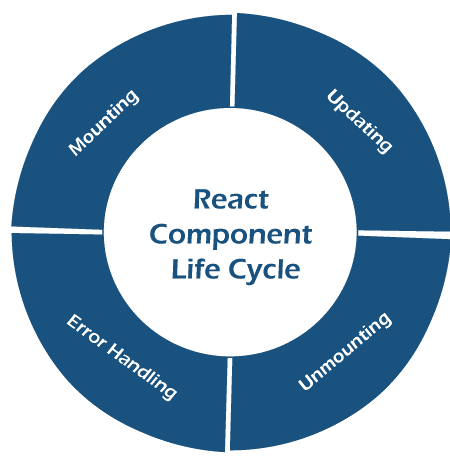
- Mounting
- Updating
- Unmounting
- Error handling.
Mounting :
The birth of the component is known as mounting. In this phase, elements are put into the DOM.
Methods that are called during mounting any element -
- constructor
- getDerivedFromProps
- Render
- componentDidMount
Constructor :
If you are familiar with OOPs(Object Oriented programming ) you must have heard word constructor. in react- native we use the constructor to initialize objects.
Objects are the same as react-native states. it is also used to bind event handler methods of react-native. For example, if you are in a child component and want to access functions of the parent component then we will be using a constructor.
So constructor has the following applications :
- Initializing objects/states.
- Binding methods.
Note: Constructors can be used only in a class component, not in functional components.
getDerivedFromProps:
It is called just before calling the render method. It takes two arguments - props and states. it returns an object if something has changed and null if nothing has changed. it is very rarely used because of the availability of simpler alternatives
Render: it is a very important method. It does not interact with the browser directly.it returns the same result each time whenever invoked.
componentDidMount:
When in DOM(Document Object Model) all the child elements and components are mounted, this method is called.it is the last phase of the mounting phase. componentDidMount works bottom to top but all other methods work top to bottom. Working bottom to the top ensures that all child components are mounted and all native components can be accessed.
Updating: if there is a change in props or state then it's called that component is updated.
above methods are called in the order below -
- getDerivedStatesFromProps
- shouldCompontUpdate
- Render
- getSnapshotBeforeUpdate
- componentDidUpdate
getDerivedFromProps: It is called just before calling the render method. props and states are taken as an argument. it returns an object if something has changed and null if nothing has changed. simpler alternatives of getDerivedFromProps are available which is why it is rarely used.
shouldComponentUpdate: it is executed when there is a change in props and state of any component. Through this, we can even restrict the update of any component. it always returns a boolean value. If it is false then no update is allowed or reflected but if it's true then an update is allowed and reflected.
Render: it is one of the important methods. Render does not interact with the browser directly. It returns the same result each time whenever invoked.
getSnapshotBeforeUpdate : it executed after render. it captures information from DOM(Document Object Model) about component before it is changed.it takes previous props(prevProps) and previous state(pevState) as an argument.
componentDidUpdate : it works just after getSnapshotBeforeUpdate. It performs some operations after the update of DOM. it's called only if a component or state is changed.
Unmounting: removal of components is called unmounting.
The method that is called while unmounting :
- ComponentWillUnmount
ComponentWillUnmount : whenever the component is removed it is immediately called. The component will never be re-rendered after unmounting. it invalidated timers, cancel requests and removes subscription, and performs every other necessary cleanup.
Error handling: This deals with exceptional cases. Whenever an error is encountered in any phase (rendering,getSnapshotBeforeUpdate,componentDidUpdate calling constructor, etc) well in that case Error handling is responsible for proper execution.
All of us know that dealing with errors is the crucial part and we should be proficient in this.
We use these methods for error handling :
- getDerivedStateFromError
- componentDidCatch
getDerivedStateFromError: whenever an error is thrown in a component this method is called and the error is passed as an argument and whatever the method returns are used to update the component. It is called during rendering.
componentDidCatch: It only works for catching errors thrown by the component’s children. It is called during the commit phase. It takes two parameters as an argument and that is error and info.
Example of the react-native life cycle :
I hope from the above explanation you have gained a basic idea about the lifecycle of react components and their methods. so now we will be implementing it practically.
App.js code:
import React from 'react';
import {View,Text} from 'react-native';
class App extends React.Component{
  constructor(){
    super();
    this.state={color:'red'}
    console.warn('constructor');
  }
  static getDerivedstateFromprops(){
console.warn('getDerivedstateFromprops');
return {};
}


render(){
  console.warn('render',this.state.color);
  return(<View><Text>Test {this.state.color}</Text></View>);
}


}
export default App;
Note: Run your app using the web for proper inspection
Explanation: we know about constructors but you may think that why are we using “super()”?
So super() basically calls the parent class constructor. we have initialized the color as red.
If you will execute the above code you will find it is showing - “Test red” on the output screen.
Let's open the console -
Right-click on the mouse, then you will see a menu has opened then click on inspect. After clicking on inspect you will see a console option there, click on that, and then you can see the sequence of execution there.
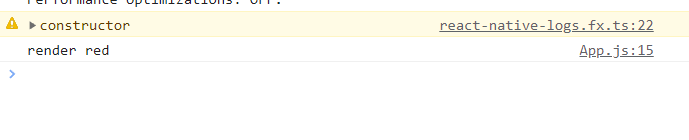
Firstly it is constructor then render, same as the picture below -
Now we will be calling componentDidMount.
Firstly let's look at the code.
App.js code With componentDidMount :
import React from 'react';
import {View,Text} from 'react-native';
class App extends React.Component{
  constructor(){
    super();
    this.state={color:'red'}
    console.warn('constructor');
  }
  static getDerivedstateFromprops(){
console.warn('getDerivedstateFromprops');
return {};
}
componentDidMount(){
  this.setState({color:'green'});
  console.warn('componentdidmount');
  return {};
}
render(){
  console.warn('render',this.state.color);
  return(<View><Text>Test {this.state.color}</Text></View>);
}


}
export default App;
Explanation :
Firstly let's recall what componentDidMount does -
componentDidMount : When in DOM(Document Object Model) all the child elements and components are mounted, this method is called.it is the last phase of the mounting phase. componentDidMount works bottom to top but all other methods work top to bottom. Working bottom to the top ensures that all child components are mounted and all native components can be accessed.
So it simply means that if we will execute the code above render will be updated and the output screen will be displaying “Test green”.
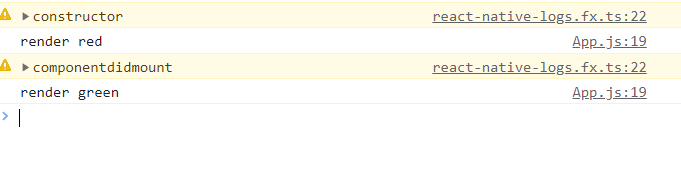
So we can see firstly the render was returning as “red” and as we called “componentDidMount “ it is recalled and we can see “green” instead of “red”.
Updating :
import React from 'react';
import {View,Text} from 'react-native';
class App extends React.Component{
  constructor(){
    super();
    this.state={color:'red'}
    console.warn('constructor');
  }
  static getDerivedstateFromprops(){
console.warn('getDerivedstateFromprops');
return {};
}
componentDidMount(){
  this.setState({color:'green'});
  console.warn('componentdidmount');
  return {};
}
componentDidUpdate(){
  console.warn("componentDidUpdate");
  }
render(){
  console.warn('render',this.state.color);
  return(<View><Text>Test {this.state.color}</Text></View>);
}


}
export default App;
Output :
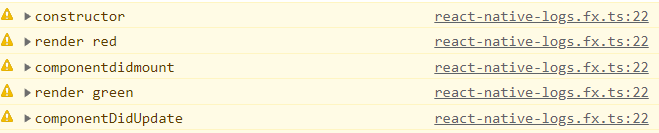
So we see the sequence of execution. we have learned about many other methods under mounting, updating, unmounting and error handling and those will work as same as their sequence.
It was a class component life cycle. Let’s look at what happens in the functional component -
Functional components: Functional components do not use lifecycle methods, they are called stateless components as they do not control their own state. It is simply a plain javascript function. we know how important is for controlling the flow but while using the class component it's a bit difficult concerning the functional component. in functional components, the react-native lifecycle is very easy and simple. We can easily implement is using use effect hooks. It takes two parameters, the first one is a callback and the second one is a dependency array. useEffect works the same as the methods of class components.
Hooks: By using hooks you can implement components as functional components. hooks are introduced in react version 16.8. It simplifies the complex lifecycle method. We do not have to use the “this” keyword.
Let's see an example of functional components :
import React, {useState, useRef} from 'react';
import {Text, View} from 'react-native';

function App() {
  const [getString, setString] = useState('This is functional components example');

   return (
     <View>
        <Text style={{color:"blue"}}>hello learners {getString}</Text>
     </View>
   )

}
 export default App;
Output:

Here I have used useState hook. There are multiple hooks, we will be learning and using them in the other parts of this react-native tutorial.
React native team is also suggested to use functional components, here's the reason -
- Simpler lifecycle.
- No need to use the “this” keyword, so simply less confusion.
- Easy to debug.
- We can use stateful logic without any change in the component hierarchy.
Hooks are a blessing for us. we should learn class components for sure but for efficient work we need to use functional components.