
TouchableOpacity in React Native

Touchable opacity is the most suited example if you want to make views respond to proper touch. If you want to control the opacity then it can be done by wrapping the children into it. Elements are called children of the App.

Props of touchable opacity :

activeOpacity: It determines the level of opacity that should be present when touch is active. Its default value is 0.2

hasTvpreffredFocus: It is of boolean type taken only true or false.

nextFocusDown: it accepts only numbers as arguments.

nextFocusNumbers: It also accepts only numbers as arguments.

Some same props named nextFocusRight,nextFocusLeft,nextFocusUp all of 

them accepts only neumeric value.

App.js code:

import React, { Component, } from 'react'
import {
  StyleSheet,
   View,
    Text,
    TouchableOpacity,
} from 'react-native'


export default TouchableOpacityExample = (props) => {
   return (
      <View style = {styles.container}>
         <TouchableOpacity style={{backgroundcolor:'pink'}}>
            <Text style = {styles.button}>
               example
            </Text>
         </TouchableOpacity>
      </View>
   )
}


const styles = StyleSheet.create ({
   container: {
      flex: 1,
      backgroundcolor:'pink',
      borderWidth:1,
      alignItems: 'center',
      justifyContent: 'center',
   },
   button: {
      borderWidth: 1,
      padding: 25,
      justifyContent: 'center',
      backgroundcolor:'red',
      fontsize:25
   }
})

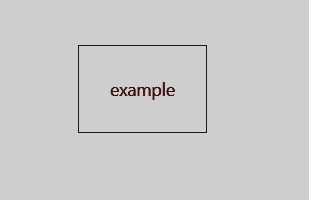
Output :
 Touchable opacity

Explanation:  

We have imported StyleSheet, View, Text, and TouchableOpacity because we will be using them throughout the app.

     <View style = {styles.container}>
         <TouchableOpacity style={{backgroundcolor:'pink'}}>
            <Text style = {styles.button}>
               example
            </Text>
         </TouchableOpacity>
      </View>

 We have declared our button and given it the name  “ Example”, you can see within the Text we have written “example” and it will appear inside the box in output which you can see in the output.

The stylesheet is for styling purposes. Through container, we have styled the whole rendered app but the button is specific for touchable opacity and you can see in touchable opacity code within styling we have mentioned {styles.button} so it inherits styles from the button.

Lets see one more example-

Example - 2

App.js code:

import React, { Component } from 'react'
import {
  StyleSheet,
  TouchableOpacity,
  Text,
  View,
} from 'react-native'
export default class App extends Component {
  constructor(props) {
    super(props)
    this.state = { count: 10 }
  }
onPress = () => {
    this.setState({
      count: this.state.count+10
    })
  }
render() {
   return (
     <View style={styles.container}>
       <TouchableOpacity
         style={styles.button}
         onPress={this.onPress}
       >
         <Text> click here </Text>
       </TouchableOpacity>
       <View style={[styles.countContainer]}>
         <Text style={[styles.countText]}>
            { this.state.count !== 0 ? this.state.count: 100}
          </Text>
        </View>
      </View>
    )
  }
}
const styles = StyleSheet.create({
  container: {
    flex: 1,
    justifyContent: 'center',
    backgroundColor:'pink',
    paddingHorizontal: 10
  },
  button: {
         padding: 25,
    alignItems: 'center',
    backgroundColor: '#DDDDDD',
    alignItems:'center',
    justifyContent:'center',
    borderWidth:1,
    padding: 10
  },
  countContainer: {
    alignItems: 'center',
    padding: 15,
    color:'red'
  },
  countText: {
    color: 'red',
    fontsize:25
  }
})

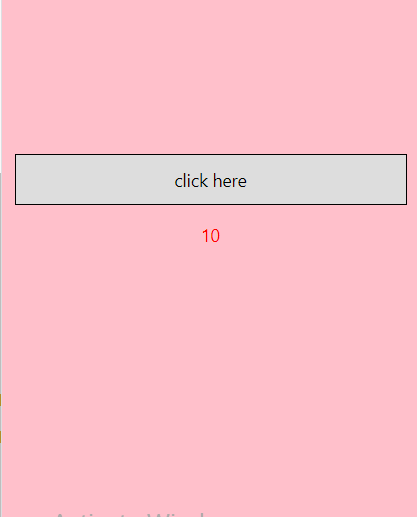
Output
 Touchable opacity

Explanation:

import React, { Component } from 'react'
import {
  StyleSheet,
  TouchableOpacity,
  Text,
  View,
} from 'react-native'

We are importing components as per our need such as stylesheet,touchableopacity,text and view.

this.state = { count: 10 }

This sets the default value of the count, which is 10. So initial value will of the count be 10 and it will increase as per our command.

  onPress = () => {
    this.setState({
      count: this.state.count+10
    })
  }

This is the responsive part which decides what will happen if the button is clicked. So as per code, it will be incremented by 10.

Ex- default value is 10. Once clicked, it will be 20, the next 30, etc.

then we do the declaration of a button. Through touchable opacity, we are constructing a button. The text defines the title of the button and styling is done using a stylesheet. The code within the stylesheet is for styling each component such as container, count text, count button, etc.


Related Topics

TouchableHighlight in React Native

It is just a wrapper for making touch work properly, and it is the conventional way of handling touch gestures. Today's most future-proof solution is pressable API. pressable manages all...

2 minutes read.

React Native API

API API stands for an Application programming interface. API allows communication between two software and is also responsible for data sharing. It takes the asked data from the server and delivers...

6 minutes read.

React Native Side Drawer

In this part of the react-native tutorial, we will be learning about the react-native side drawer. We have already studied the status bar and various parts of react-native navigation, including...

5 minutes read.

React Native stack navigation

You must know about the stack data structure. Stack is one of the important data structures which works in the FILO(first in last out) method. As you know, mobile apps are...

4 minutes read.

React Native Animations

Animation: animation is a method in which puppets, figures, drawings, etc., appear as moving creatures, making an illusion that things are moving. It is a unique way of expressing something...

6 minutes read.

How Does React Native Work

Working of React Native React Native is a framework that lets us write android and iOS mobile applications using JavaScript. It is interesting to see how easy it is to develop...

4 minutes read.

React Native Components

React Native components are the same as ordinary react components, but they are different in terms of rendering and styling. All react code lives in react components. They are independent...

16 minutes read.

States in React Native

We can control data of components of react-native by state and props. We are familiar with props and used them multiple times previously. Props: This is used to customize components and...

3 minutes read.

Difference Between React.js and React Native

React js vs. React-native React native:  react-native is an open-source javascript framework that can be used to develop native mobile apps for IOS and android. Facebook released it in 2015 and witnessed...

3 minutes read.

Basic knowledge of firebase for React Native

Firebase for react-native : Firebase is a mobile and web application development platform which is created in 2014 by google. It is a product of google which is offered to developers...

7 minutes read.

Advantages and Disadvantages of React Native

Advantages of using React Native It is observed that React Native stands out from most of the existing methods of cross-platform application development, like Ionic or Cordova, because React Native renders...

3 minutes read.

React Native Sound

It is a great way to connect to the user. Just a tiny "ting" of any email received, or some sound for deleting a file or sound for sending a...

8 minutes read.

React Native Toast

Introduction: It is a message that will be displayed on the screen for a short span of time to interrupt the user. Primarily it is displayed by any user action....

5 minutes read.

React Native Alert

In this part of the tutorial, we will learn about react-native's alert API. It is compatible with both android and IOS. What is API? Answer - API stands for Application programming interface,...

4 minutes read.

What is a Bridge in React Native?

A React Native is generally composed of two fields or two parts: The first part is the code of JavaScript.The second one is native code. The ability to build a bridge between...

3 minutes read.

React Native navigation bar and button

Here we will be focusing on header navigation. We will add buttons to the header, which is the best way to interact with a header. We have already learned about...

4 minutes read.

TouchableOpacity in React Native

Touchable opacity is the most suited example if you want to make views respond to proper touch. If you want to control the opacity then it can be done by...

3 minutes read.

Why to Learn React Native

The demand for smartphone applications is ever-changing. The elder ones disappear from our remembrances, and smartphones and new applications come each day. In this turbulent ecosystem, it is struggling for...

4 minutes read.

React Native Pressable

It manages all the touch inputs, and it is one of the core wrappers introduced in July 2022. The Two important features of pressable are listed below- onPressInonPressOut onpressIn: We already know the...

3 minutes read.

React Native indicator

React native activity indicator : React native activity indicator is one of the react-native components. We all have seen it several times. It's the loader. Look at the picture below - So now...

4 minutes read.