Django Create App
Django is a Python-based web framework that is based on the Model View Template architecture. In this post, we will go through the installation and setup for our first Django app. In Django, there is a difference between a project and an app. The project refers to the whole application. The app, in contrast, represents the subparts of the project. To create the Django project, first, we need to install Python.
To install Python, go to the link https://www.python.org/downloads/click on the download option. After downloading the Python, you can verify the installation by running this command in your console.

Virtual environment
It is considered to be good practice to use a virtual environment for separate projects. Virtual environments keep the package separately, and with the help, we can keep different versions of a library for different projects.
Virtual Environments keep the different versions of a module separated from each other to not mess up with each other.
We can install the virtual environment by using this command:
pip install virtualenv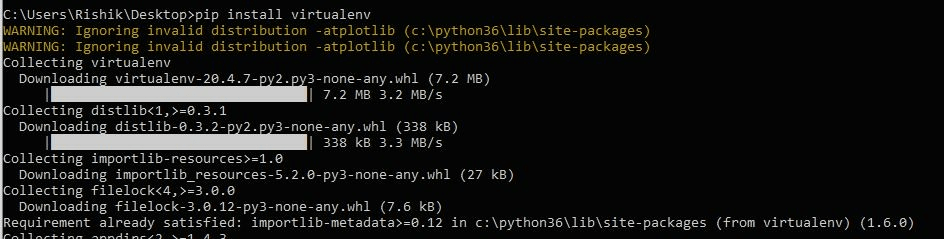
Install Django
After installing the Python, the next step is to install Django. Since we have already installed a virtual environment, subsequently, we will install Django in the virtual environment. We will install Django and create the project in a virtual environment called myenv. To create the environment, execute this command:
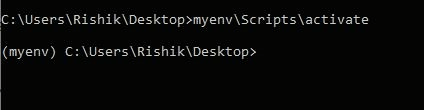
VirtualenvmyenvTo use the virtual environment we just created, we have first to activate the environments. To activate, just run this command:
newenv\Scripts\activateIf the environment is activated, we can see the environment name on the left side of the console.
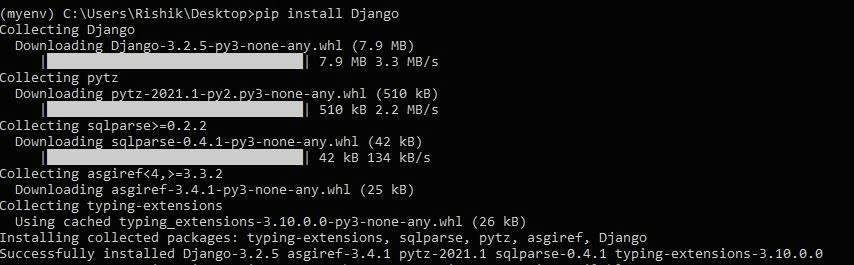
Now the environment is running and ready to use. The next step is to install Django. We can easily install Django by using the python package pip. To install Django run this command in your command-line interface python – m pip install Django.
To verify if Django is correctly installed in your local machine or not, execute the following command in the Python console:
Import Django
If this command does not show any error and Django is perfectly installed on your computer, we can check the version of the Django installed by running the below code in the python console.
Print(Django.get_version())The above command will print the version number of Django.
Project Setup
To start the project, go to the directory in which you want to create your project in your terminal or cmd and type this command:
django-adminstartprojectmyprojectThis command will create a new directory named myproject. The structure for this myproject will be like this:
myproject/
   manage.py
myproject/
      __init__.py
      settings.py
      urls.py
      wsgi.py
Now navigate to the project directory by cd myproject.
python manage.py runserverThe output of the command will be something like this in the terminal:
Performing system checks...
0 errors found
January 08, 2020 - 15:50:53
Django version 1.8, using settings 'myproject.settings'
Starting development server at http://127.0.0.1:8000/
Quit the server with CONTROL-C
This output confirms that we have done our first project successfully and have started the development server.
App Setup
As mentioned above in the post, a project is made up of many applications, and each application has a specific task. An application can be reused and function differently by just making some tweaks to it.
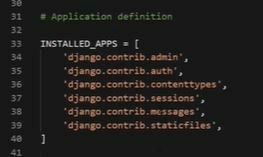
Although, Django already provides some pre-installed apps in the project. To check these apps, navigate to the settings.py file in myproject ->myproject. The file contains a section called INSTALLED_APPS, which consists of all the pre-installed apps.
To create our new app, go to the manage.py in your command line and run this command:
python manage.py startappmyapppJust like creating the project, this command will create a directory named "myapp”, whose structure will be like this:
myapp/
   __init__.py
   admin.py
   models.py
   tests.py
   views.py
To use this app and activate it, we need to tell Django that we have created a new app by specifying the app name in the INSTALLED_APPS list. After that, the INSTALLED_APPS section should look like this.
INSTALLED_APPS=(
'django.contrib.admin',
'django.contrib.auth',
'django.contrib.contenttypes',
'django.contrib.sessions',
'django.contrib.messages',
'django.contrib.staticfiles',
'myapp',
)
Now the next step after creating an app is to specify the app's URL to render it in the browser. To add the URL, go to the file myproject->myproject-> urls.pyand modify it as below:
fromDjango.contrib importadmin
fromDjango.urls importpath, include

urlpatterns =[
    path('admin/', admin.site.urls),
    path('', include("myapp.urls")),
]
By doing these steps, we have set up our app. Now, if we want to render the “Hello World” page, we have to do these steps.
All the rendering in Django is done by the views part of the MVT architecture. Create a new file named views.py in your myapp directory, and in this views.py write the code below:
import Django.http from HttpResponse


def helloworld(request):
      return HttpResponse("Hello World!")
Now create a file called urls.py in the same myapp folder and use this code in it:
from . import views
from Django.urls import path


urlpatterns = [
    path('', views.helloworld, name=”home”
]
That's all. We have created the first Django app, and now, to run this, just start the server by executing the command mentioned above also:
python manage.py runserverNow go to your browser and browse to localhost:8000 to see the output:
