Struts 2 Custom Interceptor
Custom Interceptor can be implemented in struts application by implementing Interceptor interface. We have to override all three life cycle methods. The Interceptor interface itself provides methods to implement custom interceptors.
Custom interceptor life cycle methods are:
- public void init(): The main use of this method is to initialize the interceptor. This method is called only once. It is called by the web container.
- public String intercept(ActionInvocation ai): This method is invoked for each request. Request processing logic is defined with the helpof this method. If invoke() method is returned by this method, the next action will be called. If the method returns a string then the result page is called.
- public void destroy(): The main use of this method is to destroy the interceptor. It is called only once. It performs a clean-up process.
Struts Custom Interceptor Example:
Create the Interceptor that implements Interceptor interface:
First, create a java class in a package that implements the Interceptor interface and override all the 3 life cycle methods init(), intercept() and destroy().
Call the getStack() method with ActionInvocation object to get reference of ValueStack.
Using findString() method we can find value stored in that variable.
toUpperCase() method converts name to uppercase and then it is stored in valuestack with set() method.
The next resource is then obtained with invoke() method.
import com.opensymphony.xwork2.ActionInvocation;
import com.opensymphony.xwork2.interceptor.Interceptor;
import com.opensymphony.xwork2.util.ValueStack;


@Override
public void init()
{
// TODO Auto-generated method stub
}
@Override
public String intercept(ActionInvocation ai) throws Exception
{
ValueStack vs=ai.getStack();
String s=vs.findString("name");
vs.set("name",s.toUpperCase());
return ai.invoke();
}
@Override
public void destroy()
{
// TODO Auto-generated method stub
}
}
Construct struts.xml file with the entry of Interceptor in it:
In the struts.xml file, make the entry of the interceptor. We are specifying custom interceptor by upper. Also, we have specified default stack and upper interceptor with interceptor-ref sub-element.
<?xml version="1.0" encoding="UTF-8" ?>
<!DOCTYPE struts PUBLIC "-//Apache Software Foundation//DTD Struts
Configuration 2.1//EN" "http://struts.apache.org/dtds/struts-2.1.dtd">


<struts>
 <package name="default" extends="struts-default">
 <interceptors>
 <interceptor name="upper" class="MyInterceptor"></interceptor>
 </interceptors>
<action name="login" class="LoginAction">
<interceptor-ref name="defaultStack"></interceptor-ref>
<interceptor-ref name="upper"></interceptor-ref>
<result name="success">welcome.jsp</result>
<result name="error">error.jsp</result>
</action>
</package>
</struts>
In order to get input from the user create index.jsp file:
Create index.jsp file in WebContent folder for taking name and password as a input from the user and the login button for form submission. Crate a form and place one textfield and one password field and a submit button in it.
<%@ page language="java" contentType="text/html; charset=ISO-8859-1"
    pageEncoding="ISO-8859-1"%>
    <%@ taglib uri="/struts-tags" prefix="s" %>

<!DOCTYPE html PUBLIC "-//W3C//DTD HTML 4.01 Transitional//EN" "http://www.w3.org/TR/html4/loose.dtd">


<html>
<head>
<meta http-equiv="Content-Type" content="text/html; charset=ISO-8859-1">
<title>Insert title here</title>
</head>
<body>
<s:form action="login">
<s:textfield name="name" label="enter the name"></s:textfield>
<s:password name="password" label="enter the password"></s:password>
<s:submit value="login"></s:submit>
</s:form>
</body>
</html>
Create welcome.jsp file to denote success and error.jsp to denote failure:
Create 2 JSP files namely welcome.jsp and error.jsp in WebContent folder. On success it will redirect to welcome.jsp and on failure it will redirect to error.jsp page.
welcome.jsp
<%@ page language="java" contentType="text/html; charset=ISO-8859-1"
    pageEncoding="ISO-8859-1"%>
        <%@ taglib uri="/struts-tags" prefix="s" %>
<!DOCTYPE html PUBLIC "-//W3C//DTD HTML 4.01 Transitional//EN" "http://www.w3.org/TR/html4/loose.dtd">
<html>
<head>
<meta http-equiv="Content-Type" content="text/html; charset=ISO-8859-1">
<title>Insert title here</title>
</head>
<body>
Welcome
<s:property value="name"/>
in the world of technology.
</body>
</html>
error.jsp
<%@ page language="java" contentType="text/html; charset=ISO-8859-1"
    pageEncoding="ISO-8859-1"%>
<!DOCTYPE html PUBLIC "-//W3C//DTD HTML 4.01 Transitional//EN" "http://www.w3.org/TR/html4/loose.dtd">
<html>
<head>
<meta http-equiv="Content-Type" content="text/html; charset=ISO-8859-1">
<title>Insert title here</title>
</head>
<meta http-equiv="Content-Type" content="text/html; charset=ISO-8859-1">
<title>Insert title here</title>
</head>
<body>
sorry wrong password
</body>
</html>
Create action class LoginAction.java:
Action class LoginAction.java contains name and password field and it’s getter, setters with execute() method which returns Success string.
import com.opensymphony.xwork2.ActionSupport;
public class LoginAction extends ActionSupport{
private String name;
private String password;
public String getName() {
return name;
}
public void setName(String name) {
this.name = name;
}
public String getPassword() {
return password;
}
public void setPassword(String password) {
this.password = password;
}
public String execute()
{
return "success";

}


}
Output:
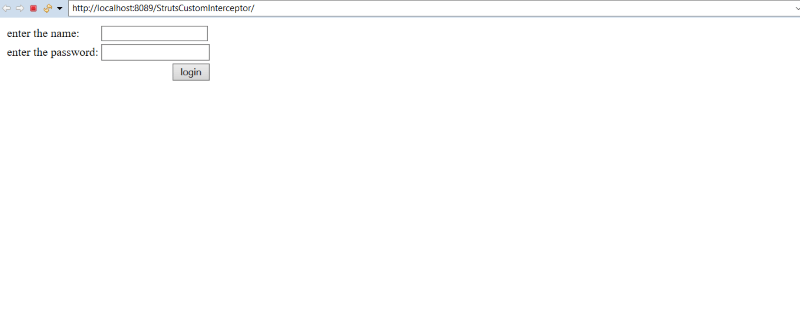
In order to run the application, right-click on the project -> Click on the option Run As -> then select Run on Server. It will show two labels for entering the name and password and the login button.
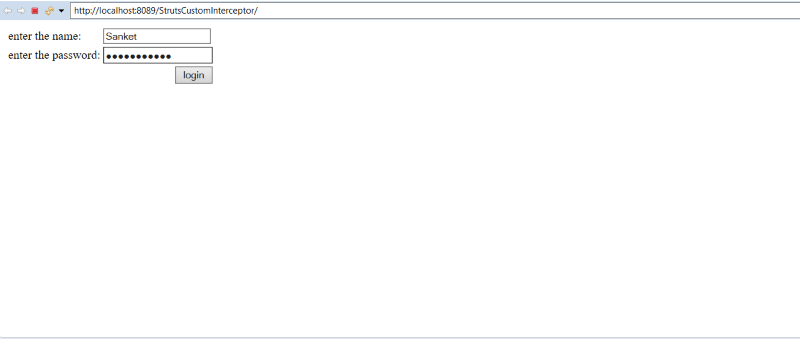
Enter the name and password and click on the login button.
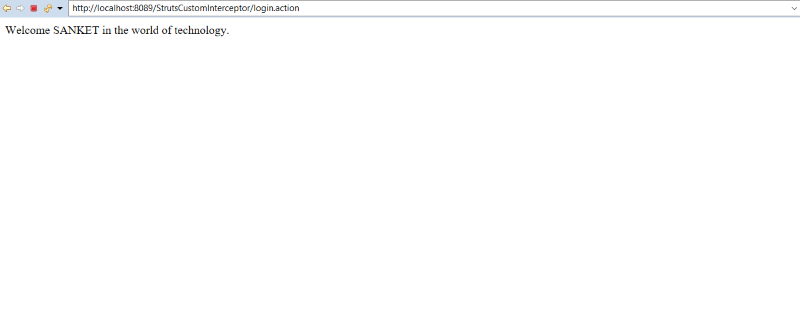
After Success, it will redirect to welcome.jsp displaying Welcome SANKET in the world of technology. The name is displayed in uppercase as the interceptor is used.