MySQL View
Introduction
MySQL View is a virtual table to create a clone of the base table. The View does not contain its values or data. MySQL View creates to connect more than one table and operates as a table. MySQL View operates in the database similarly as a table.
MySQL View does not contain values. It contains the primary table data. If the table changes data, then MySQL View also changes the value. The View contains either entire columns or requires columns from the base table.
MySQL View provides three operations to handle View and related tables. The View supports the below operation similarly as a table.
- Create View: create a new view in the database.
- Update View: update and modify View in the database.
- Show View: display available views and their data.
- Delete View: remove View from the database.
MySQL View operates using two ways. MySQL handles "view" either manually or automatically using interfaces. The below methods are used to create, update, and delete views.
- Command-line client interface
- MySQL workbench interface
The command-line client interface uses a query to handle views. The workbench interface operates View and handles view queries automatically.
Syntax
MySQL View requires a base table. Mainly, MySQL query is used to create a new View or select View to display. The view syntax is below.
CREATE [OR REPLACE] VIEW View_Name AS
SELECT column FROM Table_Name [WHERE condition];
Description
CREATE [OR REPLACE]: The "CREATE" or "REPLACE" keyword helps to create a new view or replace the available View. Here, you can use alter to update MySQL View.
VIEW: The "VIEW" is necessary to operate MySQL views.
View_Name: It helps to assign a name to the View. You do not assign table names to View.
SELECT column: select the required columns from the respective table in the database.
Table_Name: Select a base table and make a clone of that table as a view. It must be available in the database.
WHERE condition: Apply a "WHERE" condition to make the required View format.
Reason for using MySQL View
The View requires the MySQL data management system to handle data. There are some advantages of using MySQL View.
-
Uses in complex MySQL query
The data management system operates complex queries to handle a large amount of the data. The application uses information or data without interruption. The View helps to handle complex queries for application performance. The View uses simple statements for the data and avoids complex queries of the system. -
Helps to data privacy and security
The web application operates on sensitive and essential information. The application data must be private. MySQL View helps to create a clone of a table with data. This View connects with other tables and keeps secure original data. The View hides the sensitive data of the application and documents. -
Reusability of the table data
The View creates a duplicate of the base table. MySQL query applies conditions and patterns for creating views. You create more than one View of the single base table. This multiple View works for different operations. The original data of the table is not destroyed. The View helps to make data safe. -
Backward compatibility
The application wants to use extensive data. This data operates without interruption. MySQL View splits the extensive data without destroying original information. The View allows backward compatibility.
Prerequisite
You know about table and table queries to operate View. You must understand the MySQL query and table data. The base table is available in the database to create a View.
Command-line client interface
Create View
The View is a virtual table of the required main table. You can create and operate on this. The View is created in the database. The View contains either all columns or required columns of the table.
Syntax
Create a MySQL View with entire columns of the table. The syntax of "create view" shown below.
CREATE VIEW View_Name AS
SELECT * FROM Table_Name [WHERE condition];
Create a MySQL View with a required column of the table. The basic syntax of "create view" shows below.
CREATE VIEW View_Name AS
SELECT column1, column2 FROM Table_Name [WHERE condition];
If View is available, then replace it with new View as per requirement. The syntax of "create view" shows below.
REPLACE VIEW View_Name AS
SELECT column FROM Table_Name [WHERE condition];
Examples of the create MySQL View.
1) Example: Create View with entire columns of the table.
Execute the below query to create a View as a table. The view name and table name must be different.
mysql> create view tutorial AS select * from mysql_tutorial;
Query OK, 0 rows affected (0.82 sec)
OUTPUT
Execute below query to get output.
mysql> Select * from tutorial;
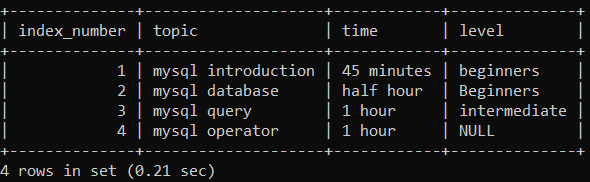
The output shows a replica of the "mysql_tutorial" table. The entire table column and its data displays in the MySQL View.
2) Example: Create a View with a required column of the table.
Execute the below query to create a view. The view name and table name must be different. You select columns of the table as per requirement.
mysql> create view training AS select topic, time, level from mysql_tutorial;
Query OK, 0 rows affected (0.15 sec)
OUTPUT
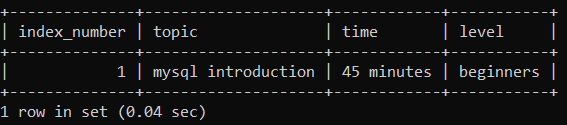
Execute the below query to get output. You select required columns from the base table to store in the View.
mysql> Select * from training;
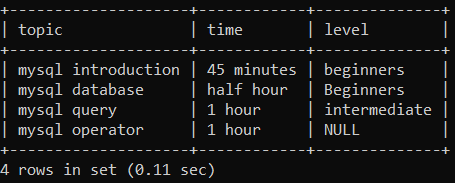
The output shows information about the "mysql_tutorial" table. The view stores three columns and four rows in the MySQL View.
3) Example: Create a View with the necessary conditions.
Execute the below query to create a view. The View selects columns of the table as per requirement. MySQL View supports the "WHERE" clause. This clause applies conditions to the query.
mysql> create view knowledge AS select topic, time from mysql_tutorial where time = '1 hour';
Query OK, 0 rows affected (0.28 sec)
OUTPUT
Execute the below query to get output. You select required columns from the base table to store in the View.
mysql> select * from knowledge;
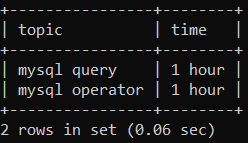
The output shows information about the "mysql_tutorial" table. The view stores two columns and two rows in the MySQL View. Here, you assign a "WHERE" clause with a time condition.
4) Example: Create a View with a required operator with a pattern.
Execute the below query to create a view. The View selects columns of the table as per requirement. MySQL View supports the "Like" operator. This operator applies a pattern to the query.
mysql> create view study AS select index_number, topic, time from mysql_tutorial where topic LIKE 'my%';
Query OK, 0 rows affected (0.28 sec)
OUTPUT
Execute the below query to get output. You select required columns from the base table to store in the View.
mysql> select * from study;
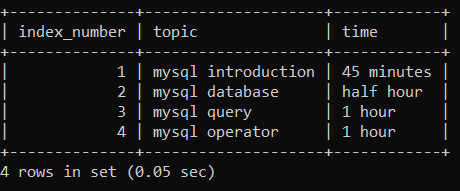
The output shows information about the "mysql_tutorial" table. The view stores three columns and four rows in the MySQL View. Here, you assign the "LIKE" operator with the "my%" pattern.
Show View
MySQL interfaces display available Views in the respective database. The interface shows available data in the View.
Examples of the display MySQL view
1) Example: show MySQL View.
Execute the below query to display MySQL View the same as a table. You use a query to execute to get output.
mysql> Select * from tutorial;
OUTPUT

The output shows a replica of the "mysql_tutorial" table in the View. The entire table column and its data displays in the MySQL View.
2) Example: show MySQL View with the condition.
Execute the below query to show View using condition. You select columns as a condition using the "WHERE" clause.
mysql> select * from tutorial where level = "beginners";
OUTPUT
The output shows information of the "mysql_tutorial" table in the View.
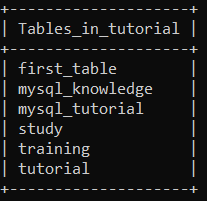
3) Example: Display available MySQL views.
Execute the below query to get available Views and tables of the respective database. You use table query to know about views.
mysql> show tables;
You do not get the difference between table and View according to names. You must remember View's name and table's name.
OUTPUT
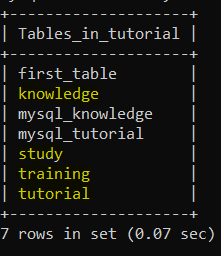
The output displays views and tables in the above image. The tutorial, training, study, and knowledge are MySQL views.
Update view
MySQL View modifies information. It updates the View and its format. You use it to alter the query to correct the view structure.
Syntax
The update view syntax shows below.
ALTER VIEW View_Name AS
SELECT column FROM Table_Name [WHERE condition];
The "ALTER" keyword is required to update View. This query helps to correct MySQL View.
Examples of the update MySQL views
The "training" view and its data show below.
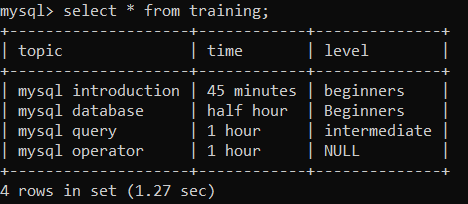
The View contains three columns and four rows. Now, you see the modified View in the below example.
1) Example: The example of the alter View.
Execute the below query to get a modified view.
mysql> alter view training AS select * from mysql_tutorial;
Query OK, 0 rows affected (1.87 sec)
OUTPUT
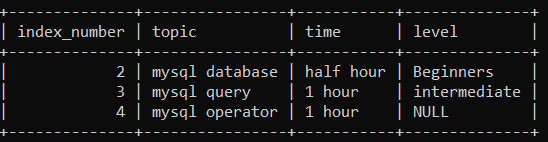
Execute the query below to get output.
mysql> select * from training;

The above output image shows the updated MySQL View. The "index_number" column is added in the "training" view.
2) Example: The example of the update MySQL view with the condition.
Execute the below query to get a modified view.
mysql> alter view training AS select * from mysql_tutorial WHERE TIME like '%hour%';
Query OK, 0 rows affected (1.87 sec)
OUTPUT
Execute the query below to get output.
mysql> select * from training;
The above output image shows the updated MySQL View. The first row of the View, which is "index_number = 1" updates.
Delete View
MySQL data management system creates multiple views using a single table. Sometimes unwanted views are stored in the respective databases. The View is removed from the database to maintain memory space. You remove MySQL View permanently.
Syntax
The delete view syntax shows below.
DROP VIEW [IF EXISTS] view_name;
The "IF EXISTS" keyword is optional in a MySQL query. This keyword is used to know the existence of the View.
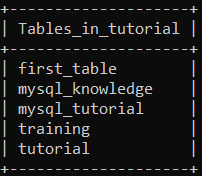
Examples of the delete view
The available views show below.

The tutorial, training, study, and knowledge are Views of the tutorial database.
1) Example: the delete view example shows below.
Execute the below query to remove the available View from the database.
mysql> drop view knowledge;
Query OK, 0 rows affected (0.34 sec)
OUTPUT
Execute the below query to get output.
mysql> show tables;
The "knowledge" view is removed from the respective database. You see the above output images to delete "view" permanently.
2) Example: the delete view with keyword example shows below.
Execute the below query to remove available Views from the respective database.
mysql> drop view IF EXISTS study;
Query OK, 0 rows affected (0.34 sec)
OUTPUT
Execute the below query to get output.
mysql> show tables;
The "study" view is removed from the respective database. You see the above output images to delete "view" permanently.
MySQL workbench interface
MySQL workbench interface is used for automation. The workbench does not need to use a query or command. The database creates the views and tables.
If you want to create a view in the MySQL system, you should use a base table. The workbench schemas create, update, display, and delete views. Here, you do not need to query. The workbench operates MySQL views more efficiently than the command-line client.
Create MySQL View
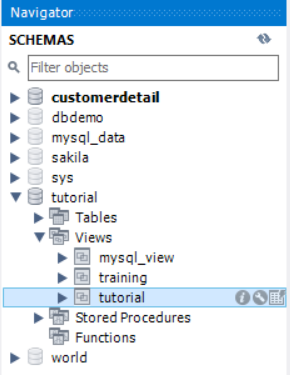
MySQL workbench shows a database list on the front page. MySQL schemas display the left side column of the workbench. This column is called Navigator. You show the working procedure of the created MySQL View.
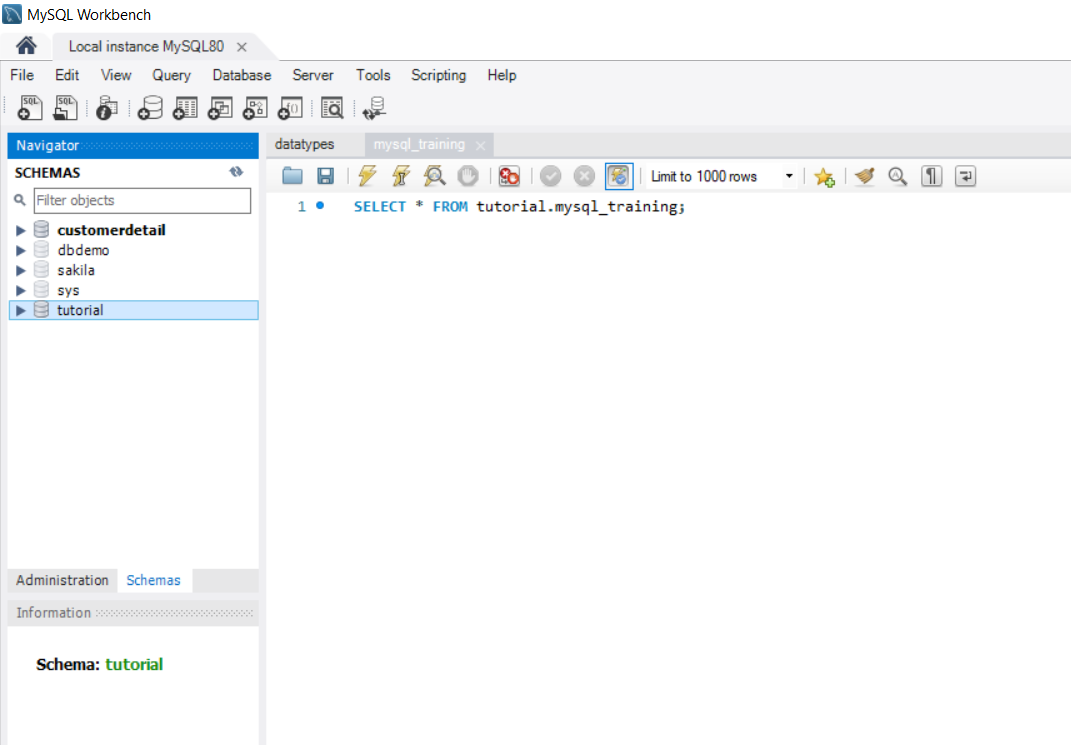
You can see the above image of the workbench home page. The database list displays in the navigator columns. Click on the respective database of the MySQL management system. You get available tables, views, stored Procedures, and Functions.
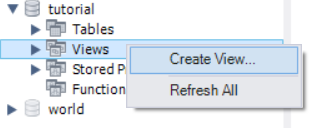
Click on the view column of the "tutorial" database. If required MySQL View does not exist, then create a new view. If you right-click on the view column, then you create a view column. Click on create View.
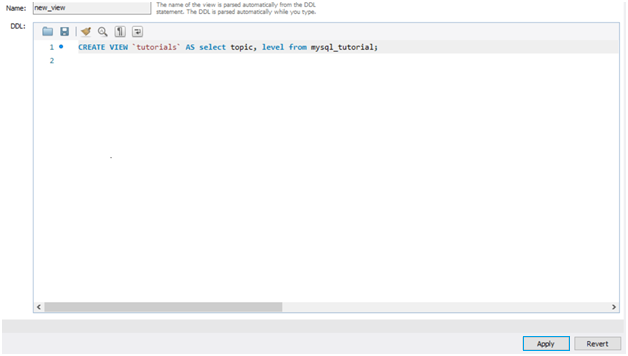
Insert query of the MySQL View in the query box and click on the "Apply" button. It is the primary query of View. You apply the "where" condition or operators to display a specific View.
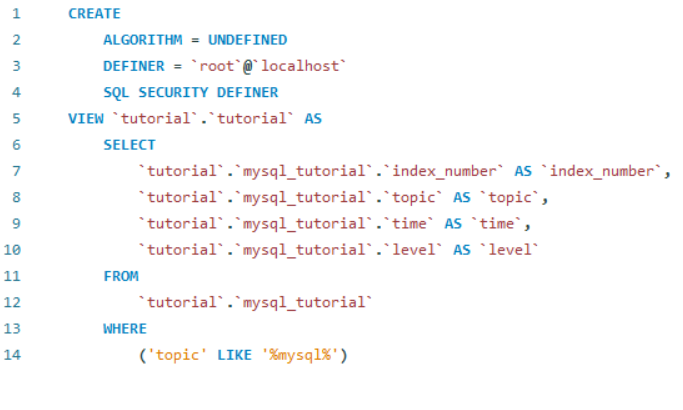
The View applies the "WHERE" clause for the "topic" condition and "like" operator with a percentage (%) pattern. After, create SQL query windows to "Apply" the given query.
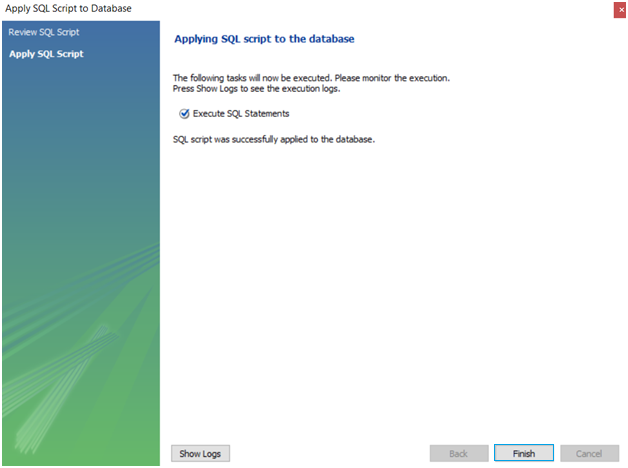
Execute SQL query or create a tutorial view and click on the "Finish" button. The workbench creates a new MySQL View. Refresh View and show the available views in the schema.
Show MySQL View
MySQL workbench shows a database list on the home page. MySQL schemas display the left side column of the workbench. The workbench displays available views and their structure. You see the working procedure of the show MySQL View and its value.

You can see the above image of the workbench home page. The database list displays in the navigator columns. Click on the respective database of the MySQL management system. You get available tables, views, stored Procedures, and Functions.

Click on the "views" column then you get available MySQL views. You get the entire list of views with some settings.
Click on the required View of the views. Here, "tutorial" view clicks and displays some setting signs. Click on the third setting symbol.
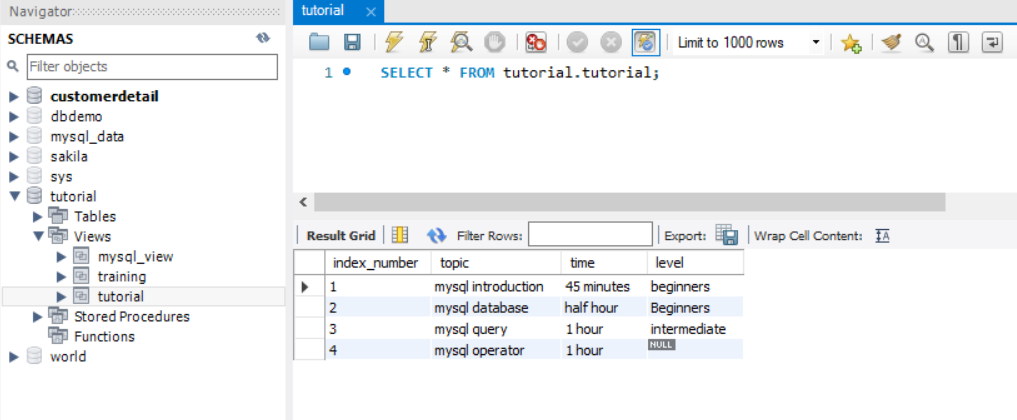
After clicking on the setting symbol, you get information about the "tutorial" view. The left column shows available views in the system. Top columns show a query of working View. The bottom column shows data of the View.
Alter MySQL View
The View is a clone of the base table. MySQL system does not change the value of the respective View. You add and remove columns as per requirement. MySQL management system displays rows of the table in the View using conditions. The View supports the "WHERE" clause and "LIKE" operator. The working procedure of the Alter view shows below.
Step1: Select the second option of the setting MySQL View. The workbench interface displays the SQL query window. You add or remove the column of the table.

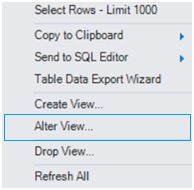
Step2: Right-click on the "View" column. This column shows the above pop-up box. Click on the "Alter View…" column. After, you get the below query pop-up box. You can change the query to update the View.
Step3: You insert or remove the required query from this View. The View wants to display specific data then apply the "WHERE" clause.

In this image, you see the SQL query of the "tutorial" view.
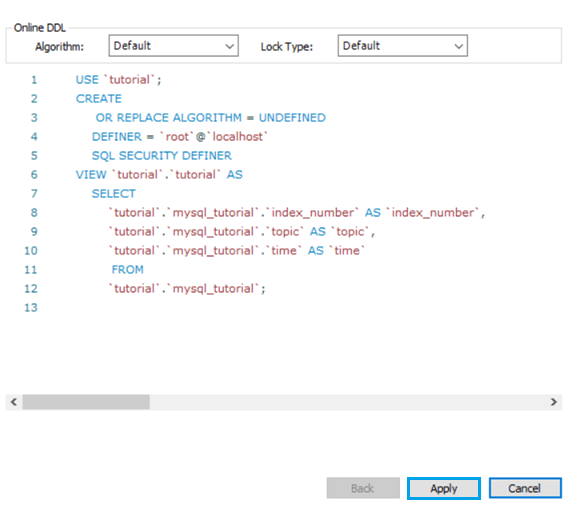
The workbench interface helps to remove the "level" column and correct the syntax. (If you want to alter rows, then use the "where" clause and "like" operator after the "mysql_tutorial" table name.)
Click on the "Apply" button and proceed to forward.
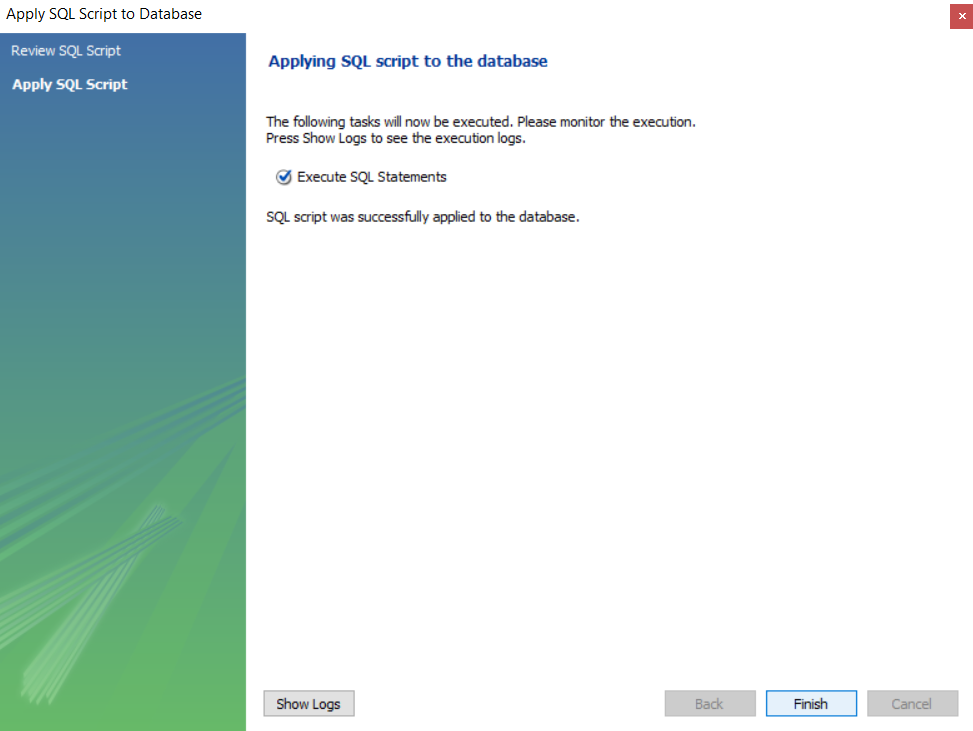
It is the final window of altering MySQL View. Click on the finish button and refresh the view column. You get the required view format and its data. If you do not want to finish, then click on the red cross and stop the procedure.
The above procedure is fundamental and straightforward of the update view and modified table information. Sometimes you need to use the "WHERE" clause with the condition and the "LIKE" operator with a pattern.
Delete MySQL view
MySQL management system creates multiple views using the base table. Sometimes unwanted views are stored in the respective databases. The View is removed from the database to maintain memory or space. You remove MySQL View permanently. The working procedure of the delete MySQL View shows below.

The database list displays in the navigator columns. Click on the respective database or schema of the MySQL management system. The schema shows tables, views, stored Procedures, and Functions.
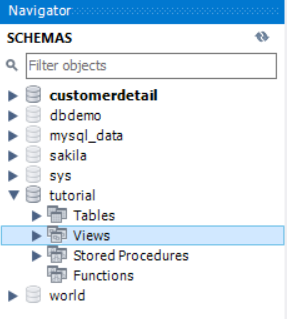
Click on the "views" column then you get available MySQL views. You get the entire list of views with some settings.

The Right Click on the required View. Here, the "tutorial" view chooses to delete from the database.
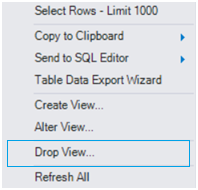
Click on the "Drop view…" option. This option creates SQL "DROP view" query.
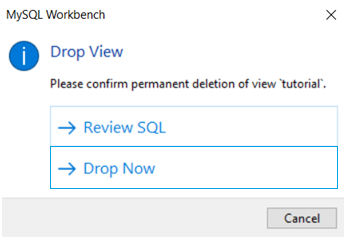
You can review the SQL query. If View wants to delete the required View, then click on the "DROP Now" option. The View automatically removes it from the database. You can see the MySQL view list. The "tutorial" view deletes permanently.
MySQL workbench is easier to handle and operate than the command line client interface.
Difference between MySQL table and MYSQL view
- The table requires creating a view, but the table does not require any view. Hence the view depends on the base table.
- The View does not change data but modifies the view format. The table changes the data and modifies the table format.
- The table and View's basic query are the same, but View does not work on column and rows query like a table.
- The multiple views are created using one table. You create a similar or different structure of the View based on the single table.