MySQL Queries
MySQL Queries
MySQL supports SQL queries in the MySQL interface. These queries help to interact data with the application. MySQL uses create database, user database, create a table, truncate table, and drop table queries. These queries are used initially to operate data queries.
The MySQL queries operate data, table, and database. MySQL stores databases to handle tables. MySQL table handles data using rows and columns. The database required functions to manage data and its operation. MySQL supports add, update, delete and display data as per your requirement.
MySQL queries execute in the command line client. The workbench interface executes queries automatically. The below table displays MySQL queries and their operation.
| Query | Description |
| MySQL insert query | This query helps to add data to the table. |
| MySQL update query | The update query modifies data in the MySQL table. |
| MySQL delete query | This query helps to erase data from the table. |
| MySQL select query | The select query supports displaying data from the table. |
| MySQL replace query | This query helps to replace old values with new values. |
Prerequisite for MySQL queries
If the database does not exist, then you should create a database. If the database exists, then execute the "USE database_name" query. After, you must create a table in the database. If the table is available, then MySQL queries use the table name directly.
MYSQL Insert Query
The "Insert query" is essential for the data management system. MySQL insert query saves the value in the table. The user can add new values and store them in the table. This query stores values according to columns and rows.
There are two ways to insert values in the MySQL table. You use either a single row or multiple rows to insert data.
- Insert single line data.
- Insert multiple line data.
If you want to insert a single row, then use a single line query. If you want to insert multiple rows, then use a multiple-line data query.
Syntax
Insert single line data syntax shows below.
 INSERT INTO table name (column1, column2... ,columnN) VALUES (data1, data2... ,dataN);
 Insert multiple line data syntax shows below.
 INSERT INTO table-name
  VALUES
 (data1, data2... ,dataN),
 (data1, data2... ,dataN),
 ..........
 (data1, data2... ,dataN);
Examples of the MySQL insert query
1) Example: The insert single-line data in the table.
Execute the below query in the command line prompt. The last row stores in the table.
mysql> insert into mysql_tutorial (index_number, topic, time, level ) values (4, ' mysql advance table', 'half hour', 'advance');
Output
You use the below query to get output.
mysql> select * from mysql_tutorial;
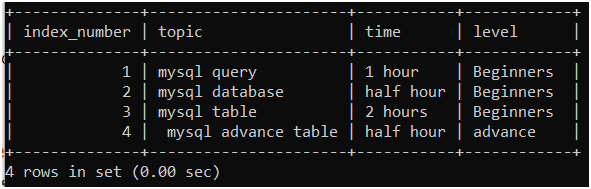
The above image shows updated table data. The index number 4 is added in the "mysql_tutorial" table.
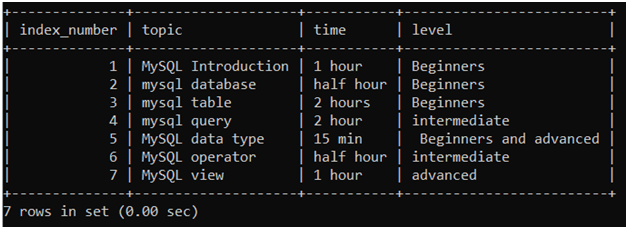
2) Example: The insert multiple line data in the table.
Execute the below query in the command line prompt. The last three-row are stored in the table.
mysql> insert into mysql_tutorial values (5, 'MySQL data type', '15 min', ' Beginners and advanced' ), (6, 'MySQL operator', 'half hour', 'intermediate'), (7, 'MySQL view', '1 hour', 'advanced');
Output
You can use the below query to get output.
mysql> select * from mysql_tutorial;
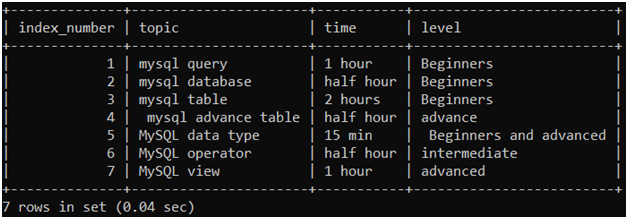
You see the output image. The three rows are added in the "mysql_tutorial" table.
MYSQL UPDATE QUERY
The update query modifies the data for data maintenance. You can change any column and row data as per your requirement. The update query is essential to represent the perfect table and its information.
Sometimes, the user inserts incorrect data into the table. The user cannot delete the entire data for a small mistake. The update query is helpful to change inaccurate data to correct data.
MySQL uses SET and WHERE clauses to update data. The SET keyword helps to assign updated columns. The "WHERE" works to assign a regular column.
MySQL update query gives two ways to update information in the table. The first way is to apply an "update query" for single-column data. The second way is to apply an "update query" for multiple column data.
Syntax
The Update query for single-column data syntax is below.
 UPDATE table name
 SET column = 'required value'
 WHERE stable column = value [condition]
The SET clause replaces the required value of the column. The "WHERE" clause assigns a regular column.
The Update query for multiple column data syntaxes is below.
 UPDATE table-name
 SET column1 = 'required value',  column2 = 'required value'
 WHERE stable column = value [condition];
The SET clause is replacing the required value in multiple columns. The "WHERE" clause assigns a stable column.
Examples of the update query
1) Example: Update query for single-column data example is below.
Executes the below query to update value.
mysql> update mysql_tutorial set topic = 'MySQL Introduction' where index_number = 1;
Output
Execute the below query to get output.
mysql> select * from mysql_tutorial;
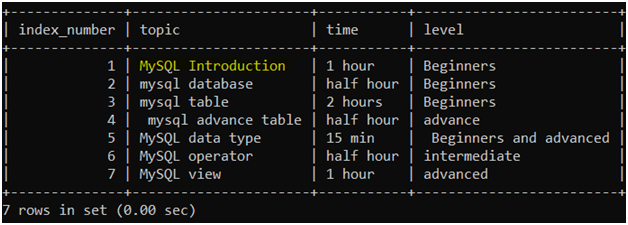
You see the output image. The "Update query" changes columns from "mysql query" to "MySQL Introduction" using index_number = 1.
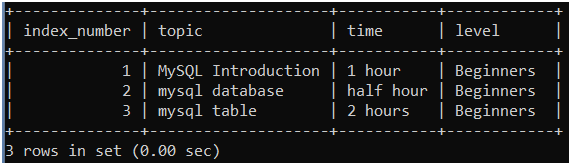
2) Example: The Update query for multiple column data example is below.
Execute the below query to change more than one column. The fourth row modifies using an update query.
mysql> update mysql_tutorial set topic = 'mysql query', time = '2 hour', level = 'intermediate' where index_number = 4;
Output
Execute the below query for output. You can update the entire row of the table.
mysql> select * from mysql_tutorial;
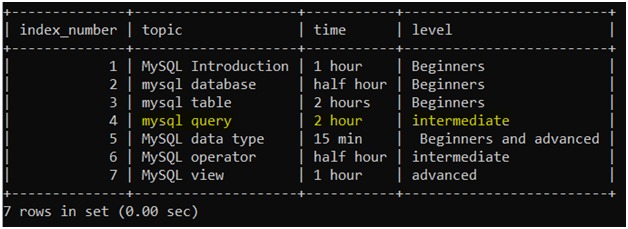
You see the above output image with updated data. The "Update query" changes the entire row from "mysql advance table" to "mysql query" using index_number = 4. You update the topic, time, and level of index_number 4.
MYSQL DELETE QUERY
MySQL can delete an unwanted row of the data.MySQL query deletes rows, columns, tables, database, and absolute values of the table.Sometimes, certain table information does not require an application.
MySQL "delete query" removes a particular row from the table. MySQL "WHERE" clause is necessary to remove table data.This clause assigns an index to delete these rows from the table.The available table information is below.
The four columns and seven rows are available in the "mysql_tutorial" table. You delete the entire table data. You can delete either a single row or multiple rows from the table.
Syntax
The delete single row syntax shows below. MySQL deletes the query using the WHERE clause.
DELETE FROM table name WHERE column = value ;
You can delete multiple rows from the table. MySQL deletes the query using the WHERE clause with the condition.
DELETE FROM table-name WHERE condition;
You can delete data from the table. MySQL deletes the query using the "ORDER BY" clause and "LIMIT" operator. The "LIMIT" operator is required to assign several rows.
 DELETE FROM table name
 ORDER BY column1, column2, ...., column
 LIMIT numbers of rows;
You can delete the entire table data. MySQL query deletes all data of the table using a truncate statement.
TRUNCATE TABLE table name;
You can use several ways to delete information from the table. You add conditions and operators to delete single or multiple rows. The table removes multiple rows in one query.
Examples of the delete query
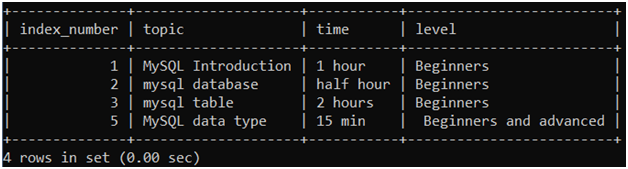
1) Example: Delete the single row.
Execute the below query to delete one row from the table. You should use the "WHERE" clause with "equal to" regex.
mysql> delete from mysql_tutorial where index_number= 4;
Output
Execute the below query to get output.
mysql> select * from mysql_tutorial;
You see the above output image. The "delete query" removes the row of "index_number = 4."
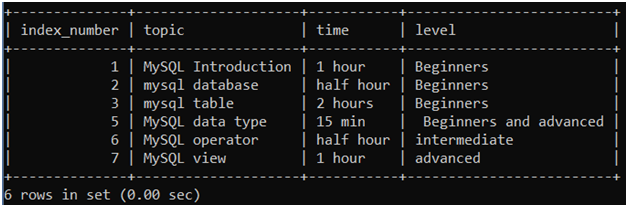
2) Example: delete data using the "LIMIT" and "ORDER BY" clause.
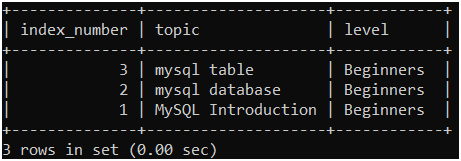
Execute the below query to delete multiple rows. You delete rows in descending order.
 mysql> delete from mysql_tutorial order by index_number DESC LIMIT 1;
 Query OK, 2 rows affected (0.23 sec)
Output
Execute the below query to get output. This query displays table information.
mysql> select * from mysql_tutorial;
The "Limit" operator set up one row and the "ORDER BY" clause set up in descending order. The "index_number = 7" deletes from the table.
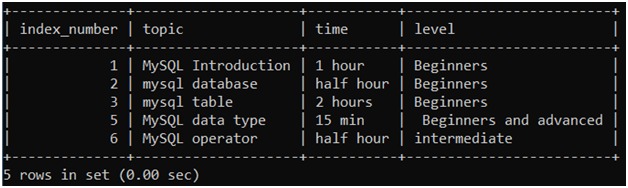
3) Example: Delete data using the "WHERE" clause with the condition.
Execute the below query to delete multiple rows. You delete the row using either "less than" or "greater than" regular expression.
mysql> delete from mysql_tutorial where index_number > 5;
Output
Execute below query to get output.
mysql> select * from mysql_tutorial;
The above output image displays delete rows. You delete multiple rows, but the column must be integer or numerical.
4) Example: Delete entire data using the "Truncate" statement.
Execute the below query to delete all rows. You delete data, but keep the table structure.
mysql> truncate table mysql_tutorial;
Output
Execute below query to get output.
mysql> select * from mysql_tutorial;

If you truncate the table, then the command-line client shows an empty set.
Execute the following query to get the table structure.
mysql> describe mysql_tutorial;
Truncate query removes only data, not a format of the table. You see the table columns, data type, and constraints.
MYSQL SELECT QUERY
Sometimes, you need to show table data and column values as per requirement. The select query displays either the entire table or required columns.
The select query shows table information briefly. This query shows table columns, rows, and their values. The select query uses the pattern and condition to display the required value.
Syntax
The basic select query syntax is below. You choose the required column to display as data.
SELECT column1, column1, ...., columnN FROM table name;
MySQL SELECT query displays the table information. This syntax shows the entire table.
SELECT * FROM table-name;
The select query syntax shows the entire table using the required database.
SELECT * FROM database.table name;
The select query syntax uses clauses, operators, and limitations.
 SELECT column1, column1, ...., columnN [*]
 FROM table name
 [WHERE column = value (condition)]
 [ORDER BY columns]
 [HAVING condition]
 [GROUP BY columns]
 [LIMIT pattern]
 [OFFSET pattern];
Examples of the select query
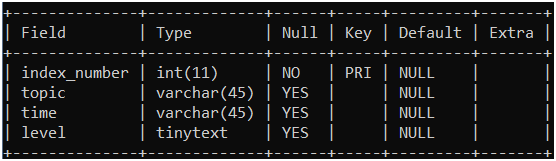
1) Example: The example displays the required column information of the table.
Execute the below query to show index_number, topic, and level columns.
mysql> select index_number, topic, level from mysql_tutorial;
Output
The required information is displayed as an output.
You see three columns of the table. You get complete data of index_number, topic, and level columns from the table.
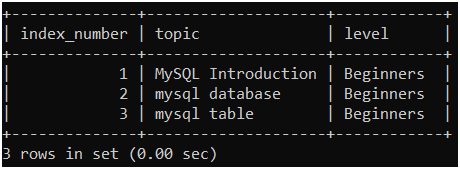
2) Example: The example displays the information from the table.
Execute the below query to display available column data.
mysql> select * from mysql_tutorial;
This query is essential for the MySQL data management system. It helps to maintain data and show available data.
mysql> select * from tutorial.mysql_tutorial;
Here, you use the required database and available table name. The "tutorial" is a database name, and "mysql_tutorial" is the table name.
Output
You can see columns and their information in the table. You get the entire index_number, topic, time, and level columns from the "mysql_tutorial" table.
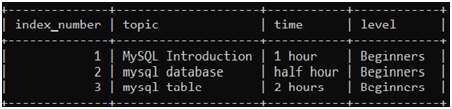
3) Example: Select Query uses with "WHERE" clause.
The example displays the required column information of the table.
mysql> select index_number, topic, level from mysql_tutorial where index_number < 3;
Output
You can see the output image. The select query is used with the "WHERE" clause and its condition. The query can display only two rows of the table.
4) Example: Select Query uses with "ORDER BY" clause.The example displays the required column information of the table.
mysql> select index_number, topic, level from mysql_tutorial ORDER BY index_number DESC;
Output
The required information of the table displays as an output.
The table data displays in reverse form. The query uses the "DESC" statement with the "ORDER BY" condition.
5) Example: Select query uses with mathematical operators.
The example displays the required column information of the table. Execute the below query to get the minimum index_number.
mysql> select topic, time, MIN(index_number) from mysql_tutorial;
Output
The required information displays as an output.
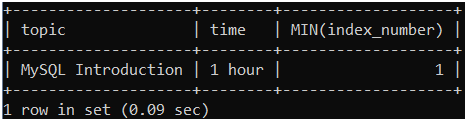
You get data of a minimum index number. The query shows the three columns and one row using the "MIN" operator.
MYSQL REPLACE QUERY
The replace query changes the particular rows or data for table maintenance. Sometimes, you may insert incorrect data into the table. You cannot delete the entire row for a small mistake. The replace query helps to change from wrong data of row to correct data.
MySQL query uses SET and WHERE clauses apply conditions on data. The SET clause replaces the required value in the column. The WHERE clause assigns a position for replacing a value.
The available table displays the below table before updating data.
Syntax
The replace query syntax shows below. You select the column and replace the required value. You can replace the entire row data of the table.
 REPLACE INTO table name (column1, column2, ..., columnN)
 VALUES ( value1, value2, ..., valueN);
Replace required row or column data with the SET clause. It is an easy way to replace data using a replace query.
 REPLACE INTO table name
 SET column1 = 'required value',
 ……………………………
 column = 'required value';
 Replace required row or column data with WHERE clause. You replace data from one table to another table.
 REPLACE INTO first table name (column1, column2, ..., columnN)
 SELECT column1, column2, ..., columnN
 FROM second table name
 WHERE CONDITION;
Examples of the replace query
1) Example: Replace values of the first row of the table.
Execute basic query to change row of the table.
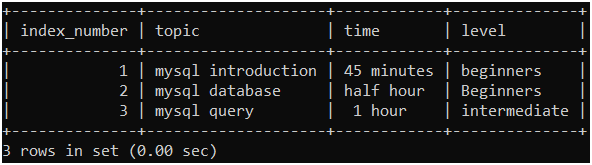
 mysql> REPLACE INTO mysql_tutorial (index_number, topic,  time, level)
           -> VALUES (1, 'mysql introduction', '45 minutes', 'beginners');
 Query OK, 2 rows affected (0.29 sec)
Output
Execute following query to get output.
mysql> select * from mysql_tutorial;
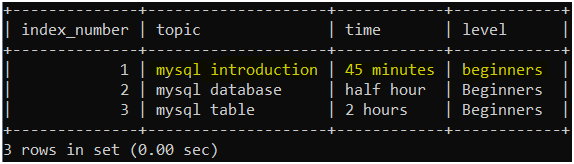
You can see the first row of the table. You can correct the column from wrong data to correct data.
2) Example: Replace values in the table using the SET condition.
Execute the following query to replace data. You replace the entire row of the table using the SET keyword.
 mysql> Replace INTO mysql_tutorial
     -> SET index_number = 3,
     -> topic = 'mysql query',
     -> time = ' 1 hour',
     -> level = intermediate;
 Query OK, 2 rows affected (0.13 sec)
Output
Execute the below query to display replace the value of the third row.
mysql> select * from mysql_tutorial;
The table changes the row of an index_number 3. You see changes in the last row in the table.
3) Example: Replace values in the table with WHERE condition.
Set one table value into another table value. You should add the same index value to the table. Execute the below query.
 mysql> Replace INTO mysql_tutorial (topic,  time, level)
         -> SELECT topic, time,  level
         -> FROM mysql_tutorial WHERE index_number = 2;
Output
The output will replace the value of the second row.
mysql> select * from mysql_tutorial;

You replace from one table value to another table value using the Where condition.
MySQL workbench interface
Introduction
The workbench interface is used to operate queries automatically. You click on the options and execute the query internally. The MySQL workbench does not need to execute data queries to execute data in the table. You operate four operations like insert data, update data, delete data and truncate data.
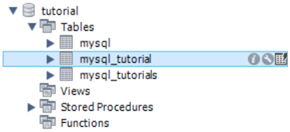
Show table data
The show table data uses only the setting symbol on the right side of the table name. You display complete table information after clicking on the setting symbol. If the table is empty, then the workbench shows the empty table with a first null row. You see the working procedure of the show table below.

The above image shows the "tutorial" database, available tables, and other database functions. If you want to show the "mysql_tutorial" table, then move the cursor to the required table. Click on the last option of the "mysql_tutorial" setting.
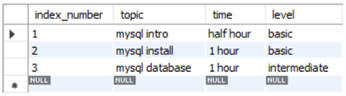
You see the entire table data quickly. You can see columns, data of the tale.
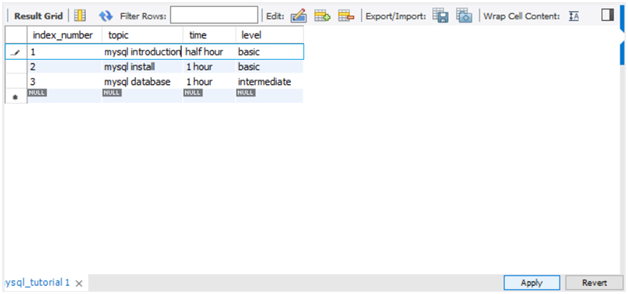
Insert table data
An insert value in the table is easy with the MySQL workbench interface. Here, you do not require a select column or use a query. Just go to table format. The table adds a single row or multiple rows quickly. You need to insert values in particular columns and click on the Apply button. The working procedure of the insert value shows below.

Select the required table to insert data. Click on the last option of the table setting.

You can see the above image. MySQL table always displays with one null row. You can insert the data in the "null" row. The table inserts the value in the fourth row of the table.
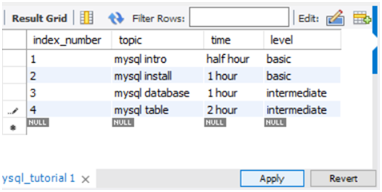
Click on the "Apply" button and save the value. You fill multiple rows and click on the "Apply" button. Then multiple data stores in the table.
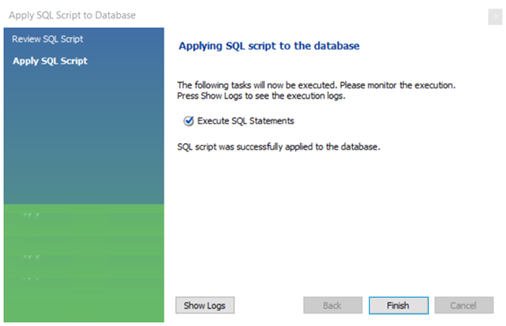
Click on the "Finish" button and store the value. The workbench executes SQL statements.
Delete table data
Click on the table options, and the interface gives you the option to delete the selected column. Click on the table name and select the truncate option to delete the entire data. You can delete either single or multiple rows quickly. The working procedure of the delete data shows below.
FIRST METHOD
Follow the "show table" procedure to display table and table data. Then go to the required index. Here, you should select a required row of the table. Select the table row to delete data.
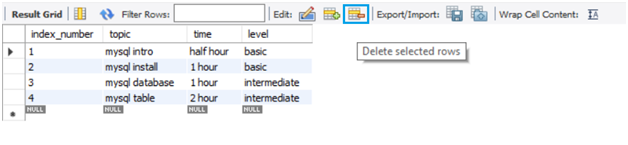
You should know the navigation bar of the table. The third table symbol after "Edit:" has a delete option. Then, click on the option to delete the required row. The row deletes permanently.
SECOND METHOD
Follow the "show table" procedure to display table and table data. Then go to the table row of the table. Here, select a required row of the table.
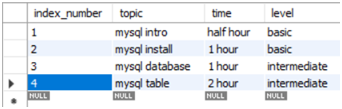
Right-click on the last row. Then the pop-up box comes with several options. Select the required option from the table.

You get multiple options after right clicking on the row. Choose the "Delete Row(s)." Click on the "APPLY" button. You continue the further procedure of the delete row.
Delete the row or particular value of the table. The workbench interface gives you many options to remove information from the table.
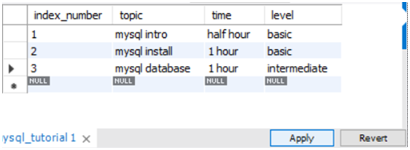
Update table data
You must display the entire table to update data. Here you click on any column or rows to change the value. The workbench interface gives you an edit option for modification of the table data. If you click on any bracket of the table, then you can change data.
You update either single or multiple columns. The workbench interface provides a feature to update and change values of the multiple rows simultaneously. The workbench supports the working procedure of the update data shown below.
You can see the above image. You see the "tutorial" database, available tables, and other database functions. If you want to show the "mysql_tutorial" table, then move the course to the required table. Click on the last option of the "mysql_tutorial" setting.

You can see the entire table data easily. You can see columns, data of the tale.

The navigation bar displays the top of the table. The "Edit:" option can change the value. If you click on the "Edit" option, then the first row is selected automatically. You should change or update the table data and click on the "Apply" button.
The above image updates the first-row second column value of the table. MySQL Workbench provides an easier and more option to handle data. This interface is easy and popular for developers. The workbench interface supports handling keys and joins of the table.