MySQL Advance table Query
MySQL Advance table Query
The table is created by index, rows, and columns in the MySQL database. The user saves their information in matrix format. The database requires a query to modify and update columns of the table.
The columns and rows are storing specific data in the MySQL table. The column stores similar types of data such as integer, string, float, etc. The row stores multiple information using indexes and columns. The index column stores numerical data to refer to operate respective information.
The below query is essential to operate columns of the MySQL table.
| MySQL Query | Description |
| Add new column | Adding a new column as per requirement in the table. |
| Delete existing column | Delete unwanted columns as per requirement from the table. |
| Change column name | Change column name as per requirement in the table. |
| Show columns | Show an available column in the table. |
| Describe table | It displays the entire table field and its constraints. |
| Lock table | It helps to secure tables from unauthorized users. |
| Unlock table | It unlocks table security from other users. |
Syntax
The table column syntax shows below.
mysql expression COLUMN column_name data_type;
COLUMN: This keyword represents the column of the respective table. The "column" keyword is necessary to operate and modify the table column.
column_name: The column name must be unique in the table. The table stores multiple columns with constraints.
data_type: The data type categories different data. The same data type value stores in a single column.
Prerequisite
MySQL needs to select the database and use it. The table is stored in the database. The interface chooses a database where the table is available. Execute the below query to operate table query in the MySQL system.
 mysql> use tutorial
 Database changed
Execute the below query to get table information. The table displays available rows and columns. The below query is used to get the output of the table.
mysql> select * from mysql_tutorial;
MySQL table contains columns and rows. The table includes a unique index.
Add Column
The column contains information as per data type. The columns are store data such as text, number, binary, non-binary data. The user requires a new column in the available table to save another field and data.
Sometimes, you forget to add columns. You should insert new columns as per requirement. The add column query helps to insert a column in an existing table.
Syntax
The Add new column syntax is below.
ALTER TABLE table-name ADD COLUMN new_column_name datatype;
The Add new column WITH CONDITION syntax is below. You can add a column before or after the required columns in the table
 ALTER TABLE table-name
 ADD COLUMN new_column_name datatype [BEFORE | AFTER old_colum];
The Add multiple columns syntax is below.
 ALTER TABLE table-name
 ADD COLUMN new_column_name datatype,
 ADD COLUMN new_column_name datatype,
  ADD COLUMN new_column_name datatype;
The "ALTER TABLE" statement is necessary to modify and update the table.
Examples of Add columns
1) Example: Add a new column in the MySQL table.
The following query shows a simple and easy to insert column in the table.
mysql> ALTER TABLE mysql_tutorial ADD COLUMN mark float;
OUTPUT
The "mark" column is inserted automatically at the end of the table. Execute the below query for output.
mysql> describe mysql_tutorial;
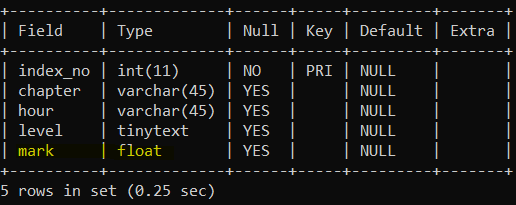
The above image displays the output. The table inserts the "mark" column.
2) Example: Add a new column after the "level" column.
Execute insert column query using the "after" keyword in the altar table. The table inserts a single column in the table as per required position.
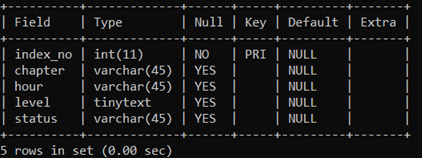
mysql> ALTER TABLE mysql_tutorial ADD COLUMN status varchar(45) AFTER level;
OUTPUT
Execute the below query to get output.
mysql> describe mysql_tutorial;
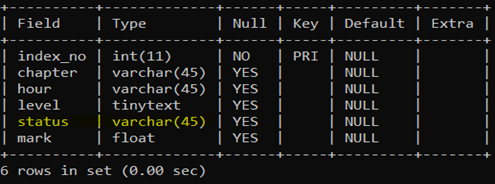
You see the "status" column added after the "level" column in the "mysql_tutorial" table.
3) Example: Add multiple columns in the table.
Execute below query to insert two columns in the "mysql_tutorial" table. You add columns anywhere with or without constraints.
 mysql> ALTER TABLE mysql_tutorial
          -> ADD COLUMN book varchar(45),
         -> ADD COLUMN complete tinytext;
OUTPUT
Execute the below query for output.
mysql> describe mysql_tutorial;
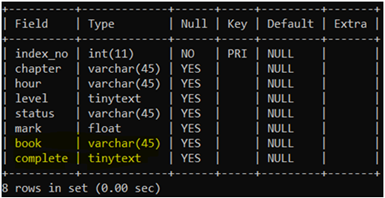
The above output image shows two columns added automatically. The "book" and "complete" columns insert automatically at the end of the table.
Delete Column
The table contains several unwanted columns in the MySQL database. This column has not been used for a long time. The database has a query to remove an unnecessary column in the table.
It helps to maintain the memory size of the MySQL system. The drop column query maintains the joins and keys of the table. The alter table query deletes either a single column or multiple columns.
Syntax
The below syntax shows the drop column. You remove single columns from the table.
ALTER TABLE tabl_name DROP COLUMN column name;
The below syntax shows drop multiple columns. You remove multiple columns from the table.
ALTER TABLE tabl_name DROP COLUMN column name1, DROP COLUMN column name2;
Examples of the delete column
1) Example: Delete single column example displays below.
The following query helps to know about the drop column.
mysql> alter table mysql_tutorial drop column mark;
Query OK, 0 rows affected (1.21 sec)
Records: 0 Duplicates: 0 Warnings: 0
OUTPUT
Execute the below query for output.
mysql> describe mysql_tutorial;
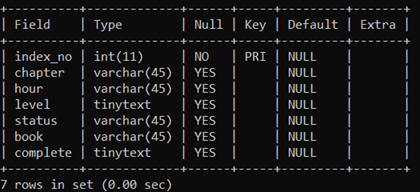
You see the above output image. The "mark" column deletes from the table.
2) Example: Delete multiple column example shown below.
The following query helps to know about dropping multiple columns.
 mysql> alter table mysql_tutorial
 drop column book,
 drop column complete;
Query OK, 0 rows affected (1.12 sec)
Records: 0 Duplicates: 0 Warnings: 0
OUTPUT
Execute the below query to get output.
mysql> describe mysql_tutorial;
The above output image deletes the multiple columns. Two columns are removed from the table simultaneously.
Change Column
If a table has a complex table name, then MySQL can change the column name. This query gives meaningful and understandable column names.
MySQL gives two ways to change the column name.
- Change column: the query uses the "CHANGE" keyword to change the column name.
- Rename column: the query uses the "RENAME" and "TO" keyword to replace the column name.
Change column
The "ALTER TABLE" helps to change column names using the "CHANGE COLUMN" keyword. Here, you change the single column name or multiple columns name of the table.
Syntax
The syntax helps to change the name from the old column to the new column.
Change the single column name of the table.
ALTER TABLE table-name CHANGE COLUMN old_column new_column_name data type;
Change the multiple column names of the table.
 ALTER TABLE table-name
 CHANGE old_column1 new_column_name1 data type,
 CHANGE old_column2 new_column_name2 data type,
 ....
 CHANGE old_columnN new_column_nameN data type;
Examples of Change column
1) Example: Change the column name example shown below.
Execute the below query to know the procedure of the change column name.
mysql> ALTER TABLE mysql_tutorial CHANGE COLUMN index_no index_number int(11);
Query OK, 0 rows affected (0.26 sec)
OUTPUT
Execute the below query for the required output.
mysql> describe mysql_tutorial;
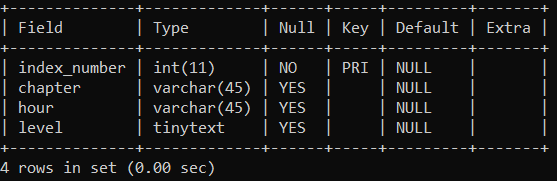
The above output image displays a change column from "index_no" to "index_number."
2) Example: Change the multiple column names. The example is below.
Execute below query to know the procedure of changing multiple column names.
 mysql> ALTER TABLE mysql_tutorial
      -> CHANGE COLUMN chapter topic varchar(45),
      -> CHANGE COLUMN hour time varchar(45);
Query OK, 0 rows affected (0.26 sec)
Records: 0 Duplicates: 0 Warnings: 0
OUTPUT
Execute the below query to get the required output.
mysql> describe mysql_tutorial;
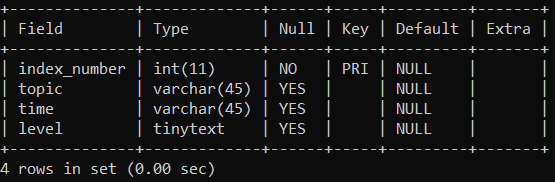
The above output image displays a changed column. Here, two column name changes of the table.
Rename column
The "ALTER TABLE" helps to change column names using the "RENAME COLUMN" keyword. Here, you change either a single column name or multiple columns name of the table. The "TO" keyword requires between the old column name and the new column name.
Syntax
The below syntax helps to rename name from the old column to the new column
Rename the single column name of the table.
 ALTER TABLE table-name
 RENAME COLUMN old_column TO  new_column_name data type;
Rename the multiple column names of the table.
 ALTER TABLE table-name
 RENAME COLUMN old_column1 TO  new_column_name1 data type
 RENAME COLUMN old_column2 TO  new_column_name2 data type
 ....
 RENAME COLUMN old_columnN TO  new_column_nameN data type;
Example of Rename column
1) Example: Rename the column name example below.
Execute the below query to rename the column from old to requires a name.
 mysql> ALTER TABLE mysql_tutorial
 RENAME COLUMN  index_no TO index_number int(11);
Query OK, 0 rows affected (0.26 sec)
OUTPUT
Execute the below query for the required output.
mysql> describe mysql_tutorial;

The above output image displays a column. The column changes from "index_no" to "index_number."
Show Column
MySQL Column stores information in the table as per data types. The database displays columns and their information as per requirement. The system displays either the required column or all columns in the table.
Show columns
You can display the required columns of the table. The show columns apply conditions and patterns to display table information.
Syntax
The following syntaxes display table fields and columns in several ways.
The basic syntax of the Show column is below.
SHOW COLUMNS from table name;
The syntax displays the Show column with the "Where" and "LIKE" operators.
SHOW COLUMNS from table name [WHERE CONDITION] [LIKE PATTERN];
The syntax of the Show entire column is below.
SHOW FULL COLUMNS from table name;
Example of Show columns
1) Example: show columns from the required table. Execute the below query and get output.
mysql> show columns from mysql_tutorial;
OUTPUT

You get the entire column information in the table.
2) Example: show full columns from the table. Execute the below query to get detailed information of the columns.
mysql> show full columns from mysql_tutorial;
OUTPUT

You see the image of the table information. The table displays detailed information about each column.
3) Example: show columns use the "LIKE" pattern. This operator with a pattern helps to display a particular column.
Execute the below query to get table data using a required pattern.
mysql> show columns from mysql_tutorial LIKE '%e%';
OUTPUT
You can see three columns displayed in the image. The "e" character is available in these three columns.
4) Example: show columns use the "WHERE" condition.
The clause helps to display columns under the given condition. Execute the below query to show a table that contains varchar data type.
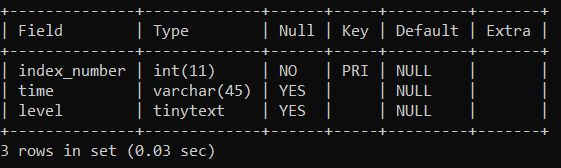
mysql> show columns from mysql_tutorial WHERE Type = 'varchar(45)';
OUTPUT
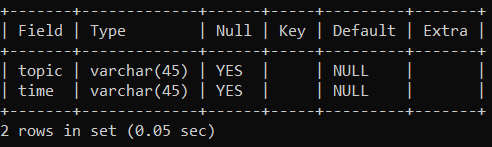
You see two columns displayed in the image. The varchar(45) data type is available in these two columns.
5) Example: show columns use database and table name simultaneously.
Execute the below query to show the column of the table.
mysql> show columns from tutorial.mysql_tutorial;
OUTPUT

The above output image gets the complete column information in the table.
Describe statement
This statement describes the entire columns of the table. You cannot apply conditions and patterns to display table information. The describe statement shows only table format like a field, data type, and constraints. It does not show the data in the table. The describe statement uses either the "describe" keyword or "DESC" keyword.
Syntax
The described column syntax shown below.
Describe table name;
The describe column using the "DESC" keyword shows below.
DESC table name;
Examples of the described table.
1) Example: Example of a display table.
Displaycolumns from the required table using the "describe" keyword. Execute the below query to get output.
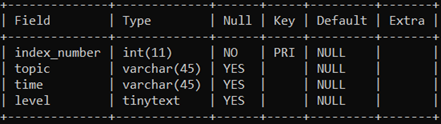
mysql> describe mysql_tutorial;
OUTPUT

The above output image displays an entire field of the table.
2) Example: Example of the display table.
Displayfield of the required table using the "DESC" keyword. Execute the below query to get output.
mysql> DESC mysql_tutorial;
OUTPUT

You see the above output image. You get the entire data of the table.
The table column is necessary to store and handle table information as per the application's requirement. It helps to manage tables as per convenience and is easy to maintain. The show table uses clauses and operators. The described table does not use operators and clauses.
MySQL table lock
The table lock is a mechanism of the MySQL system to secure table information from other users.
The table lock helps to prevent unofficial users and prohibited access to table data. It helps to restrict the modification and operation table data from unauthorized users. This lock system keeps safe and secure table information.
The multiple computers use the MySQL system with similar data. Sometimes multiple operations happen simultaneously in the application. It becomes challenging to manage tables and handle tables. The table becomes predictable and easy to access for everybody. The lock mechanism removes the concurrency of the MySQL table.
The "InnoDB" storage engine does not require a table lock manually. This storage engine automatically applies a table lock. The lock table requires reading data and then writing data into a table. The table provides lock in two ways. One is read lock, and the other is write lock. You do not provide both locks on the table simultaneously.
- Read lock: This lock system provides feature read-only data. You do not write any value in the table.
- Write lock: This lock system provides Read and Write operation in the table.
MySQL system provides a feature to unlock a table. This table is accessible for everybody. You operate and modify table data as per requirement. The table unlock system does not provide safety and security.
The CONNECT_ID() helps to display the session id of the connection for reading lock. You check the connection id after applying a read lock on the table. The "connection_id()" works with the "select" keyword.
Read lock
The read lock system provides some feature to the table
- The read lock applies to the multiple tables. The table reads the data without applying the read lock. The read lock applies to the table and views.
- The read lock does not support writing information in the table. If you try to write some information, then it goes to the waiting state.
- The "unlock tables" query helps to remove the read lock. You are ready to write information on the table.
- The read lock table does not truncate and delete a table. It shows an error because of the lock.
Syntax
The following syntax shows a single table lock. This query helps to read table data for other users.
LOCK TABLE table_name READ;
The following syntax shows multiple table locks. This query helps to restrict multiple table data for other users.
LOCK TABLE table_name1 READ, table_name2 READ;
Examples of the lock table
The following query helps to apply a read lock on the table. This lock applies to a single table.
mysql> lock table mysql_tutorial read;
The following query helps to apply read lock on the multiple tables.
mysql> lock table mysql_tutorial read, mysql_training read;
Executes the below query to read table data or get table information.
mysql> select * from mysql_tutorial;
You get the table data with the field and index column.

The above image helps to read the table data with their columns.
Execute the following query to get table format or structure.
mysql> describe mysql_tutorial;
You get the table data with the field and index column.

The above output images show several columns and rows with their values.
The connection id requires the number of connections in the read session. Execute the below query to get the connection id.
mysql> select CONNECTION_ID();

The read lock gets connection id = 8. This id changes with every lock. It is removed with an unlock table.
Now, insert the value in the table with a read lock. You see the error at execution time. Sometimes a waiting state occurs to update the table.
mysql> insert into mysql_tutorial (index_number, topic, time, level)
values (5, "lock table", "half hour", "intermediate");
Now you will get the limitation of the read lock.

The above image shows an error after trying to insert data into the lock table.
Write lock
The write lock system provides some feature to the table
- The write lock applies to the multiple tables. The table does not write the data without applying the write lock. The write lock applies to the table and views.
- The write lock supports reading and writes information in the table. The lock table requires reading data initially and then writing data into the table.
- The unlock table helps to remove the write lock. You are ready to read and write information with another table.
- The write lock supports truncating and deleting a table.
Syntax
The following syntax shows a single table lock. This query helps to create an authorized table.
LOCK TABLE table_name WRITE;
The following syntax shows multiple table locks. This query helps to create multiple authorized tables.
LOCK TABLE table_name1 WRITE, table_name2 WRITE;
Examples of the lock table
The following query helps to apply the write lock on the table. This lock applies to a single table.
mysql> lock table mysql_tutorial write;
The following query helps to apply the write lock on the multiple tables.
mysql> lock table mysql_tutorial write, mysql_training write;
Executes the below query to read table data or get table information.
mysql> select * from mysql_tutorial;
You get the table data with the field and index column.

The above image helps to display the table data with their columns.
Execute the following query to get table format or structure.
mysql> describe mysql_tutorial;
You get the table data with the field and index column.
The above output image shows many columns and rows with their values.
The connection id requires the number of connections in the lock session. Execute the below query to get the connection id.
mysql> select CONNECTION_ID();
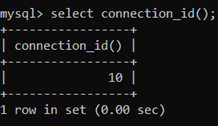
The write lock gets connection id = 10. This id changes with every lock. It is removed with an unlock table.
Now, insert the value in the table with the write lock. The write lock supports reading the data of the table and writing new data in the table.
 mysql> insert into mysql_tutorial (index_number, topic, time, level)
 values (5, "lock table", "half hour", "intermediate");
Executes the below query to get table data or updated table information.
mysql> select * from mysql_tutorial;
You get the table data with the field and index column.
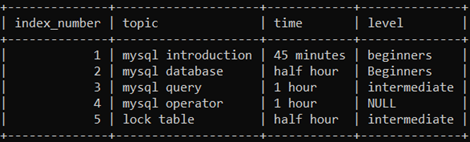
Now, you see the above output table of a write lock. The index number 5 inserts into the lock table.
The write lock supports truncating and deleting a table from the database.
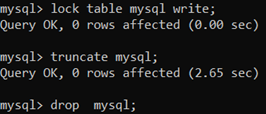
The above image helps to understand how to write lock works for removing the table and its data.
Unlock table
The unlock table helps to release the read lock and write lock. The unlock table follows an exact opposite procedure of the lock table. MySQL system unlocks available tables. You do not unlock a single table.
Syntax
The following syntax shows the "unlock table" statement. This query helps to release table locks.
UNLOCK tables;
Example of unlocking table
The following query helps to unlock available tables.
mysql> unlock tables;
show the below image to know about unlocking the table.

Comparison between "read lock "and "write lock."
- The read lock accesses multiple access simultaneously. The other table can read the information without using the lock.
- The write lock does not access multiple threads. The other table does not access the lock table.
- The read lock and write lock does not apply on tables simultaneously. You provide either a read lock or write lock on the table.
- The read lock has low priority compared to the write lock on the table.
- The read lock restricts the operation of the function of the table, but another table accesses easily.
- The write lock restricts access from other table users but operates all functions efficiently.
- The read lock does not write, truncate or delete a table. It shows an error in the output.
- The write lock provides functions such as read, write, truncate, and delete a table.