MySQL Table
Introduction
MySQL table is an essential part of the system. MySQL table stores data using index, rows, and columns. It accesses data from the server quickly because of the table—this table stores data in matrix format.
MySQL management system depends on relational databases because of the table and its interconnection. It stores, modifies, retrieves, and removes data using table columns and rows. MySQL creates and operates various tables in the system.
MySQL tables are connected using joins and keys. You can operate, update data easily because of the matrix form of the table. You can handle MySQL tables using either a command-line client interface or workbench interface.
The following queries are essential to handle the MySQL table. You can operate table data using these queries.
| Table Query | Description |
| Create MySQL Table | This query is used to create a new table. |
| Show MySQL Table | This query works to display table structure and information. |
| Rename MySQL Table | This query helps to change the table name. |
| Alter MySQL Table | This query works to operate and modify the table's rows and columns. |
| Copy MySQL Table | This query supports creating an old duplicate table. |
| Truncate MySQL Table | This query helps to delete data from the MySQL table. |
| Drop MySQL Table | The drop table query provides to delete the entire table with data. |
| Temporary Table | This query is used to create a table for a short time. It is a one-time use table. |
| Repair Table | This query helps to recover the damaged table. |
MySQL table handles using command line client query and workbench interfaces.
Prerequisites
MySQL data management system uses a command-line client's database or workbench's schema. The database or schema stores on multiple tables and manages them efficiently. MySQL system requires a database query to access the table.
Command-line client interface
You cannot access the table without using a database query. The following query helps to create and operate the MySQL table.
Syntax
USE database_name;
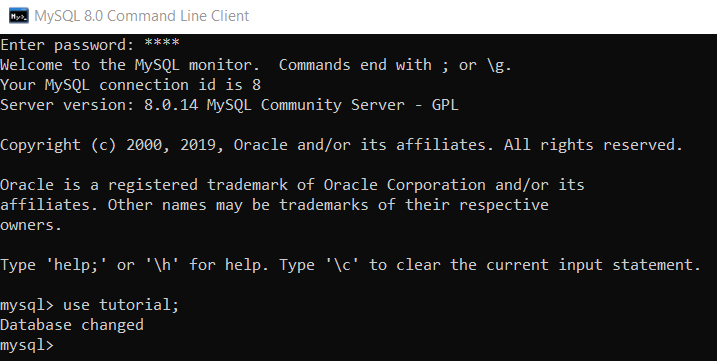
The above image shows the procedure of the database "tutorial." This database is ready to work with MySQL server data. You can execute any MySQL table query.
MySQL workbench interface
The MySQL workbench creates a new schema or uses existence schema to operate table information.
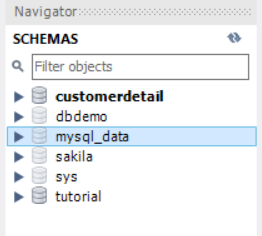
You see many schemas are available in the workbench. You should use it as per your requirement to create and manage tables.
The schema stores multiple tables, views, functions, and stores procedures. The tutorial schema inserts several tables without executing a query.
MySQL Table Terminology
There are many essential parts or features available in the MySQL tables. These features are necessary to work tables and manage data.
- Column: the column categorizes the similar type of data and stores it in a one queue format.
- Row: the row stores the value of the columns as per the category.
- Index: The index represents a left-most column of the database. You can operate columns and rows, helping the index.
- Data type: The Data type helps the column partition the data based on the kind of information.
- Values: The value is a vital part of the table. You should assign a table NULL OR NOT NULL.
- Constraints: the constraint means PRIMARY KEY, NOT NULL, AUTO INCREMENT, and DEFAULT of the MySQL table.
Create MySQL Table
MySQL is a data management system that handles various kinds of information. MySQL system requires generating a new table as per the new database or schemas. The table contains data using indexes, columns, and rows. A similar type of data store is specified in the column. The primary data stores in the rows using an index column. The left column of the table is called an index. The columns are created as per data types such as an int, varchar, etc. The below three terminologies are helpful to create a table.
- Table name: the table name is unique or different in the database.
- Column name: the table creates several columns with a unique name in the table.
- Constraints: the table defines the limitations of the columns and their data. Examples of the Constraints are Not NULL, UNIQUE, FOREIGN KEY, PRIMARY KEY, etc.
Syntax
The following syntax helps to create a new table.
CREATE TABLE table_name(
Column_names1 datatype,
Column_names2 datatype,
-----------------
Column_name datatype
Constraints of table
);
Examples of creating a new table.
1) Example: Create a new table.
Execute below query in the MySQL command line client interface.
mysql> create table mysql_tutorial (
              index_no int NOT NULL,
              chapter varchar(45),
              hour varchar(45),
              level text(45),
              PRIMARY KEY(index_no));
Query OK, 0 rows affected (1.41 sec)
OUTPUT
Execute below query to get table information.
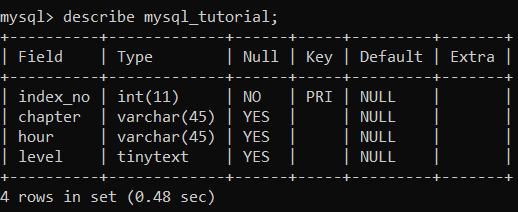
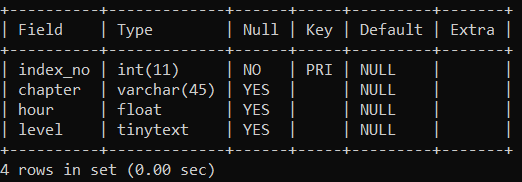
mysql> describe mysql_tutorial;
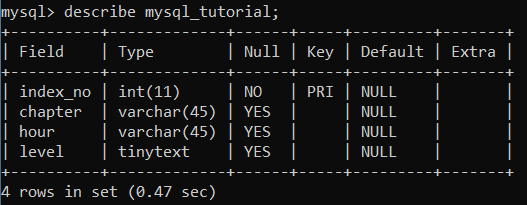
The above image displays table structure in detail. This table shows the column name, data types, and constraints of the columns.
2) Example: Create the existence name of the table.
Execute below query in the MySQL command line client interface.
mysql> create table mysql_tutorial (
              index_no int NOT NULL,
              chapter varchar(45),
              PRIMARY KEY(index_no));
OUTPUT
If table name exists then output shows error.

The out shows the error and does not create a table. MySQL system does not contain a similar name to the table.
Show MySQL Table
MySQL has several ways to display tables and information. You must know how many tables are available in the database. MySQL displays table information like columns, index, data types, and constraints of the table.
If you are confused with the table name and description of the tables, you can use show table queries. You should use table queries in the command line client.
The below method is available to display the table and its information.
- Show tables.
- Show full tables.
- Show tables with the condition.
- Describe table.
Show tables
The "show tables" query displays the available table in the database. The command-line client interface uses a query to get a table list.
Syntax
If you want to know how many tables are available in the database, then you use the below syntax.
SHOW TABLES;
If you want to show tables from a particular database, then you use the below syntax.
SHOW TABLES FROM database_name;
These queries are executed in the MySQL command-line client interface.
Examples of Show tables
1) Example: show available tables.
Execute the below query to display several tables in the MySQL system.
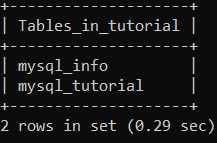
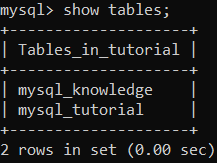
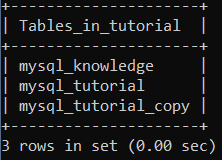
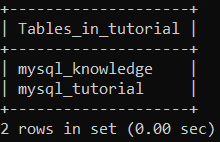
mysql> show tables;
OUTPUT

The above image shows the output. The output shows two tables in the respective database.
2) Example: show available tables.
Execute the below query to display available tables in the required database.
mysql> show tables from tutorial;
OUTPUT
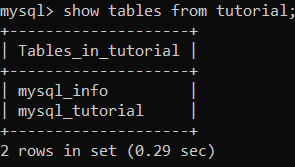
The above image shows the required output. Now, you see two tables in a "tutorial" database.
Show full tables
If you want to display the table's information and its type, you work with a full table query.
Syntax
Below syntax shows table data and table type.
SHOW FULL TABLES;
Below syntax shows table data and table type of the given database.
SHOW FULL TABLES from database_name;
Examples of Show full tables
1) Example: show available tables.
Execute the below query to display available tables in the MySQL system.
mysql> show full tables;
OUTPUT

The above image shows the required output. Now, you see two tables with table type in a MySQL system.
2) Example: show available tables.
Execute the below query to display tables in the required database.
mysql> show full tables from tutorial;
OUTPUT
The above image shows the required output. Now, you see two tables are available in a "tutorial" database.
Show tables with condition
MySQL conditions are used to filter the tables. MySQL table supports the "LIKE" operator with pattern and the "WHERE" clause with the condition. You get the essential table quickly.
Syntax
The table with the "LIKE" operator syntax is below.
SHOW TABLES LIKE pattern;
Show table with "WHERE" clause syntax is below.
SHOW TABLES WHERE condition;
Examples of display table with condition
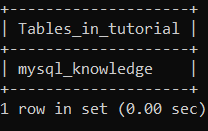
1) Example: show tables with the "LIKE" operator.
Execute the below query to display required tables using the pattern.
mysql> show tables like '%al';
OUTPUT

The above image shows the required table. Now, you get a required table using the LIKE operator with the "%al" pattern.
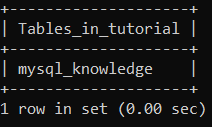
2) Example: Show table with "WHERE" clause.
Execute the below query to display the table in the respective database.
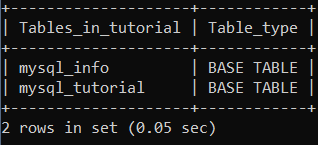
mysql> show full tables where Table_type = 'BASE TABLE';
OUTPUT
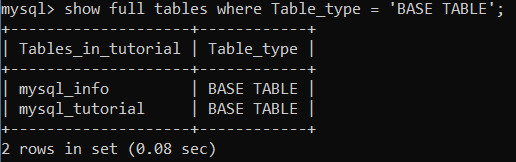
The above image shows the required table. Now, you get two tables with the required table type using the "WHERE" clause.
Describe table
MySQL query displays complete information about a table. You get the columns, constraints, and other table information using the "describe table" query.
Syntax
Use the below syntax in the MySQL command-line client interface.
DESCRIBE table_name;
Examples of Describe table
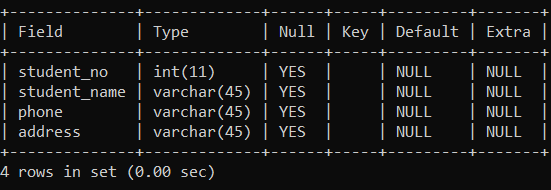
1) Example: show table description.
Execute the below query to display table information available.
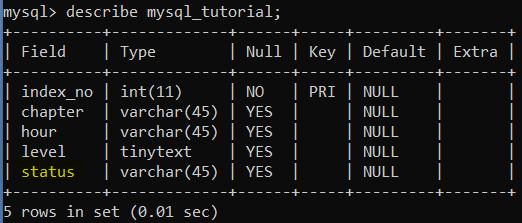
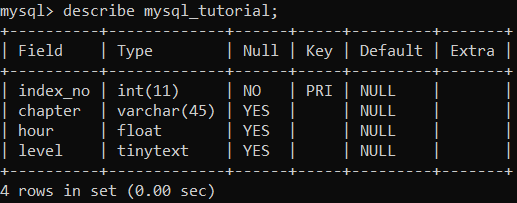
mysql> describe mysql_tutorial;
OUTPUT
You see the above image to get table information. The output shows the column names, data types, size of data type, and other constraints.
Rename MySQL Table
MySQL system stores many tables for one application. Sometimes, the system shows a similarity between names and descriptions. Some table names are complicated and inconvenient. If you want to change the table name for convenience, then use rename query.
Syntax
Change the old table name to the required table name. The following syntax displays a table name.
RENAME TABLE old table name TO new table name;
Example of Rename table
The tutorial database shows the available table list. Executes the below query.
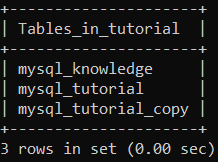
mysql> show tables;
1) Example: Change the table name.
Execute the below query to replace from old name to new name.
mysql> RENAME TABLE mysql_info TO mysql_knowledge;
Query OK, 0 rows affected (1.33 sec)
OUTPUT
The new table name is below. Executes the below query to show output.
mysql> show tables;
The "mysql_info" table name shows inconvenience to understand about a table. This table name changes from "mysql_info" to "mysql_knowledge."
Alter MySQL Table
MySQL table operates and updates the table and its column. Here, you change the columns of the table. You should either add new columns or delete unwanted columns in the table.
You can recover and modify your mistakes about table data. MySQL Alter table operates three primary operations.
- Add new columns
- Change or modify columns
- Delete old columns
Add New Columns
Sometimes, you forget to add columns to the table. Then, the Alter table helps to insert new columns in the MySQL table. The alter table query inserts a single column or multiple columns in the existing table.
Syntax
Add a single column in table syntax shown below.
Alter table table_name Add column_name datatype [before|after old_column];
Add multiple columns in the table syntax shown below.
Alter table table_name
Add column_name1 datatype [before|after old_column],
Add column_name2 datatype [before|after old_column],
--------------
Add column_name datatype [before|after old_column];
[before|after old_column]: MySQL query chooses the position of the table to add a new column. You add a new column before or after the required old column.
Examples of Add new columns
1) Example: Add a single column.
Execute the "alter table" query to insert the column. The query works with the "After" keyword.
mysql> alter table mysql_tutorial
    -> add status varchar(45) After level;
Query OK, 0 rows affected (0.76 sec)
Records: 0 Duplicates: 0 Warnings: 0
OUTPUT
Execute the below query to display a new column in the table.
mysql> describe mysql_tutorial;
You see the "status" column added after the "level" column in the "mysql_tutorial" table.
2) Example: Add multiple columns.
Execute the alter table query to add multiple columns in the table.
mysql> alter table mysql_tutorial
    -> add point int,
    -> add remark tinytext,
    -> add comment varchar(45);
Query OK, 0 rows affected (0.41 sec)
Records: 0 Duplicates: 0 Warnings: 0
OUTPUT
Execute the below query to get an altered table output. Display new columns in the table.
mysql> describe mysql_tutorial;
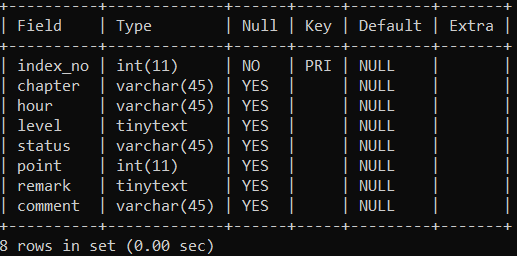
You see the above output image. The "point", "remark", and "comment" columns are added in the "mysql_tutorial" table.
Delete Old Columns
The delete query helps to remove an unwanted column in the table. MySQL query uses the "DROP" keyword. The alter table helps to maintain table size and table data.
Syntax
See the below syntax to remove the column.
alter table_name DROP column column_name;
Examples of the delete column
1) Example: delete a single column.
Execute the below query to delete the column of the table.
mysql> alter table mysql_tutorial drop column comment;
Query OK, 0 rows affected (4.24 sec)
OUTPUT
Display a table after deleting a column. You use the below query to get output.
mysql> describe mysql_tutorial;
The "comment" column deletes from the MySQL table.
2) Example: delete multiple columns
Execute the below query to delete multiple columns of the table.
mysql> alter table mysql_tutorial drop column remark, drop column point, drop column status;
Query OK, 0 rows affected (0.90 sec)
OUTPUT
Display a table after deleting multiple columns. You use the below query to get output.
mysql> describe mysql_tutorial;
The output image shows after deleting multiple columns in a single query. Now you see four columns are available in the table.
Modify Columns
You change the column's data type and constraint using "modify" keywords. The update table column requires getting the correct data with the format. The alter table helps to remove many mistakes made by humans.
Syntax
Change the data type of a column syntax shown below.
Alter table table_name MODIFY column_name datatype [before|after old_column];
Examples of Modify column
1) Example: Modify column in the table example is below.
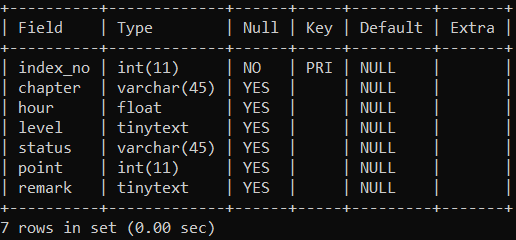
Execute the below query to change the data type of the column.
mysql> alter table mysql_tutorial modify hour float;
Query OK, 0 rows affected (1.44 sec)
Records: 0 Duplicates: 0 Warnings: 0
OUTPUT
Executing the below query helps to modify the column in the table.
mysql> describe mysql_training;

The "hour" column changes its data type. This column adjusts the data type from varchar(45) to float.
2) Example: Modify the index of the table.
Execute below query to change index constraint.
mysql> alter table mysql_tutorial modify index_no int(11) NOT NULL;
Query OK, 0 rows affected (0.56 sec)
Records: 0 Duplicates: 0 Warnings: 0
OUTPUT
Execute the query to display columns in a table.
mysql> describe mysql_tutorial;

You see the output in the table but get a new constraint. The index column adds "NOT NULL" conditions in the table.
Copy MySQL Table
MySQL needs to create a duplicate table of the original table. The duplicate table helps to update different operations on similar types of tables. The copy table creates the base table format and their values automatically. The copy table uses the "WHERE" clause with required conditions.
Syntax
The syntax helps to create a copy table. This syntax helps to a basic clone of the required table.
CREATE TABLE new table name
SELECT column names [*]
FROM required table name
[WHERE conditions];
Examples of the copy table
1) Example: copy table example is below.
Execute the below query to get a clone of the base table.
mysql> create table mysql_tutorial_copy select * from mysql_tutorial;
Query OK, 0 rows affected (0.42 sec)
Output
Execute below MySQL query below to get output.
mysql> show tables;
MySQL is creating a clone of the "mysql_tutorial" table. The " mysql_tutorial_copy" is a clone of the " mysql_tutorial " table.
Execute the below query to get information about the copy table.
mysql> describe mysql_tutorial_copy;

The original table's index, columns, rows, and constraints are available in the copied table.
Truncate MySQL Table
The truncate query deletes the entire data of the MySQL table. The truncate query removes all the rows of the table. The truncate table makes an empty file with table format. It keeps the structure of the table in MySQL.
Syntax
The below syntax helps to delete entire data from a table.
truncate [table] table_name;
Example of the truncate table
1) Example: Remove data from the table.
Execute truncate query to create empty table format.
mysql> truncate table mysql_tutorial;
Query OK, 0 rows affected (1.28 sec)
Output
Execute the below query to show the empty table.
mysql> select * from mysql_tutorial;

The table does not contain data.
You see the only table remains in the system. The index, row, columns, and constraints show in the "mysql_tutorial" table. The data is deleted from the table.
Drop MySQL Table
MySQL deletes unwanted and unused tables as per the requirement. The drop query helps to delete the MySQL table permanently. This table deletes permanently with complete information and structure. If you delete the table once, then you cannot recover the table and data.
Syntax
The below syntax deletes the required table.
drop table table_name;
The below syntax deletes the required table from the specific database.
drop table database_name.table_name;
If multiple tables are available in MySQL, then you get confused about the name. The below syntax deletes the required table from the database.
drop table [if exists] table_name;
Examples of delete table
Prerequisite: The available table in MySQL shows below. Execute the below query to know about the existing table in the required database.
mysql> show tables;
You can show the available table in the required database.
1) Example: deletes the unwanted table.
Execute the below query to remove the table from the tutorial database.
mysql> drop table mysql_tutorial_copy;
OUTPUT
Executes the below query to show available tables.
mysql> show tables;
The above output image shows the "mysql_tutorial_copy " table deleted from the "tutorial" database.
2) Example: deletes the unwanted table with the condition.
Execute the below query to remove a table from the tutorial database.
mysql> drop table tutorial. mysql_tutorial;
OUTPUT
Execute the below MySQL query to display the available table.
mysql> show tables;
You can see the " mysql_tutorial " table deleted from the "tutorial" database.
3) Example: deletes the existing table of the required database.
Execute the below query to remove the existence table from the database.
mysql> drop table if exists mysql_tutorial;
OUTPUT
Execute the below MySQL query to display the available table.
mysql> show tables;

The available "mysql_tutorial " table deletes from the database.
4) Example: deletes the non-existence table.
The table is not present in the database. When you try to delete the unavailable table using a drop query, the command-line client will display an error. Execute the below query to delete an unavailable table.
mysql> drop table mysql_tutorial;
OUTPUT

The above output image displays an error. MySQL command-line client interface shows errors and does not execute a query.
Temporary Table
The temporary table creates a table for a limited period. It is a one-time use table. Mainly, this table is used for several operations on the same table. This table is deleted automatically by the database after closing the table connection. The temporary table is available in MySQL from the MySQL3.23 version to the latest version of the database.
If you do not want to work on a complicated task on the main table, you create a temporary table. You work on a temporary table for a short time and see the output. MySQL creates a temporary table using a query in the command-line client.
Syntax
The temporary table syntax shows below. This syntax helps to work on a temporary table.
Create temporary table table_name (
Column_name1 data type, Column_name1 data type, constraints of table);
Examples of the temporary table
1) Example: Create a basic temporary table in MySQL.
Execute below query to create a temporary table in MySQL.
mysql> create temporary table information ( student_no INT, student_name varchar(45), phone varchar(45), address varchar(45));
Query OK, 0 rows affected (0.00 sec)
OUTPUT-1
Execute below query to get temporary table.
mysql> show tables;
You can see the temporary table is not stored in the system. The stable table can hold and operate permanently.
OUTPUT-2
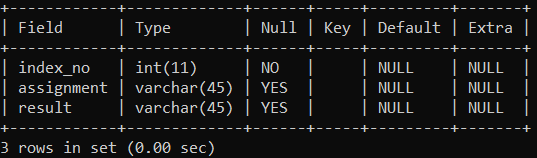
Execute the below query to get the table structure.
mysql> describe information;
You can see the "information" table and its functions.
2) Example: The example of the insert value in the temporary table.
Execute below query to store information in the table.
mysql> insert into information (student_no, student_name, phone, address) values (1, 'sadhana', '9119119919', 'India');
Query OK, 1 row affected (0.05 sec)
Output
Execute the below MySQL query to get table data.
mysql> select * from information;
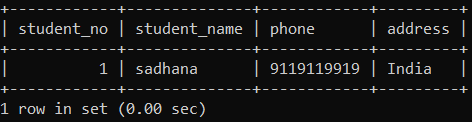
The output image helps to understand the temporary table. The table values and table structure displays only once.
3) Example: the example of creating a temporary table from another table example is below.
Execute the below query to create a temporary table using the available table in the system.
mysql> create temporary table mysql_online select * from mysql_knowledge;
Query OK, 1 row affected (0.15 sec)
OUTPUT-1
Execute the below query to display the available table.
mysql> show tables;

The temporary table does not store in the system. The only stable table can hold and operate permanently. The "mysql_knowledge" table is available in the "tutorial" database. The "mysql_online" temporary table does not store in the "tutorial" database.
OUTPUT-2
Execute the below query to get output.
mysql> describe mysql_online;
You can see the "mysql_online" table and its data types and constraints.
Repair Table
The repair table query fixes the damage information of the MySQL table. If the required storage engine supports the table, then MySQL can repair the table. If the table loses the data or creates excessive damage, you should improve data using a storage engine. The repair table accesses an easier way to workbench interface than the command-line client.
The table often uses the "InnoDB" storage engine. This engine does not support the repair table. The other storage engine, like the "MyISAM" engine, supports the repair table.
Syntax
The repair table syntax is below.
REPAIR TABLE table_name;
The repair table with command syntax is below.
REPAIR [NO_WRITE_TO_BINLOG | LOCAL] TABLE table_name QUICK EXTENDED USE_FRM;
This query executes only in the worst case, but the user should store a database table's backup.
It is part of advanced MySQL operation. The repair table does not make it usable in project operations.
Examples of the repair table
1) Example: The repair table example shows below.
Execute the below query in the command-line client interface. The table uses the "InnoDB" storage engine in the "tutorial" database.
mysql> REPAIR TABLE mysql_tutorial;
OUTPUT
You see the output of the above query.

The table displays a message in the output image. The storage engine does not help to repair the table.
2) Example: The repair table example shows below.
The table alters the storage engine to get an update of the table data. If the storage engine does not support the repair table, then use the below query.
mysql> alter table mysql_tutorial ENGINE = 'MyISAM';
Execute the below query in the command-line client interface. The table uses the "MyISAM" storage engine in the "tutorial" database.
mysql> REPAIR TABLE mysql_tutorial;
Query OK, 4 rows affected (3.32 sec)
OUTPUT
You see the output of the above query.
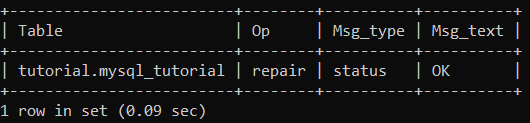
The table displays a message in the output image. The "MyISAM" storage engine helps to get the status of the table and its data.
Repair table procedure
The altered table procedure with error and without error displays in the below image. You refer to the working procedure of the repair table and storage engine.
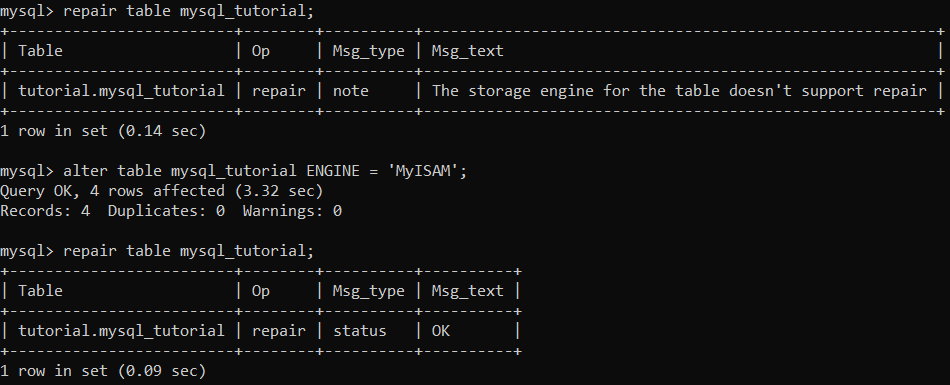
The first query shows the error of the table constraint and format. The table uses the "InnoDB" storage engine. The second query helps to alter the table to change the storage engine. The table uses the "MyISAM" storage engine. The third query shows the repair table query with output.
3) Example: The repair table with the statement example shows below.
Execute the below query with the "NO_WRITE_TO_BINLOG" optional keyword and "QUICK EXTENDED USE_FRM" statement.
mysql> repair NO_WRITE_TO_BINLOG table mysql_tutorial QUICK EXTENDED USE_FRM;
Execute the below query with the "LOCAL" optional keyword and "QUICK EXTENDED USE_FRM" statement.
mysql> repair LOCAL table mysql_tutorial QUICK EXTENDED USE_FRM;
OUTPUT

The above output image shows table information. The table displays the database name, operation status, message type, and text. You get several tables available in the table. The condition of the table is good or not.
MySQL Workbench Procedure Table
MySQL workbench interface is used to operate data automatically. Here, the workbench does not need to use SQL queries or commands. The workbench creates tables inside of schemas.
If you want to create a table in MySQL, then you should create schemas. The workbench schemas create, store, operate tables.
Create table
The navigator column provides many databases to generate and store tables. The working procedure of creating a new table shows below.
Step1: Initially, you have to go to the left side column (navigator). MySQL workbench creates a new table using the required database. Primarily, choose the required database to create a new table. Right-click on the table column.
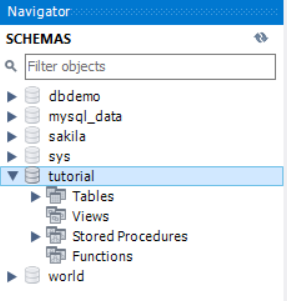
The above image tutorial database creates a new table. Click on the database.
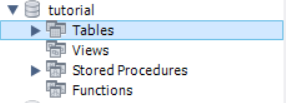
Step2: The "tutorial" database contains tables, views, stored procedures, and functions. Select "tables" to create a new table. Right-click on the "Tables" column.

You see the above image and its features or parameters.
Step3: After, a popup box appears with many options. If you want to create a new table, then choose the "Create Table" column. If you want to copy the old table, then choose the "Create Table Like..." column.
Right-click on the "Create Table" column to generate the new table in the required database.
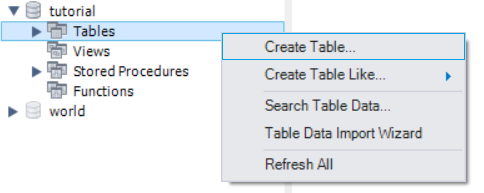
Above, you can see the tutorial database, its functions, and the popup box.
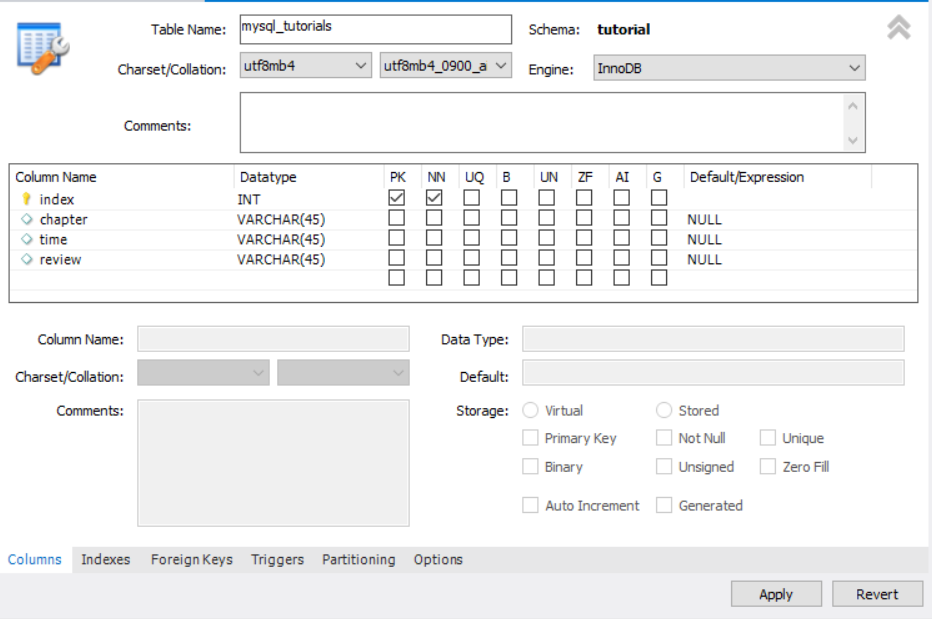
Step4: the workbench assigns a unique table name in the "Table name" column. The Charset and collation of the table set default. The primary storage engine chooses "InnoDB." If you want to support the repair table, then choose the "MyISAM" storage engine

You show the above image. The interface creates a "mysql_tutorials" table.
Step5: Add columns, their data type, and constraint in the table. The workbench inserts multiple fields simultaneously inside the table.
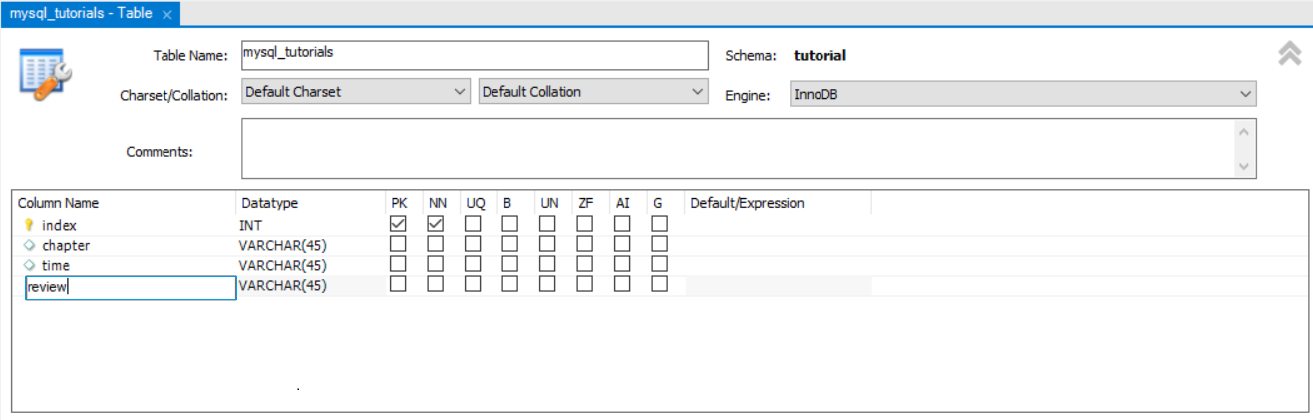
Here, you see four columns or fields, their data type, and their constraints.
Step6: After, click on the "Apply" button. This step helps to set up table format.

The above image shows the fundamental steps of creating a new table. Now click on "Apply" to process further steps.
Step7: After, the SQL query shows in the window box. You verify table format and their field. If the query is correct, then press the "Apply" button. If you manually detect the wrong statement, then click on the "cancel" button. Now, click on "Apply" to execute this query.
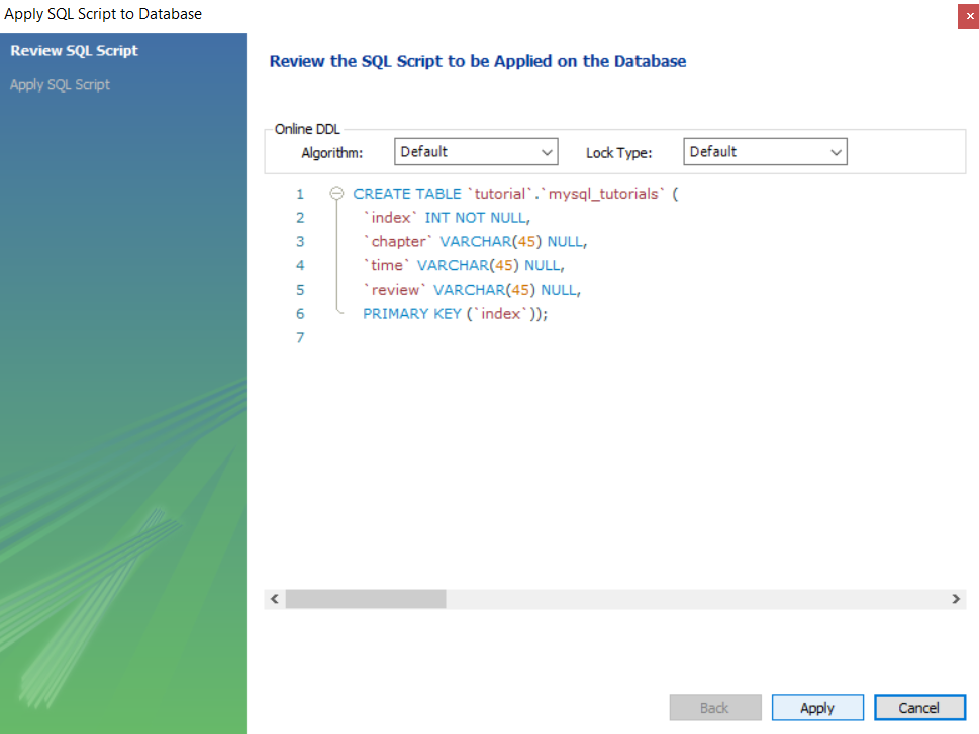
The above image displays the SQL query of the table. The interface displays the below window after successfully querying execution.
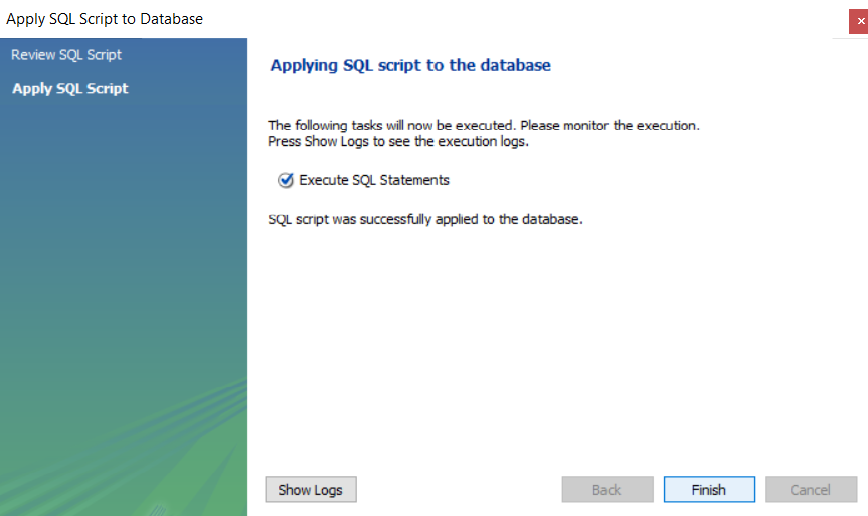
Step8: Finally, "Execute SQL Statement" successfully. Click on the "Finish" button to get a new table.

MySQL workbench interface creates a new table successfully. You refresh the table or database to see the "mysql_tutorial" table.
Show table
You must know how many tables are available in the required database. The workbench interface does not need to search tables. The workbench interface displays the table and database on the home page.
MySQL workbench interface shows available tables, required table structure, and information of the table. You see below how to show the table and their data.
Display available table in the database
Step1: MySQL workbench interface displays the available table in the database. Primarily, choose the required database.

The above image tutorial database creates a new table. Click on the database.
Step2: The "tutorial" database contains tables, views, stored procedures, and functions. Click on the "Tables" column.
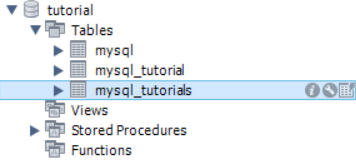
Step3: Now, the "Tables" columns show an available table in the database.
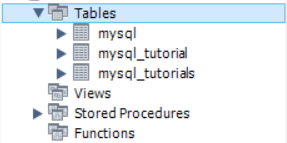
You see three tables available in the "tutorial" database. The table shows columns, indexes, foreign keys, and triggers.
Display table format
The required table shows data type, field, constraints, and keys. You click on the setting of the table.
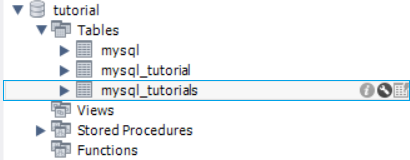
You see the three options in the "mysql_tutorials" table. You select the middle option of the setting.
You see the above image to get the table format with restrictions.
Display information of the table
The required table shows data type, field, constraints, and keys. You click on the setting of the table.

You see the three options in the "mysql_tutorials" table. You select the last option of the setting.
You see the above image to get the table information.
The workbench interface displays multiple databases and their tables simultaneously. You must adjust the columns of the home page.
Alter table
Sometimes, you need to delete, create, adjust columns using an alter table in the workbench interface. This workbench modifies tables smartly and provides more options about columns. You create many mistakes while creating a table.
Sometimes, you should add, remove, and update columns. Alter tables recover the errors and create a specific table. The working procedure of the Alter table shows below.
Step1: Click on the "Tables" column to display the available table. Right-click on the required table.

Here, right-click on the "mysql_tutorial" table.
Step2: choose the "Alter Table…" option to update the table field and its data.
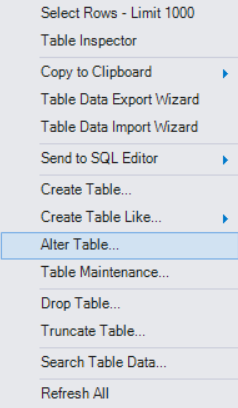
You get many options after applying to the "Alter table."
Step3: Modify table data as per requirement. The Alter table helps change the column name, column data type, key, constraints on the page. If you click on the particular column, then you quickly edit the data. After, click on the "Apply" button.
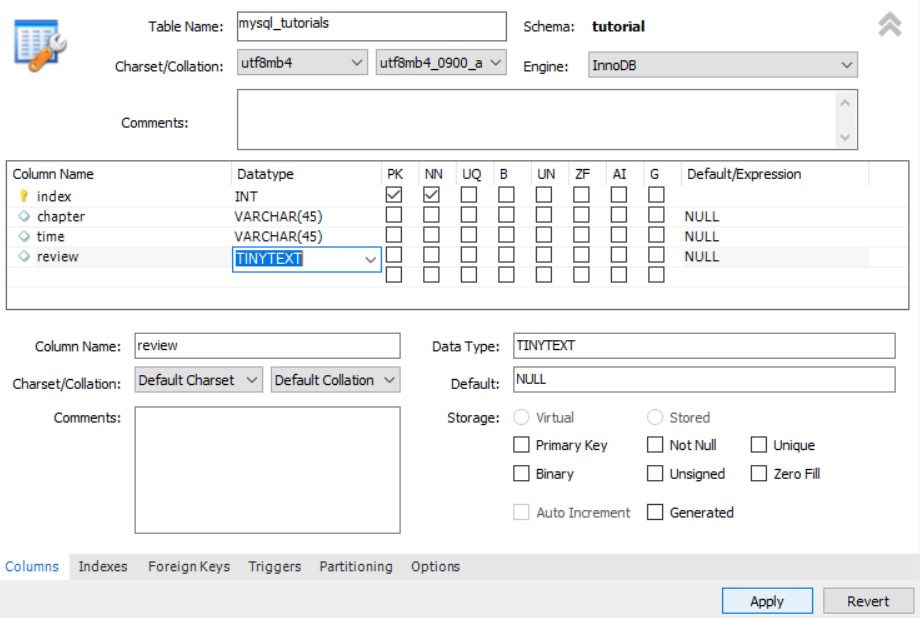
Here, the altered table changes the data type of the review field. The data type update from varchar(45) to TINYTEXT. Click the "Apply" button to proceed further.
Step4: If the query is correct, then press the "Apply" button. If you manually detect the wrong statement, then click on the "cancel" button. Now, click on "Apply" to execute this query.
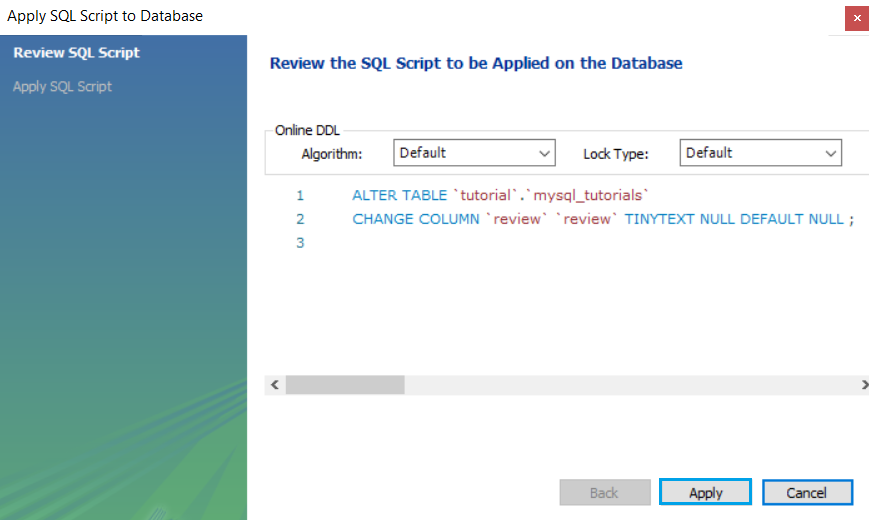
This SQL statement shows perfect therefore click on the "Apply" button.
Step5: click on the "Finish" button to complete the "alter table" procedure.
You get "Execute SQL Statement" successfully. Click on the "Finish" button. The table shows updated data.
Truncate table
The truncate table option removes all the rows of the table. The truncate table does not make an empty table but keeps the table structure. The working procedure of the truncate table shows below.
Step1: You click on the "Tables" column and right-click the required table name.

You truncate the "mysql_tutorials" table. You get a popup window with multiple options for the respective table.
Step2: Now, you can click on the "Truncate Table…" column to remove information.
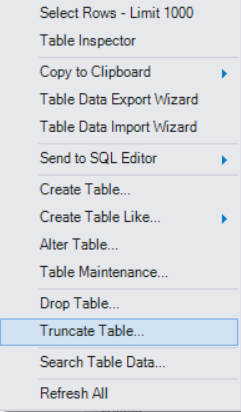
Choose the given option and make the table empty.
Step3: choose the "Truncate" option.
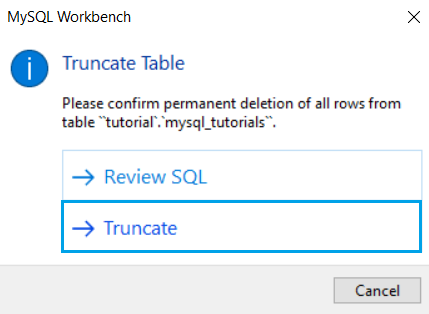
You can see the above image. The interface gives two options one is Review SQL query, and the other is Truncate. It would help if you chose the truncate option. Then, your table is empty.
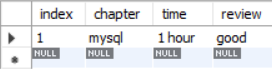
Your table becomes empty because all values are null. Your index column becomes null means you can insert new data from the beginning.
Drop table
A drop table option deletes the table permanently. Sometimes, unwanted tables are stored in the database for a long time. It affects the MySQL memory size. MySQL needs to remove the table to maintain data and memory size. The working procedure of the drop table shows below.
Step1: You click on the "Tables" column and right-click the required table name.
You get a popup window with multiple options for the respective table. You delete the "mysql_tutorials" table.
Step2: Now, you can click on the "Drop Table…" column to remove information.
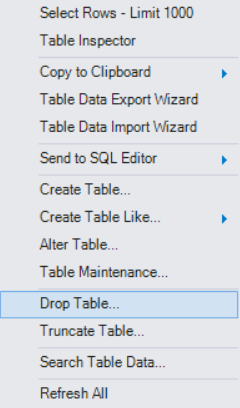
Choose the above option and remove the table permanently.
Step3: choose the "Drop Now" option.
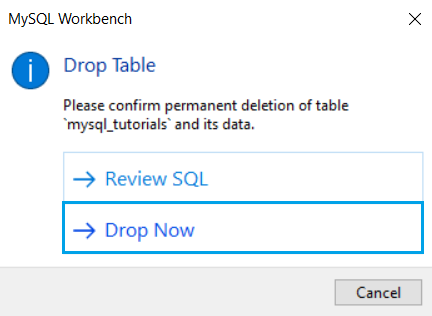
You can see the above image. The interface gives two options: the "Review SQL" query and the other is "Drop Now." It would be best if you chose the "Drop Now" option. Then, your table deletes permanently.
Finally, your table deletes successfully. Now you get the difference between a truncate table and a drop table.
The workbench interface settings operate the table and its data. This setting helps to avoid errors in the table and work application without interruption.