Android GridView
Theview group that displays items in a two-dimensional scrolling grid is called GridView. The data isadded into this grid layout from anArray List or database. The adapter class isutilized to display this data at its accurate position on the grid, the setAdapter() method is utilized to bind the adapter with the GridView. The main task of the GridView adapter is to get data from an array List or databaseand insert each data into the corresponding item displayed in the GridView. In this article, the demonstration is implemented using Java language.
GridViewXML Attributes
- android:numColumns-This property of GridView is used to determine the number of columns to display in the Grid.
- android:horizontalSpacing-This property is utilized to declare the spacing between the two columns of the GridView.
- android:verticalSpacing- This property is utilized to declare the spacing between two rows in the GridView.
Demonstration
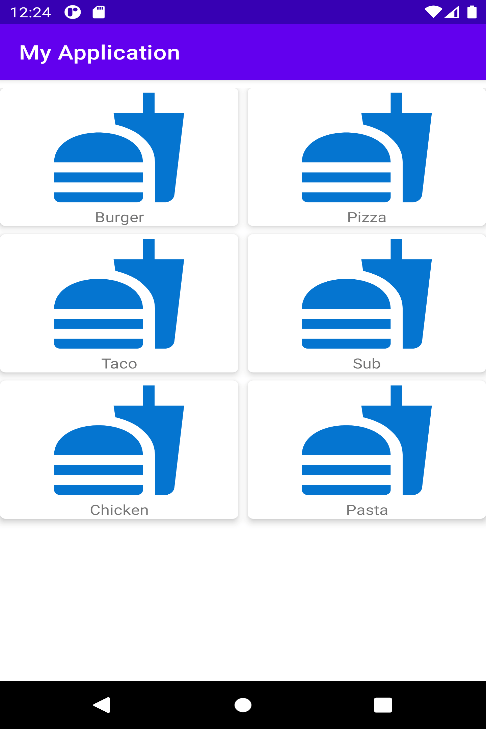
Here's ademonstration of implementing a simple GridView in an Android application. The GridView is displaying the different kinds of fast food we want to eat.
1. In Android Studio, make a new project and name it as GridView Example. If you come across any problem in creating a new project, please refer to Android Studio Tutorial.Remembertochoose Java language.
2. Insert GridView by drag and drop to activity_gridview.xml file and xml code for this file is as follows:
<?xml version="1.0" encoding="utf-8"?>
<androidx.constraintlayout.widget.ConstraintLayout
xmlns:android="http://schemas.android.com/apk/res/android"
xmlns:app="http://schemas.android.com/apk/res-auto"
xmlns:tools="http://schemas.android.com/tools"
android:layout_width="match_parent"
android:layout_height="match_parent"
tools:context=".Javatpoint.GridViewActivity">


<!-- android:horizontalSpacing is the spacing between the horizontalgrid items.
android:numColumnsis the Grid View’s column count that is two in this demonstration-->
<GridView
android:id="@+id/idFoodTypes"
android:layout_width="match_parent"
android:layout_height="match_parent"
android:horizontalSpacing="8dp"
android:numColumns="2"
android:verticalSpacing="8dp"
app:layout_constraintBottom_toBottomOf="parent"
app:layout_constraintEnd_toEndOf="parent"
app:layout_constraintStart_toStartOf="parent"
app:layout_constraintTop_toTopOf="parent" />


</androidx.constraintlayout.widget.ConstraintLayout>
3. Create an XML file for each grid item to be displayed in GridView. Click on the app > res > layout > Right-Click > Layout Resource file and then name the file as grid_item. Following is the XML code of grid_item.xml file:
<?xml version="1.0" encoding="utf-8"?>


<!--XML implementation of Grid Item-->
<androidx.cardview.widget.CardView
xmlns:android="http://schemas.android.com/apk/res/android"
xmlns:app="http://schemas.android.com/apk/res-auto"
android:layout_width="match_parent"
android:layout_height="wrap_content"
android:layout_gravity="center"
android:layout_margin="5dp"
app:cardCornerRadius="5dp"
app:cardElevation="5dp">


<LinearLayout
android:layout_width="match_parent"
android:layout_height="wrap_content"
android:orientation="vertical">


<ImageView
android:id="@+id/idFoodImage"
android:layout_width="120dp"
android:layout_height="120dp"
android:layout_gravity="center"
android:src="@drawable/ic_baseline_fastfood_24" />


<TextView
android:id="@+id/idFoodName"
android:layout_width="match_parent"
android:layout_height="wrap_content"
android:text="@string/app_name"
android:textAlignment="center" />


</LinearLayout>


</androidx.cardview.widget.CardView>
4. Modal Class is a Java Class that takes care of data to be inserted in each item of GridView. For Modal Class creation:
- Select app > java > apps package name and Right-Click on it.
- Then Select New > Java Class.
- Name your new Java Class file as Food and code for modal file is as follows:
public class Food {


// string food_name for storing food_name
private String food_name;
private int ID_image;


public Food(String food_name, int ID_image) {
this.food_name = food_name;
this.ID_image = ID_image;
    }


public String getFood_name() {
return food_name;
    }


public void setFood_name(String food_name) {
this.food_name = food_name;
    }


public int getID_image() {
return ID_image;
    }


public void setID_image(int ID_image) {
this.ID_image = ID_image;
    }
}
5. Adapter Class puts Modal Class data to each item of GridView which is displayed on the screen. For adapter class creation:
- Select app > java > apps package name and Right-Click on it.
- Then Select New > Java Class.
- Name your new Java Class file as FoodAdapter and code for FoodAdapter.java is as follows:
import java.util.ArrayList;


import android.content.Context;
import android.view.LayoutInflater;
import android.view.View;
import android.view.ViewGroup;
import android.widget.ArrayAdapter;
import android.widget.ImageView;
import android.widget.TextView;
import androidx.annotation.NonNull;
import androidx.annotation.Nullable;


import com.example.myapplication.R;


public class FoodAdapter extends ArrayAdapter<Food> {
public FoodAdapter(@NonNull Context context, ArrayList<Food> FoodList) {
super(context, 0, FoodList);
    }


@NonNull
    @Override
public View getView(int position, @Nullable View convertView, @NonNull ViewGroup parent) {
View view = convertView;


if (view == null) {
// Layout Inflater inflates each item to be displayed in GridView.
view = LayoutInflater.from(getContext()).inflate(R.layout.item2, parent, false);
        }
Food food = getItem(position);
TextView courseTV = view.findViewById(R.id.idFoodName);
ImageView courseIV = view.findViewById(R.id.idFoodImage);
courseTV.setText(food.getFood_name());
courseIV.setImageResource(food.getID_image());
return view;
    }
}
6. GridViewActivity file does all the backend work i.e., adding data to the GridView. The modified code for the GridViewActivity.java will be as follow:
import androidx.appcompat.app.AppCompatActivity;


import android.os.Bundle;
import android.widget.GridView;


import com.example.myapplication.R;


import java.util.ArrayList;


public class GridViewActivity extends AppCompatActivity {
GridView foodGrid;
@Override
protected void onCreate(Bundle savedInstanceState) {
super.onCreate(savedInstanceState);
        setContentView(R.layout.activity_main5);
foodGrid = findViewById(R.id.idFoodTypes);


ArrayList<Food>foodArrayList = new ArrayList<Food>();
foodArrayList.add(new Food("Burger", R.drawable.ic_baseline_fastfood_24));
foodArrayList.add(new Food("Pizza", R.drawable.ic_baseline_fastfood_24));
foodArrayList.add(new Food("Taco", R.drawable.ic_baseline_fastfood_24));
foodArrayList.add(new Food("Sub", R.drawable.ic_baseline_fastfood_24));
foodArrayList.add(new Food("Chicken", R.drawable.ic_baseline_fastfood_24));
foodArrayList.add(new Food("Pasta", R.drawable.ic_baseline_fastfood_24));


FoodAdapter adapter = new FoodAdapter(this, foodArrayList);
foodGrid.setAdapter(adapter);
    }
}
GridView output