Android ListView
A kind of AdapterView that displays a vertical list of scrollable views, each of which is laid out below each other is called ListView. Using adapters, items are inserted into the view from an array list or a database. setAdaptor() is used to display items in the list method. The setAdaptor() method associates a/n adapter with a list.
Android ListView ViewGroup is used to display a list of items on multiple lines, with an adapter to automatically insert items into the list. The main task of the adapter is to retrieve from an array list or a databaseand put each item into a list to get the expected result. Therefore, it is the main source of importing data from a strings.xml file that contains all the required strings from a Java or XML file.
ArrayAdapter
This adapter can be used when an array is the data source. Basically, the ArrayAdapter calls the toString() method on each item and puts its data into a TextView, creating a view of each array item. If you have an array of strings to display in the ListView, use the constructor to initialize a new ArrayAdapter and specify the layout of each string and the string array.
ArrayAdapter adapter = new ArrayAdapter<String>(this,R.layout.ListV,StrArrayList);The arguments to this constructor are: -
- Application context is the first argument that needs to be passed. ‘this’ is passed most of the time.
- The second argument is a layout with a TextView for each string in the array defined in the XML file.
- An array of strings to be entered into the textview is the last argument. After creating thearray adapter, I just call setAdapter() on the ListView object like this -
ListView listVi = findViewById(R.id.listv);
listVi.setAdapter(adapter);
The List view will be declared in an XML filein the res/layout directory. For our demonstration, we are going to using the activity_listview.xml file.
ListView XML Attributes
- android:divider-A color or drawable for separating list items.
- android:dividerHeight-Property to specify divider’s height.
- android:footerDividersEnabled-The ListView will draw the divider before each footer view when set to true.
- android:headerDividersEnabled-The ListView will draw the divider before each header view when set to true.
- android:entries- Refer to an array resource that will fill the ListView with the items.
Android ListView Click Processing
To handle the click of an Android ListView item, the onListItemClick() method is used. This method takes four arguments-
- ListView: ListView containing the display of items
- View: View of the specific item selected
- Position: The position of the item selected from the array. Recall that the first item in the array is at position 0 because the array index starts from 0.
- Id: ID of the selected item. In the tutorial, it's not important, but it's important if you want to use the data retrieved from the database because you can use id (the ID of the row that contains the item in the database) to retrieve the item from the database.
Demonstration of adding ListView
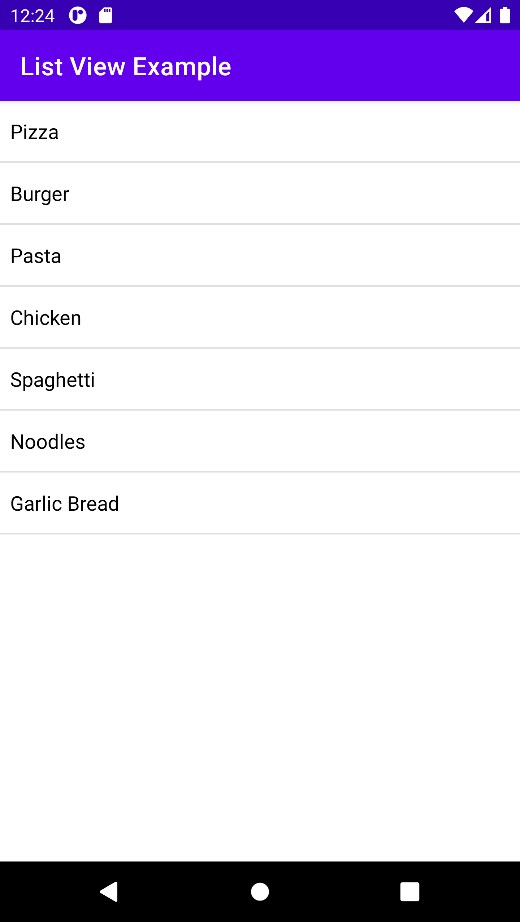
Here's a demonstration of implementing a simple ListView in an Android application. In the demonstration, let’s build an android application that will display a list of the different fast foods we like to eat.
1. In Android Studio, make a new project and name it as ListView Example. If you come across any problem in creating a new project, please refer to Android Studio Tutorial. Remembertochoose the Java language.
2. Insert a ListView in the activity_main.xml file and the XML code is as follows:
<?xml version="1.0" encoding="utf-8"?>
<androidx.constraintlayout.widget.ConstraintLayout xmlns:android="http://schemas.android.com/apk/res/android"
xmlns:app="http://schemas.android.com/apk/res-auto"
xmlns:tools="http://schemas.android.com/tools"
android:layout_width="match_parent"
android:layout_height="match_parent"
tools:context=".Javatpoint.ListViewActivity">


<ListView
android:id="@+id/FoodList"
android:layout_width="match_parent"
android:layout_height="match_parent"
app:layout_constraintBottom_toBottomOf="parent"
app:layout_constraintEnd_toEndOf="parent"
app:layout_constraintStart_toStartOf="parent"
app:layout_constraintTop_toTopOf="parent" />
</androidx.constraintlayout.widget.ConstraintLayout>
3. In this step, let's design the backend of our application. Go to ListViewActivity.java. The following creates an array of strings in a Java file and stores the values to display in the list. It also creates a ListView class object. I use findViewById() method in onCreate() method to retrieve ListView by id. Using the new keyword, make an ArrayAdapter object followed by a constructor call.
package com.example.myapplication.Javatpoint;


import androidx.appcompat.app.AppCompatActivity;


import android.os.Bundle;
import android.view.View;
import android.widget.AdapterView;
import android.widget.ArrayAdapter;
import android.widget.ListView;
import android.widget.Toast;


import com.example.myapplication.R;


public class ListViewActivity extends AppCompatActivity {


@Override
protected void onCreate(Bundle savedInstanceState) {
super.onCreate(savedInstanceState);
        setContentView(R.layout.activity_listview);


ListView lv;
String foodArray[]
                = {"Pizza", "Burger",
"Pasta", "Chicken",
"Spaghetti", "Noodles",
"Garlic Bread"};


lv = findViewById(R.id.FoodList);
ArrayAdapter<String>arr;


arr = new ArrayAdapter<String>(
this,
R.layout.support_simple_spinner_dropdown_item,
foodArray);
lv.setAdapter(arr);


lv.setOnItemClickListener(new AdapterView.OnItemClickListener() {
@Override
public void onItemClick(AdapterView<?> adapterView, View view, int position, long l) {


String value=arr.getItem(position);
Toast.makeText(getApplicationContext(),value,Toast.LENGTH_SHORT).show();
            }
        });
    }
}
ListView Output