Assets folder in Android
You might have noticed that unlike the Eclipse ADT (App Development Tools), the Android Studio does not have an Assets folder, which is mainly used to store the web resources like HTML. Assets allow us a technique where we can include arbitrary files in the application, such as text, XML, HTML, fonts, audio, and video. Android treats these files as "resources" if we try to add them, but we cannot access the raw data because of this. Assets are one method for obtaining undisturbed access to data. The issue is why is the asset folder problematic? We may achieve the same results by establishing a Resource Raw Folder.
Let's see how the assets folder and the resource raw folder are different.
What distinguishes the resource raw folder from the asset folder?
There are two places where raw asset files like JSON, Text, mp3, HTML, and PDF can be kept For Android:
- assets
- res/raw folder
Both appear to be the same since they can read the file and create the InputStream, as seen below.
// This is from assets
assets.open ( assetPathFilename )
// This is from res / raw
resources.openRawResource ( resourceRawFilename )
resources.openRawResource ( resourceRawFilename )
But did not know when we should pick which folder. Your choice may be improved by these recommendations.
1.Variable File Name: (assets is better)
- Assets: The developer is free to use any naming convention they like, such as capital letters (fileName) or spaces (file name).
- Res/raw: The file name is limited in this scenario. Only lowercase a-z, 0-9, and underscore are permitted in file-based resource names.
2. Store in subdirectory: (possible in assets)
- Assets: This may be seen under assets if the developer has divided the files into subfolders, as we can see.
- Res/raw: Here, just the root folder has files.
3.Checking at compile time: (possible in res/raw)
- Assets: The method for reading it into InputStream can be seen here. If the filename does not exist, we must capture it.
assets.open ( “ filename ” )
- res/raw folder: This is the method read it into InputStream.
resources.openRawResource ( R.raw.filename )
Placing a file in the res/raw folder ensures that the correct file name is used during the compilation time verification.
4. Runtime filename list: (This is possible in assets)
- Assets: A developer have to use the list () function with the folder name or " " on the root folder to list all the files, as seen underneath.
assets.list ( NAME_OF_THE_FOLDER ) ?.forEach {
   println ( this )
}
- Res/raw: We have no option like that in this folder. The filename must be known by the developer during development, not during runtime.
As a result, in the assets, the filename may be read during runtime, listed, and used dynamically. We should make them in the string resources file or in res/raw.
5. Accessible filename from XML: (possible in res/raw)
- Assets: There is no straightforward or simpler way for the developer to point an XML file (e.g., AndroidManifest.xml) to a file in the assets folder.
- Res/raw: The developer may immediately access the file in res/raw using @raw/filename in any XML file, such as in Java.
Put your file in the res/raw folder if you need to access it in XML. Let's build a table to help us recall the entire incident.
| Scenario | Assets Folder | Res/Raw Folder |
| Flexible File Name | YES | NO |
| Store in subdirectory | YES | NO |
| Compile-time checking | NO | YES |
| List filenames at runtime | YES | NO |
| Filename accessible from XML | NO | YES |
How to make an Assets Folder in Android Studio?
Now, let us discuss how it may be transformed into an assets folder in Android Studio. The procedure for creating an assets folder in Android Studio is outlined below.
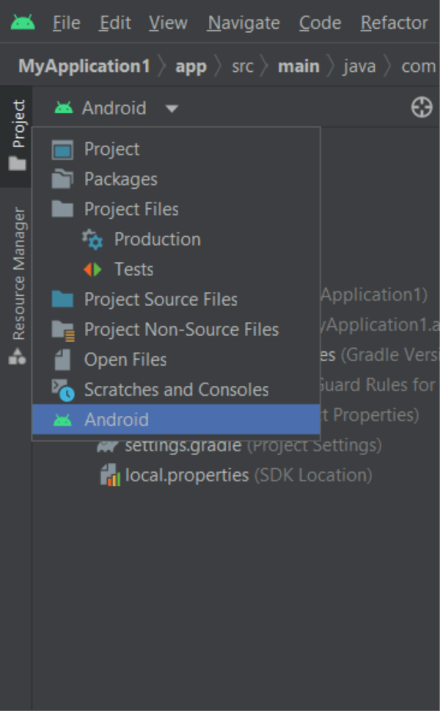
Step 1: To build an asset folder in Android Studio, first switch to Android mode, as seen in the image below.
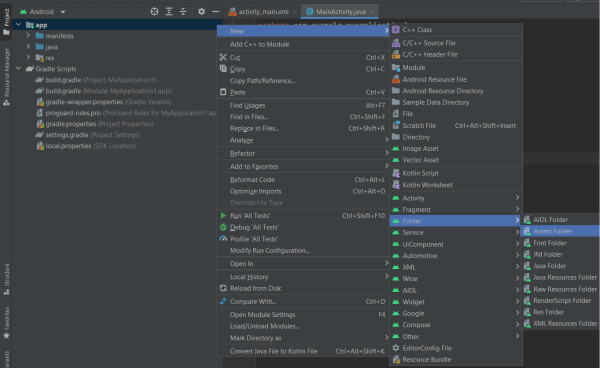
Step 2: To Launch the application, right-click, and select New > Folder > Asset Folder to create the asset folder.
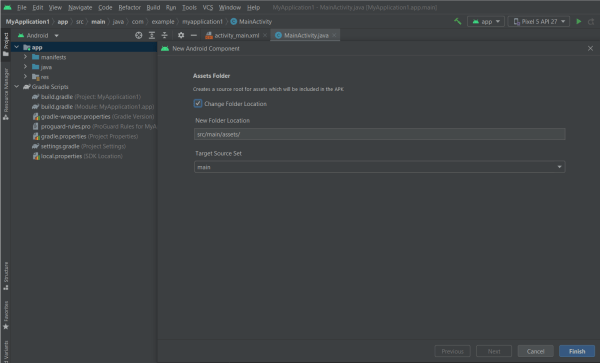
Step 3: In Android Studio, a dialogue box will appear. Maintain the default settings. Option main should be chosen in the target source set. And then press the Finish button.
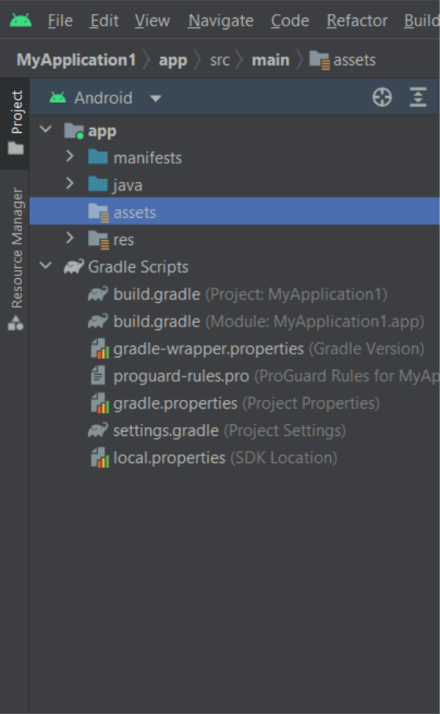
Step 4: Now, enter the app folder and look for the "assets" folder, as seen in the figure below.