Android Studio's Layout Editor
The Layout Editor allows you to efficiently create layouts by dragging UI elements from the Palette into the visual design editor instead of manually creating the layout XML file by implementing the code. The design editor can be used to preview designed layouts on various Android devices and versions, dynamically resizing layouts to make them work well on different screen sizes. The layout editor is particularly strong forcreating layouts using ConstraintLayout, a layout manager adaptable with Android 2.3 (API level 9) and higher.
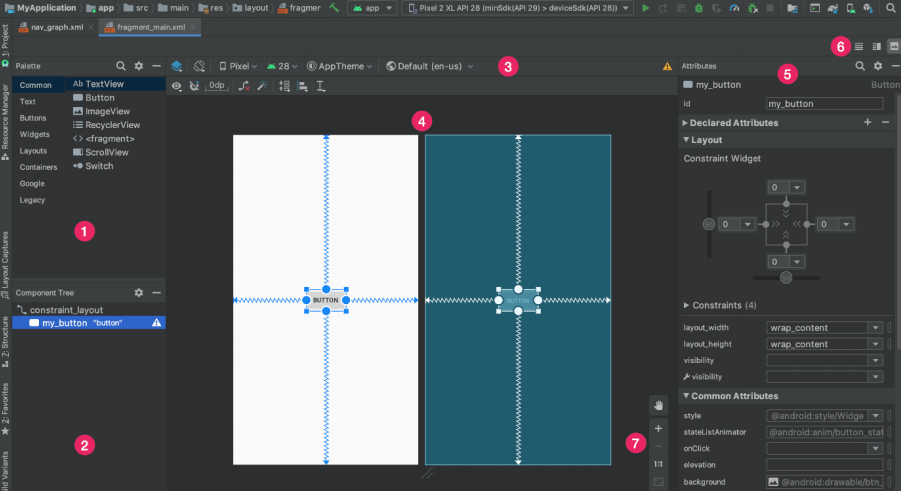
- Palette: Contains multiple views and view groups that can be dragged onto the layout.
- Component Tree: Displays the component hierarchical relationships within the layout.
- Toolbar: Click this button to customize the appearance of the design and change the properties of the design in the editor.
- Design Editor: Contains Blueprint View and Design View for editing the layout.
- Properties: Manage the properties of the selected view.
- Display Mode: Display the layout in eitherdesign,split, or code mode. In split mode, the code window and the design window are displayed at the same time.
- Zoom and Pan Controls:control the size and position of the preview in the editor.
When you open the layout XML file, the layout editor opens by default, as shown in Figure 1.Click on the [Code] button in the upper-right corner of the window to edit the layout in the text editor. You must remember that the component tree, properties pane,and palette are unavailable while editing the layout in the text editor.
UI Components
There are four terminologies used in the Android SDK documentation to refer to variouscomponents of the user interfaceclass hierarchy:
- View - See the android.view.View class, that is the parent class for all user interface classes. All user interface objects are view objectsfrom the object perspective because android.view.View class is the root of thehierarchy in user interface classes.
- ViewGroup- See the class android.view.ViewGroup, which is the parent class of some notable user interface classes. These classes can include other View objects as child objects. Because ViewGroup objects are also View objects, you can organize multiple ViewGroup and View objects in an object tree to build a complex user interface structure.
- Widget - Refers to any user interface class that provides specific simple or complex user interface functions. A simple view object can be used by a simple widget. Complex widgets can use a tree structure of view objects with many view groups and view objects.
- Layout - Refersany user interface class specifically designed to host subviews in UI templates. Obviously, the layout should be a subclass of android.view.View.ViewGroup.
UI class example:
- The android.widget.Button class: This is a widget class that depictsan elementaryuser interfacepart containing a single view object.
- The android.widget.LinearLayout class: This is a widget class and a layout class. It depicts a complex user interface component, and its ViewGroup object contains other View objects as children. The child view object in the LinearLayout object is placed in the user interface as a template string.
- The android.widget.DatePicker class: This is a widget class. It is a very complex user interface component. Its ViewGroup contains the year, month, and day numbers. Each counter is a ViewGroup with year, month, or day as the viewers that the user can select.
When building a user interface, you can locate the widget class provided in the Android SDK that corresponds to the structure of the user interface. The new widget class can be extended to include project-specific adaptations. You can also build a user interface from scratch. This can be achieved by using a ViewGroup object, and then adding child ViewGroup or View multiple times to create the structure of the View object. You can customize any View or ViewGroup object to finalize the structure of the user interface.
Some of the most commonly used Android views and widgets are:
- EditText
- ImageView
- TextView
- Button
- ImageButton
- CheckBox
Layout
Layouts are derived classes of the ViewGroup class, and typical layouts define the visual appearance of the Android application UI and can be built at runtime using View/ViewGroup objects, or you can declare them using a simple XML resource file activity_layout.xml under your project's res/layout folder. Android provides layouts, many of which providedifferent views, views, and feels used by almost every Android application.
Some of the default Android layouts are described below.
- Linear Layout
A Linear Layout is a group of views in which all children are placed vertically or horizontally. It is important to specify the orientation of the linear layout and the height and width of its child objects. If weights are used, the height or width values will be zero in vertical and horizontal layouts respectively. An object's weight determines how much space the object uses in its parent layout. The larger the weight, the more space it takes up.
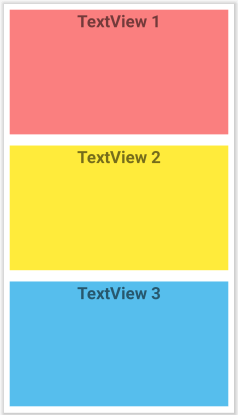
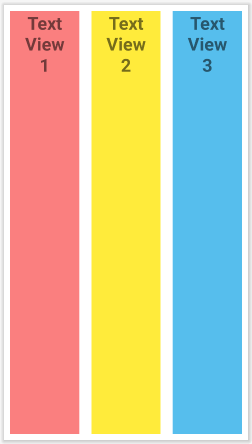
Vertical Linear Layout Horizontal Linear Layout
- Relative Layout
A Relative Layout is a group of views that display child views relative to each other. The only important values to specify are the height and width of the child and the layout itself. Objects are stacked on top of each other in the layout if no other properties are declared.
Relative Layout
- Frame Layout
FrameLayout is designed to display items that block an area of the screen. In general, FrameLayout is used to maintain a single child view because the child views do not overlap each other, and it is difficult to configure the child views in a way that can be scaled to other screen sizes.
Attributes
Attributes are typically used to define the behavior of UI elements in the layoutXML file or to provide additional information about the elements. Each UI component has many attributes, but some of the most commonly used attributes are as follows:
Id: These identifiers are typically assigned in the layout XML file and are used to find specific views in the view tree. View IDs don't have to be unique throughout the tree, but it's best to make sure they're unique at least within the part of the tree you're looking for.
android:id="@+id/textView"height & width:Both these attributes represent the height and width of a given view as the name suggestsitself. These are the properties required for all views in the XML file.
android:layout_width="wrap_content"
android:layout_height="wrap_content"
padding & margin:The padding is the room within the border between the contour and the content of the actual view mode. Remember that padding goes fully around the content. The margin is the exterior space of the border between the border next to this display and other elements.
android:padding="20dp"
android:layout_margin="10dp"
gravity &layout_gravity:android:gravitysets the gravity of the content of the view considered. Android: Layout_gravitysettles the gravity of the view or the layout into its parents. Gravity properties play an important role in looking for the view objects and may take one or more (separated by `|`) of the unchanged values later.
android:gravity="center"
android:layout_gravity="bottom"
android:maxHeight: An optional attribute to declare a maximum height for a view.
android:maxHeight="10dp"android:maxWidth: An optional attribute to declare a maximum width for a view.
android:maxWidth="10dp" android:scaleType:Control how to zoom or move the image to match the size of the ImageView.
android:scaleType="centerCrop" android:hint:To display hint text to display when the entertextfield is empty.
android:hint="Password" android:inputType: This helps to declarethe data type that is being entered in anentertext field.
android:inputType="number" android:textAppearance:Used to declare Base text color, typeface, font size, and font style.
android:textAppearance="@style/darktheme"android:textColor: Text color.
android:textColor="#000000"android:textSize:used for declaring the size of the text.
android:textSize="18sp"Width and height determine the size of the layout/view, which can be specified according to DP (pixels depending on the density), PT (the point is 1/72 points of One inch), PX (pixel), mm (millimeter), SP (scale-independent pixel), and finally in (inches).
The attributes in Android are not limited to the ones mentioned in the document as every View has its own set of attributes. And a detailed view of those can be found online on Android’s official Developer website.
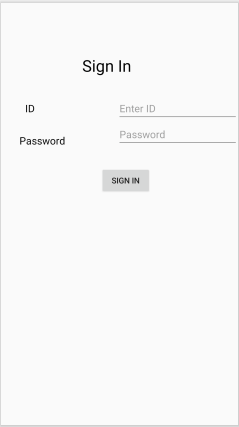
Below is an example for basic relative layout:
<?xml version="1.0" encoding="utf-8"?>
<RelativeLayoutxmlns:android="http://schemas.android.com/apk/res/android"
xmlns:app="http://schemas.android.com/apk/res-auto"
xmlns:tools="http://schemas.android.com/tools"
android:layout_width="fill_parent"
android:layout_height="fill_parent"
tools:context=".MainActivity"
>


<TextView
android:id="@+id/text1"
android:layout_width="wrap_content"
android:layout_alignParentLeft="true"
android:layout_alignParentStart="true"
android:layout_alignParentTop="true"
android:layout_marginLeft="141dp"
android:layout_marginStart="141dp"
android:layout_marginTop="89dp"
android:text="Sign In"
android:textColor="@android:color/black"
android:textColorLink="@android:color/black"
	android:layout_height="wrap_content"
android:textSize="28sp" />
<TextView
android:id="@+id/text2"
android:layout_width="wrap_content"
android:layout_marginTop="43dp"
android:text="ID"
android:textColor="@android:color/black"
android:textSize="18sp"
android:typeface="normal"
android:layout_below="@+id/textView"
android:layout_alignLeft="@+id/text"
android:layout_alignStart="@+id/text"
	android:layout_height="wrap_content"
android:layout_marginLeft="10dp"
android:layout_marginStart="10dp" />
<EditText
android:id="@+id/editText"
android:layout_width="wrap_content"
android:layout_height="wrap_content"
android:ems="15"
android:inputType="textPersonName"
android:hint="Enter your ID"
android:layout_alignBaseline="@+id/text2"
android:layout_alignBottom="@+id/text2"
android:layout_alignLeft="@+id/editText2"
android:layout_alignStart="@+id/editText2" />
<TextView
android:id="@+id/text"
android:layout_width="wrap_content"
android:layout_height="wrap_content"
android:textSize="18sp"
android:textColor="@android:color/black"
android:text="Password"
android:layout_alignBottom="@+id/editText2"
android:layout_alignParentLeft="true"
android:layout_alignParentStart="true"
android:layout_marginLeft="32dp"
android:layout_marginStart="32dp" />
<EditText
android:id="@+id/editText2"
android:layout_width="wrap_content"
android:layout_height="wrap_content"
android:layout_alignParentEnd="true"
android:layout_alignParentRight="true"
android:layout_below="@+id/editText"
android:ems="10"
android:hint="Password"
android:inputType="textPassword" />


<Button
android:id="@+id/S"
android:layout_width="wrap_content"
android:layout_height="wrap_content"
android:layout_below="@+id/editText2"
android:layout_alignParentEnd="true"
android:layout_alignParentRight="true"
android:layout_marginTop="45dp"
android:layout_marginEnd="170dp"
android:layout_marginRight="178dp"
android:text="Sign In" />
</RelativeLayout>
Screenshot of the layout is as follows: