JavaScript Image resize before upload
Image resizing can be a quite tedious task, so it is usually done on the server-side. The resized image file is then delivered to the client side. However, sometimes the image resizing is done on the client-side using JavaScript.
Why are images resized before uploading to the server?
Uploading a large file on the server takes a lot of time. So, it's advisable to first resize the images on the browser and then upload them. It reduces the upload time and improves the application performance of the website.
Imagine an image editor with the feature to resize, crop, rotate, zoom in and zoom out the image, but it often requires image manipulation at the client side.
But while editing the image, efficiency and speed are important for the user in these editors.
After the image manipulation is done, it takes quite a time to download transformed images from the server.
How is image resizing done using JavaScript?
The canvas() element is used in JavaScript for image manipulation. Although, there are various libraries available that can help us do so, for example, fabric.js (it has good APIs).
What is <canvas> tag?
This element acts as the only container for graphics. The other functionalities of JavaScript are used to draw the graphics.
The <canvas> element is primarily used to draw graphics via JavaScript. This element consists of several methods for drawing lines, boxes, circles, text, and adding images.
This method is supported by mostly all the browsers like Google chrome, safari, Microsoft Edge/Internet Explorer, Oracle, Firefox etc.
The <canvas> tag usually draws a rectangular area on an HTML page. By default, a <canvas> element provides no border and no content.
Syntax:
<canvas id= “nameofId” width= “value" height= "value"></canvas>Example:
<!DOCTYPE html>
<html>
<head>
    <title>
         Javascript resize images
    </title>
</head>


<body>


<canvas id="samplebox" width="300" height="200" style="border:2px solid red;">
The canvas tag is not supported in this browser.
</canvas>


</body>
</html>
Output:
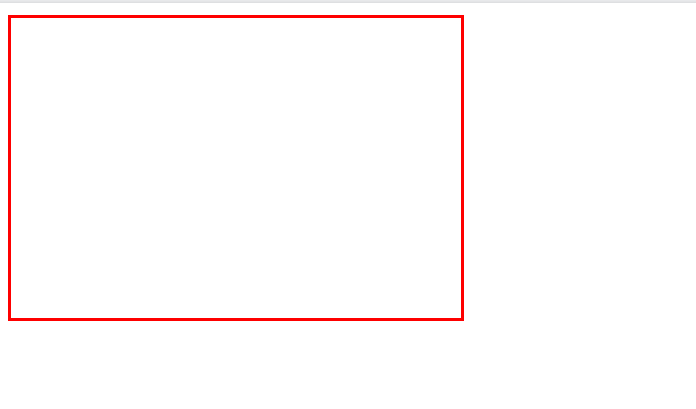
Image resizing in JavaScript
The drawImage function is used along with “src” attributes on the images. This function allows us to render and scale images on the canvas element.
Syntax:
drawImage(image, x, y, width, height)Here, the “image” is created using <img> element tag alomg with the image() constructor.
Example:
<!DOCTYPE html>
<html>
<head>
<title>
Javascript Resizing Images while uploading
</title>
</head>
<body>
<div>
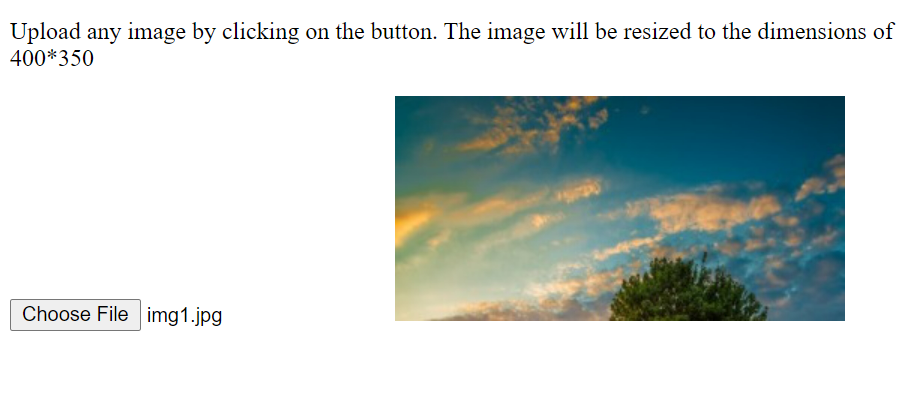
<p>Upload any image by clicking on the button. The image will be resized to the dimensions of 400*350</p>
<input type="file" id="image-upload" accept="image/*">
<img id="img-content"></img>
</div>
<script>
let imgupload = document.getElementById('image-upload');
imgupload.addEventListener('change', function (e) {
if (e.target.files) {
let imageVal = e.target.files[0];
var reader = new FileReader();
reader.onload = function (e) {
var img = document.createElement("img");
img.onload = function (event) {
// This line is dynamically creating a canvas element
var canvas = document.createElement("canvas");
var ctx = canvas.getContext("2d");
//This line shows the actual resizing of image
ctx.drawImage(img, 0, 0, 400, 350);
//This line is used to display the resized image in the body
var url = canvas.toDataURL(imageVal.type);
document.getElementById("img-content").src = url;
}
img.src = e.target.result;
}
reader.readAsDataURL(imageVal);
}
});
</script>
</body>
</html>
Here, the following example demonstrates how to resize an image(uploaded by the user) to the dimensions of 400X350.
Output:

After uploading the following image from the local device,

Now the screen looks like this,