AutoCAD 2d Drawing
What is AutoCAD 2D drawing?
The act of making and altering technical drawings, as well as annotating designs, is known as 2D drafting and drawing. Drafters create floor plans, construction permit drawings, building inspection plans, and landscape layouts using computer-aided design (CAD) software.
Two-dimensional drawing:
Two-dimensional components make up a 2D drawing view. It has nothing to do with a three-dimensional model.
A 2D drawing view enables you to rapidly build or alter a drawing view without affecting the component or assembly document.
In AutoCAD, how can I make a two-dimensional drawing?
How to Change the Drawing Options (General)
- Select Application > Options from the drop-down menu.
- Select a tab in the Values dialogue box and specify the desired options.
- Save the changes: Click Apply to save the adjustments and continue working in the dialogue box. Click OK to save the changes and exit the dialogue box.
Two different sorts of drawings
Various Drawing Techniques
- Drawing as an illustration These are diagrams produced to depict the layout of a certain document
- Drawing from life. Life drawings are those that are created as a consequence of direct or true observations
- Analytic Drawing
- Emotive Drawing
- Drawing in Perspective
- A diagrammatic drawing is a drawing that shows how something works
- Drawing in Geometry
Good example of 2D art
Art procedures and techniques that are generated on a flat surface are known as two-dimensional art. They have a lot of height and width, but not much depth. Drawing, printing, painting, photography, and some mixed media are among them.
In AutoCAD, learn how to create a simple 2D drawing.
This is an easy AutoCAD exercise for beginners.
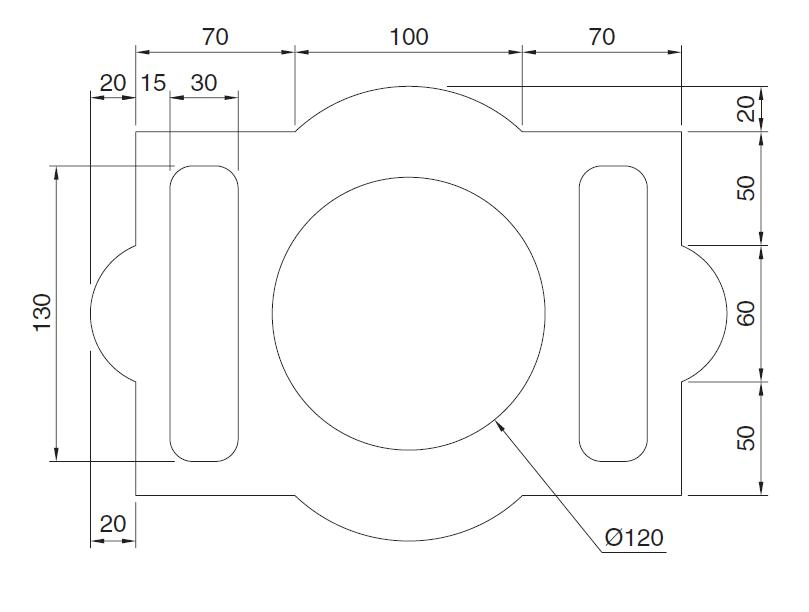
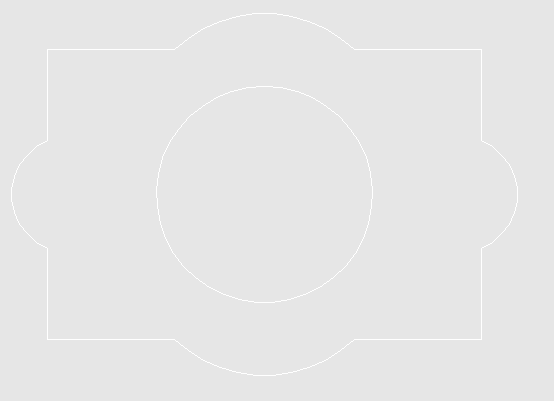
We'll see how to utilize AutoCAD commands to create the figure below in this assignment.
How to Draw a Simple Two-Dimensional Figure
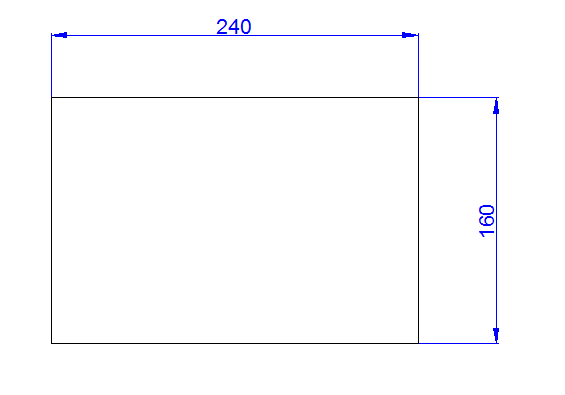
- We'll begin by drawing a rectangle with the dimensions listed below.
- Get the image below, and make sure you've modified your settings as described in Things to learn on your first day with AutoCAD. You should be able to pinpoint the Centre of each side, therefore make a gap of 100 and 60 centimeters centered in the Centre of each side. Also, draw a 20-foot-long perpendicular line. The line will aid in the drawing of arcs because each of our arcs will require three points. You must also draw a diagonal, which will be used to construct the circle; we need to be able to draw a circle that is centered in the middle of our rectangle.
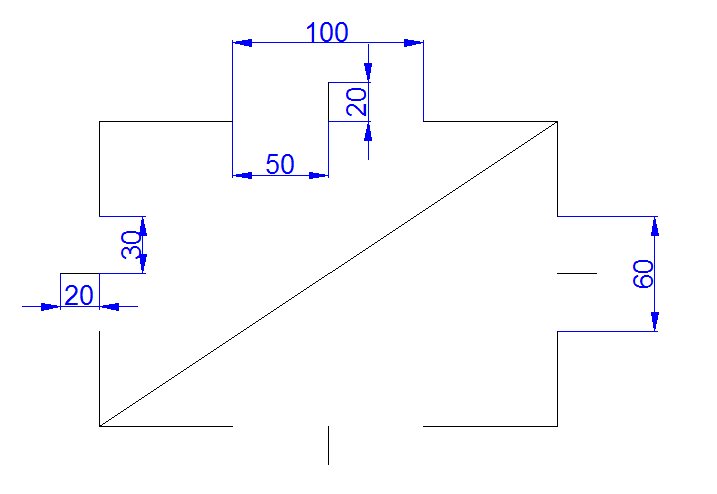
We can easily draw our circle using the rectangle's diagonal, and we can be confident that the circle is at the correct location.
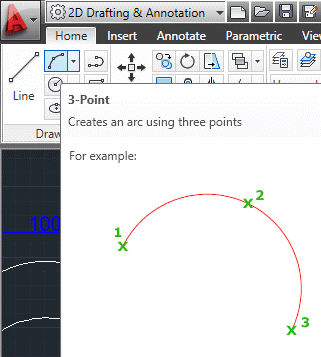
- To draw arcs, use the ARC command. You can select to draw only two arcs in this assignment and use the MIRROR command to get the other two.
- We're attempting to draw rectangles with rounded corners in this phase. There's a technique that lets you start a line at a certain distance from a point. To use it, activate the LINE command, move near the end of a line, stay for a second, move slowly horizontally or vertically, you should notice those green dotted lines, leave your mouse in that position, and type a digit using your keyboard; if you, did it correctly, the beginning of the line should be created at the distance and in the direction you specified. This method may be used to locate the beginning point of the triangle we're attempting to draw. However, if you are unable to do so, simply create lines, utilize them, and then erase them when you are through. It shouldn't be an issue because the goal justifies the means.

5. Now we need to create those rounded shapes with a radius of 10 on each of the rectangle's edges. Use the FILLET command to fill in the blanks. To use the FILLET command, follow these steps:
- Click the symbol in the picture above and click ENTER.
- Type "R" and press ENTER.
- Type "10" and press ENTER.
- To circle the corner, start with the first side.
- To turn the corner, choose the second side.
Rep for the last three corners. Notice, You don't need to walk through 2 and 3 to go to the other corners; instead, go from 1 to 4, 5. While executing this command, AutoCAD has preserved the radius dimension you supplied and will use it as the default value unless you wish to modify it. The value of this radius is set to zero by default, which is why you modified it.