Calculate Area in AutoCAD
AutoCAD has various tools for measuring distances, areas, lengths, angles, and other geometric computations quickly and accurately. When it comes to constructing and translating your ideas into real-world items or buildings, getting dimensions is crucial.
The procedure of calculating area in AutoCAD is actually rather straightforward. However, there are several elements that demand extra care. This AutoCAD function is frequently used in building drawings
- To calculate the area in AutoCAD, start by pressing the "area" command on the keyboard. You can utilise the other method if you have problems memorising. The "measure" tab may be found in the top menu. Then select the "area" command from the menu.
- Next, pick the geometry that surrounds the region you wish to compute. While picking the location, you have a few alternatives.
So let see further how area is calculated in AutoCAD.
Let's begin by selecting "Measure" from the "Utilities" panel on the "Home" page. Continue your search for "Area" in all options. Select the region for which AREA is to be computed from the selected item.
Further right click- enter. The screen displays area of the selected point on that object.
Sometimes it happens that results aren't displayed but we have a solution for it too. So, you can even press "F2" key to view results.
Calculate area of irregular shapes
Let's have glance through the steps to calculate area of irregular shapes.
So, if you have an irregular form made up of beelines, you can simply choose the line's points when selecting the region to compute, as we saw before. If you have a curve, though, you must use a different strategy than the previous one. While choosing the object, pick the 'arc' option from the command bar.
So can't wait to understand how this is done.
Let's start this by selecting "Measure" drop-down menu from "Utilities" panel in the "Home".
Further select "Area" from the all option.
To move on start selecting the point on the object.
So, if you have an irregular form made up of beelines, you may choose the line's points when calculating the area. If there is a curve present, pick the 'arc' option from the command bar when choosing the item. If you want to choose line points again, use the command bar's "Line" option, as described previously. Right-click and select enter after choosing all of the area points. Above the command bar, the area will appear. Press the "F2" key if the area appears above the command bar.
Calculate area in square Metres in AutoCAD
Area can be measured in various measurement system, but the most commonly used is in SI system that is in square meters.
For this you need to change unit in your workspace. So, type "UNIT" and press enter key. Then choose "Length Type" as a "Decimal" and then select unit as "Meter"
The AREA Command:
AREA command allows quick calculation of the area and perimeter geometry.
To find area if multiple object
Type "AREA" in the command bar to start the 'Area' command, or choose it from the "Measure" drop-down option in the 'Utilities' panel in the 'Home' tab. Select the object or the region by picking the points by clicking on the 'Object' from the command bar. After that, right-click. The region will be shown in AutoCAD. If you want to add more object areas to that, click "Add area" and then pick the area you want to add. Also, if you want to remove an area from the previous, go to the command bar and pick "Subtract area" from the drop-down menu. After that, hit the enter key. Furthermore, the area will be increased or decreased.
Then press the enter key.
Further The area will be added or subtract.
Using hatch:
The hatch command may also be used to determine the area of enclosed geometries. Hatch the ostracised region. Exit the command and right-click the region to select it, then pick properties from the contextual menu. A property menu will emerge; scroll down the palette to the geometries panel and look for Area of the hatch. This hatch will also be the contained geometry region. We have a geometry made up of Spline, Line, and Arc in any scenario. Because we don't have a single item in this geometry, you'll have to utilise the JOIN command to identify its area.
To connect entire geometry into a single unit, type J on the command line and press enter, then pick complete geometry and press enter again. Now choose geometry, right-click, and select properties from the contextual menu; scroll down in this menu to view the closed geometry's area and total border length. You may use REGION instead of JOIN to combine geometries into a single unit and then get its area from the attributes panel.
Calculate and Show the Surface Area
The instructions below show how to calculate room areas so that we may figure out how many people can fit in a given space.
There are numerous methods for determining an object's area information or utilising given points. The Properties palette or commands like AREA, MEASUREGEOM, or LIST can be used.
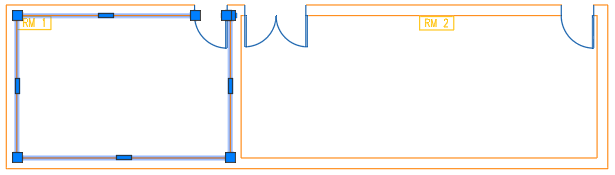
1. Select any item if the Properties panel isn't visible. Consider the circumference of RM 1 as an example.
2. Choose Properties from the right-click menu.
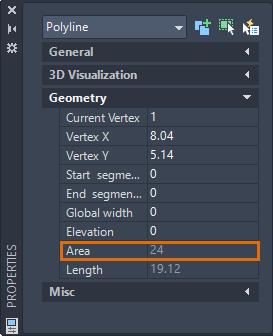
The selected object's properties, including the area, are presented.
Polylines, unlike individual lines, are considered closed objects with a constant estimated area.
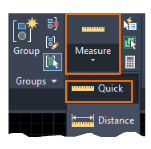
3. Calculate the area of RM 2 using a set of coordinates. Printed on the ribbon ,click Home tab → Utilities panel → Measure drop-down → Area.  Find
Find
Alternatively, enter aa at the Command prompt (AREA)
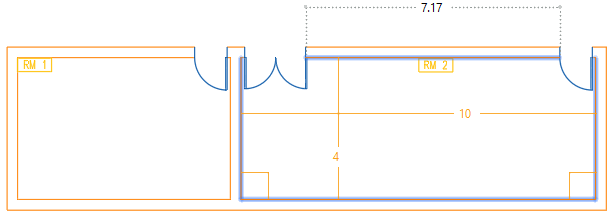
4. It is unnecessary to repeat the first and last points. The enclosed border highlighted in green defines the region to be calculated.
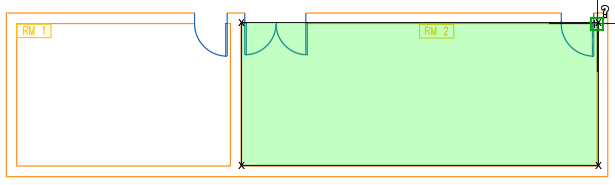
The area to be computed is defined by the contained boundary marked in green.
5. Enter the code. Make sure the Area option is turned on.
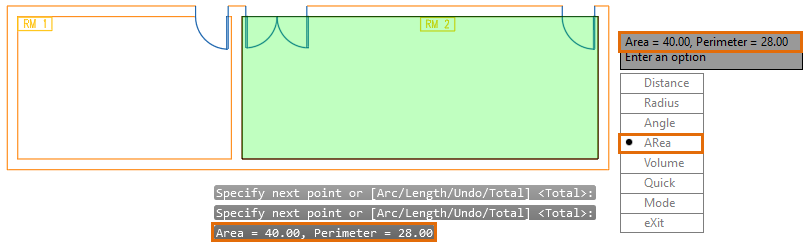
The calculated area is displayed in the command window and in a dynamic tooltip. If the results aren't shown, use F2 to open the command window.
The MEASUREGEOM command's Quick option can also be used to display the perimeter and area. Let's use Quick Measure to recalculate the area.
1. Printed on the ribbon, click home tab → Utilities panel → Measure drop-down → Quick.
As you move your cursor over and between items, computed values appear.
2. Hover over an area inside RM2's boundaries.
3. When the perimeter's sides are highlighted, click.
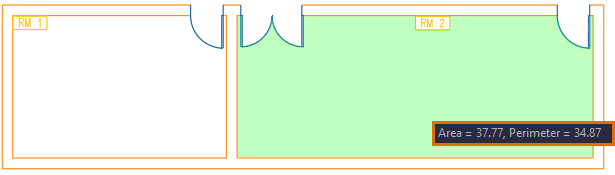
Note: The Quick option is intended to show the computed area of an enclosed item in real time. The designated region (highlighted in green) does not include the open spaces. To compute several enclosed areas, use Shift+ click.
The Calculated Area should be labelled.
Let's add some labels to show the location of the meeting rooms. The AREA or MEASUREGEOM commands, as well as the Properties palette, display the room area but do not add a label to your design. To show the region, we'll utilise multileader objects (MLEADER) and fields. See Have You Tried: Multileader for Labels and Callouts for more information and advice on utilising MLEADER.
1. Locate the Leaders panel under the Annotate tab. Select the Multileader command.
2. To choose the arrowhead placement, click anywhere inside the boundary, then select a landing location for the leader.
3. Fill up the blanks with your text (for example, "Area=").
4. Place your cursor where the field text should appear. Insert field by right-clicking.
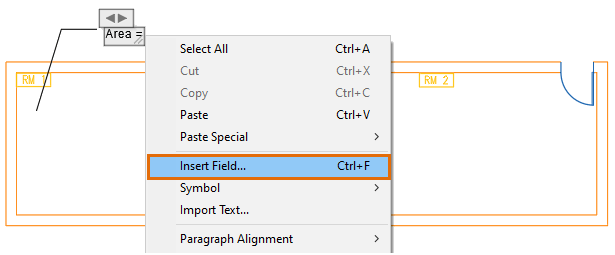
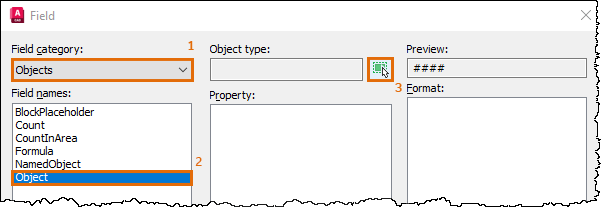
5. Select the choices in the Field dialogue box in the order shown.
6. Select the polyline that forms the perimeter of RM 1 in the drawing window. The Field dialogue box appears once more.
7. The selected object's accessible attributes are presented. Select Area from the Property menu.
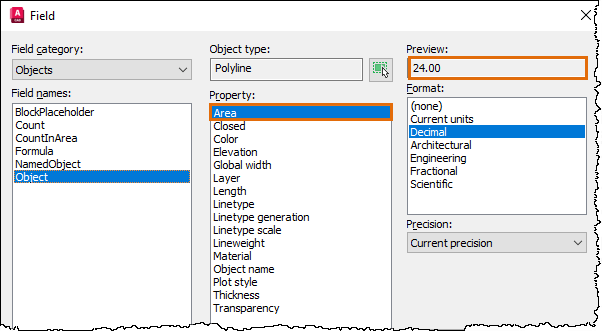
8. Select OK.
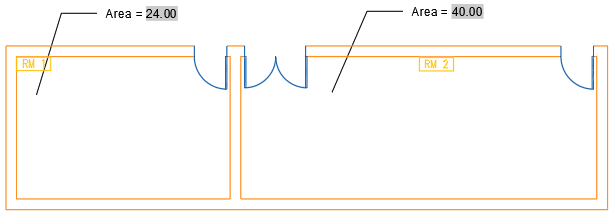
9. The area for the given room is shown in the text of the multileader object. The contextual tab Close panel on the Text Editor ribbon can be used to close Text Editor. Alternatively, click outside the in-place text editor in the drawing.
10. To make a label for the RM 2 region, repeat the instructions. An open polyline outlines the border of RM 2. When the Field dialogue box prompts you to pick an object, click the polyline that forms the room's bottom and sides. The room's top line isn't a closed polyline. Checking the preview of the computed number in the Field dialogue box is a recommended practise.
The data in the field does not automatically update. When fields are recalculated, the FIELDEVAL system variable controls it. A save or a REGEN will update the field if it is set to the default value. Alternatively, double-click the multileader object's text (where the field is inserted). Choose Update Field from the context menu.
Arrange and space the items
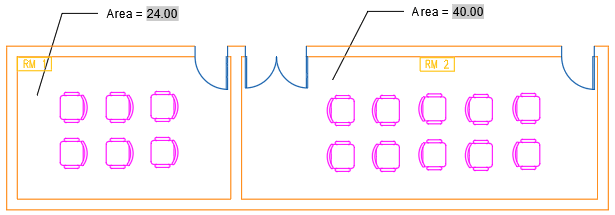
Let's fill the conference rooms with some furniture and space the seats at least a metre apart.
1. Select View from the drop-down menu -Palettes panel- Designcenter  find
find
2. Navigate to the content you wish to put in the drawing in the DesignCenter tree view.
3. In RM 1, place six seats, and in RM 2, place ten chairs.
4. Check the chair-to-chair distance. Select the Home tab. Panel of utilities Drop-down measurement Quick.
5. When presenting real-time distances within a graphic, the Quick option comes in handy. You may also use the DIST command to compute the distance between two points.
6. Distances between items are dynamically shown as you move your pointer.
7. Rearrange and space the objects suitably.
Summary
Accurate measurements in the drawing may save time and money while also ensuring that your plans are feasible.